TP-Link TL-WR340G User Guide - Page 13
Installation Environment Requirements, Connecting the Device
 |
UPC - 845973051075
View all TP-Link TL-WR340G manuals
Add to My Manuals
Save this manual to your list of manuals |
Page 13 highlights
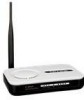
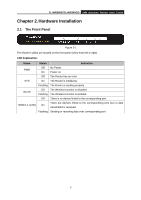
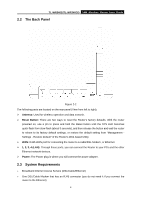
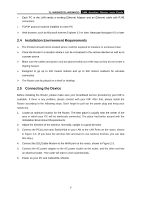
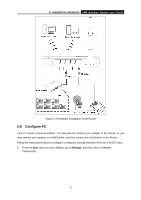
TL-WR340G/TL-WR340GD 54M Wireless Router User Guide ¾ Each PC in the LAN needs a working Ethernet Adapter and an Ethernet cable with RJ45 connectors ¾ TCP/IP protocol must be installed on each PC ¾ Web browser, such as Microsoft Internet Explorer 5.0 or later, Netscape Navigator 6.0 or later 2.4 Installation Environment Requirements ¾ The Product should not be located where it will be exposed to moisture or excessive heat. ¾ Place the Router in a location where it can be connected to the various devices as well as to a power source. ¾ Make sure the cables and power cord are placed safely out of the way so they do not create a tripping hazard. ¾ Designed to go up to 100 meters indoors and up to 300 meters outdoors for wireless connection. ¾ The Router can be placed on a shelf or desktop. 2.5 Connecting the Device Before installing the Router, please make sure your broadband service provided by your ISP is available. If there is any problem, please contact with your ISP. After that, please install the Router according to the following steps. Don't forget to pull out the power plug and keep your hands dry. 1. Locate an optimum location for the Router. The best place is usually near the center of the area in which your PC will be wirelessly connected. The place had better accord with the Installation Environment Requirements. 2. Adjust the direction of the antenna. Normally, upright is a good direction. 3. Connect the PC(s) and each Switch/Hub in your LAN to the LAN Ports on the router, shown in Figure 2-3. (If you have the wireless NIC and want to use wireless function, you can skip this step.) 4. Connect the DSL/Cable Modem to the WAN port on the router, shown in Figure 2-3. 5. Connect the AC power adapter to the AC power socket on the router, and the other end into an electrical outlet. The router will start to work automatically. 6. Power on your PC and Cable/DSL Modem. 5
-
 1
1 -
2
-
3
-
4
-
5
-
6
-
7
-
 8
8 -
 9
9 -
 10
10 -
 11
11 -
 12
12 -
 13
13 -
 14
14 -
 15
15 -
 16
16 -
 17
17 -
 18
18 -
19
-
20
-
21
-
22
-
23
-
24
-
25
-
26
-
27
-
28
-
29
-
30
-
31
-
32
-
33
-
34
-
35
-
36
-
37
-
38
-
39
-
40
-
41
-
42
-
43
-
44
-
45
-
46
-
47
-
48
-
49
-
50
-
51
-
52
-
53
-
54
-
55
-
56
-
57
-
58
-
59
-
60
-
61
-
62
-
63
-
64
-
65
-
66
-
67
-
68
-
69
-
70
-
71
-
72
 |
 |