TRENDnet TE100-P1U User Guide - Page 18
If your Print Server is not listed, Setup Wizard
 |
UPC - 710931204100
View all TRENDnet TE100-P1U manuals
Add to My Manuals
Save this manual to your list of manuals |
Page 18 highlights
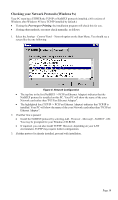
Figure 11: Print Port Setup (Peer-to-peer Printing) If your Print Server is not listed: • Click the "Refresh" button. • Check that both the Print Server and the printer are properly connected, and powered on. • Check that the Print Server has been configured. (Use the Setup Wizard on the CD-ROM.) • If using TCP/IP, try installing the NetBEUI protocol. Then try again. 2. Select the desired port on a Print Server, then click Next. A pop-up message will inform you if the port has been created successfully. If you see the following error message, either install Internet Explorer 4 or later, or follow the procedure in the "Trouble Shooting - Windows" section of Chapter 8. Page 15
-
 1
1 -
2
-
3
-
4
-
5
-
6
-
7
-
8
-
9
-
10
-
11
-
12
-
 13
13 -
 14
14 -
 15
15 -
 16
16 -
 17
17 -
 18
18 -
 19
19 -
 20
20 -
 21
21 -
 22
22 -
 23
23 -
24
-
25
-
26
-
27
-
28
-
29
-
30
-
31
-
32
-
33
-
34
-
35
-
36
-
37
-
38
-
39
-
40
-
41
-
42
-
43
-
44
-
45
-
46
-
47
-
48
-
49
-
50
-
51
-
52
-
53
-
54
-
55
-
56
-
57
-
58
-
59
-
60
-
61
-
62
-
63
-
64
-
65
-
66
-
67
-
68
-
69
-
70
-
71
-
72
 |
 |

Figure 11: Print Port Setup (Peer-to-peer Printing)
If your Print Server is not listed:
•
Click the "Refresh" button.
•
Check that both the Print Server and the printer are properly connected, and
powered on.
•
Check that the Print Server has been configured. (Use the
Setup Wizard
on
the CD-ROM.)
•
If using TCP/IP, try installing the NetBEUI protocol. Then try again.
2.
Select the desired port on a Print Server, then click
Next
. A pop-up message will inform
you if the port has been created successfully.
If you see the following error message, either install Internet
Explorer 4 or later, or follow the procedure in the "Trouble
Shooting - Windows" section of Chapter 8.
Page 15