TRENDnet TV-IP320PI User's Guide - Page 40
On Screen Display Settings, Space DNR Level
 |
View all TRENDnet TV-IP320PI manuals
Add to My Manuals
Save this manual to your list of manuals |
Page 40 highlights
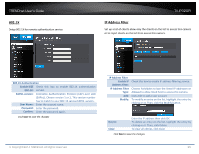
TRENDnet User's Guide TV-IP320PI Image adjustments Back Light Compensation and Digital WideDynamic-Range: Back light compensation: Setup a fixed light source position to compensate and adjust the image in the dark. Choose the area that you want to enhance (dark area, not light source). Note: By default, the D-WDR is enabled. Please disable DWDR to set up back light compensation. On Screen Display Settings Display the camera name and the time the video is shooting on the screen White Balance: Digital Noise Reduction: D-WDR: Digital Wide Dynamic Range compensates for the dark area dynamically. D-WDR Level: The level of compensation. Range: 0-100%, default: 20%. Choose a color temperature as the white color and compensate the color on the whole image. Choose the mode of noise reduction. Normal Mode Noise Reduction Level: Adjust the effect of digital noise reduction. Range: 0-100%, default : 100% Expert Mode Space DNR Level: Adjust the special digital noise reduction with adjacent pixels. Change the range (0100%) to change the adjacency effect, default : 50% Time DNR Level: Adjust the 3D digital noise reduction. Compare and reduce noise between video frames. Range: 0-100%, default : 100% Click Reset to reset the display adjustments © Copyright 2014 TRENDnet. All Rights Reserved. Display Name: Display Date: Check this box to display the product name that was setup in the device settings (refer to page 26 Device Settings to change the device name.) Check this box to display system time. Display Week: Check this box to display time of the week. Time Format: Select 12 or 24-hour time format. Date Format: Select the date format Display Mode: Choose how the text will show on the screen. OSD Size: Select the text size from 16 to 64 or adjusted by screen size automatically. Move the red box to position the text. Click Save to save the changes. 40
-
 1
1 -
2
-
3
-
4
-
5
-
6
-
7
-
8
-
9
-
10
-
11
-
12
-
13
-
14
-
15
-
16
-
17
-
18
-
19
-
20
-
21
-
22
-
23
-
24
-
25
-
26
-
27
-
28
-
29
-
30
-
31
-
32
-
33
-
34
-
 35
35 -
 36
36 -
 37
37 -
 38
38 -
 39
39 -
 40
40 -
 41
41 -
 42
42 -
 43
43 -
 44
44 -
 45
45 -
46
-
47
-
48
-
49
-
50
-
51
-
52
-
53
-
54
-
55
-
56
-
57
-
58
 |
 |
