TRENDnet TV-IP320PI User's Guide - Page 44
Draw Area, Stop Drawing, Sensitivity, Clear All, Arming Schedule, All Day, Customized, continuous
 |
View all TRENDnet TV-IP320PI manuals
Add to My Manuals
Save this manual to your list of manuals |
Page 44 highlights
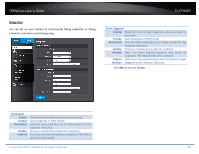
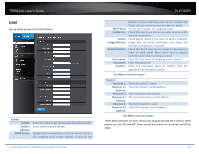
TRENDnet User's Guide Draw Area: Click Draw Area button to start drawing. Click and drag on the area you want to set up the motion detection. You can draw up to 8 different areas. Click Stop Drawing to stop drawing motion detection areas. The red grids represent the motion detection area. TV-IP320PI Arming Schedule Edit: Click Edit to edit the recording schedule. The Edit Schedule window will pop up. Sensitivity: Move the slider to adjust detection sensitivity. Clear All: Click this button to clear all the set up areas. © Copyright 2014 TRENDnet. All Rights Reserved. 1. Select day of the week you want to edit. 2. Select All Day or Customized schedule of the day. 3. Set the time period and the event you want to trigger the video recording continuous (always recording) or motion detection. 4. Click Select All or the weekday you want to have the same schedule on different day. 5. Click another day of the week by clicking on its tab to set the next schedule. Click OK when you have finished your settings. 44
-
 1
1 -
2
-
3
-
4
-
5
-
6
-
7
-
8
-
9
-
10
-
11
-
12
-
13
-
14
-
15
-
16
-
17
-
18
-
19
-
20
-
21
-
22
-
23
-
24
-
25
-
26
-
27
-
28
-
29
-
30
-
31
-
32
-
33
-
34
-
35
-
36
-
37
-
38
-
 39
39 -
 40
40 -
 41
41 -
 42
42 -
 43
43 -
 44
44 -
 45
45 -
 46
46 -
 47
47 -
 48
48 -
 49
49 -
50
-
51
-
52
-
53
-
54
-
55
-
56
-
57
-
58
 |
 |
