Thermador HMWB36WS View Kitchen Design and Planning Guide - Page 102
Door Swivel Range - 1
 |
View all Thermador HMWB36WS manuals
Add to My Manuals
Save this manual to your list of manuals |
Page 102 highlights
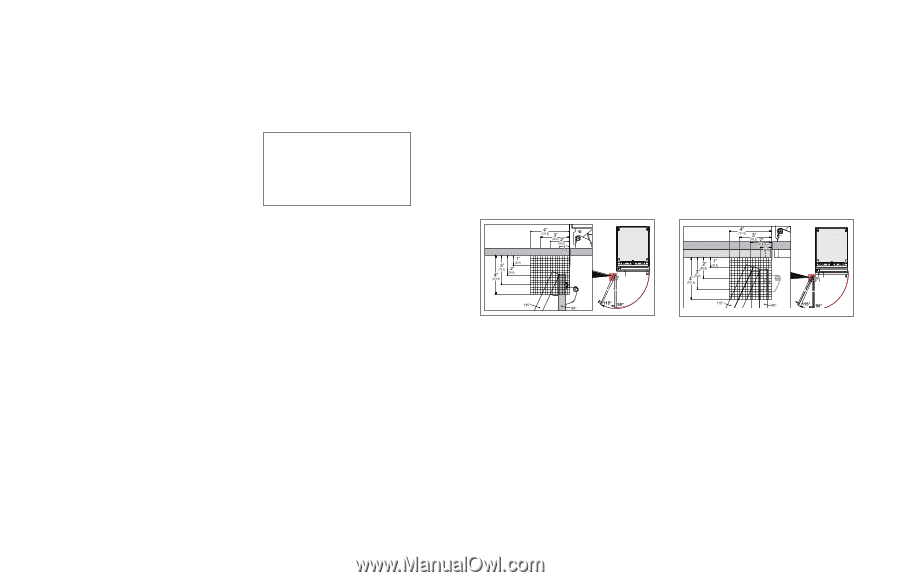
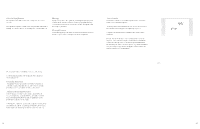
INSTALLATION Freedom® Collection Toekick & Venting Grille Each Freedom® Collection refrigeration appliance comes with a 4" (102 mm) tall stainless steel toekick. A custom-made toekick that matches the surrounding cabinetry may be applied instead. While standard toekick height is 4" (102 mm), depending on the usage of the leveling legs, the toekick height could vary. Regardless of toekick height, it is imperative that the venting grille remain unblocked to ensure proper functionality of the appliance. Decorative toekicks should be removable to allow for servicing. Door Panel Toekick Typical 4" (102 mm) toekick height. Velcro adhesive strips are used to fasten the toekick to the appliance. Venting grille and (if applicable) the water filter cavity are located above the toekick area. Upper Molding The planning of decorative upper molding above the cutout requires taking into account the actual or desired height of the door panel. The overall height of the door panel will depend on: • the height of the appliance, typically 84" (2134 mm) - leveling legs allow height adjustment ranging from -1/2" (-13 mm) to +1 3/8" (+35 mm) • the installed height of the door panel (distance from the bottom edge of the door panel to the floor, typically 4" (102 mm), and, if desired, any extension of the custom panel above the appliance cutout) • the appliance type (single door or bottom freezer) Important Please recall that a panel should be installed at a minimum height of 4" (102 mm) from the floor to allow proper ventilation of the appliance. Always ensure that the top of the cutout or upper decorative molding is at least 4" (102 mm) deep, so that the refrigerator can be properly secured to the cutout wall. This is particularly important if a protruding cutout is specially created and configured with a face frame. Furniture returns for any face frame must be a minimum of 4" (102 mm) deep. If required by the surrounding cabinetry design, the distance between the bottom edge of the door panel and the floor can be increased from approx. 4" (102 mm) up to 7 1/8" (181 mm), but should not be decreased. Note, however, that the venting grille and (if applicable) water filter cavity will be visible, even if the door is closed. Vertical Section, Side View: Possible Extension of the Door Panel Decorative Molding Standard Door Panel Appliance Door Appliance *Adjustment in leveling legs: -1/2" (-13 mm) to 1 3/8" (35 mm) INSTALLATION Freedom® Collection Door Swivel Range It is absolutely essential to ensure that the appliance is installed in such a way that the doors (including handles) and adjacent cabinets, countertops, pilasters, walls or other kitchen elements do not interfere with one another when opened. The illustrations below depict the swivel range of the Freedom® Collection refrigerator doors including mounted door panels of both 3/4" (19 mm) and 1 1/2" (38 mm) thickness. In the event of door interference the following solutions may be employed: • Limit the refrigerator door opening angle to 90° with a door stop pin inserted into the hinge. • Reduce the door panel thickness (if larger than 3/4" (19 mm)). • Install a spacer between the appliance and the kitchen element that creates the interference. • Rearrange the opposing kitchen element that creates the problem. • Create a protruding cutout for the appliance. Door Swivel Range - 3/4" (19 mm) Flush Appliance Door Panel Door Swivel Range - 1 1/2" (38 mm) Flush Appliance Door Panel Handle Installation and Dimensions Professional Handle Top-View Doors Side-View Drawer Masterpiece® Handle Top-View Doors Side-View Drawer Professional PR36HNDL20 PR30HNDL20* Masterpiece® MS36HNDL20 MS30HNDL20* | THERMADOR | FREEDOM® REFRIGERATION | THERMADOR | FREEDOM® REFRIGERATION 200 Visit Thermador.com for complete specifications or text a Thermador model number to 21432 to have specs sent to your phone *For use with 30" bottom freezer T30IB905SP drawer only 201
-
 1
1 -
2
-
3
-
4
-
5
-
6
-
7
-
8
-
9
-
10
-
11
-
12
-
13
-
14
-
15
-
16
-
17
-
18
-
19
-
20
-
21
-
22
-
23
-
24
-
25
-
26
-
27
-
28
-
29
-
30
-
31
-
32
-
33
-
34
-
35
-
36
-
37
-
38
-
39
-
40
-
41
-
42
-
43
-
44
-
45
-
46
-
47
-
48
-
49
-
50
-
51
-
52
-
53
-
54
-
55
-
56
-
57
-
58
-
59
-
60
-
61
-
62
-
63
-
64
-
65
-
66
-
67
-
68
-
69
-
70
-
71
-
72
-
73
-
74
-
75
-
76
-
77
-
78
-
79
-
80
-
81
-
82
-
83
-
84
-
85
-
86
-
87
-
88
-
89
-
90
-
91
-
92
-
93
-
94
-
95
-
96
-
 97
97 -
 98
98 -
 99
99 -
 100
100 -
 101
101 -
 102
102 -
 103
103 -
 104
104 -
 105
105 -
 106
106 -
 107
107 -
108
-
109
-
110
-
111
-
112
-
113
-
114
-
115
-
116
-
117
-
118
-
119
-
120
-
121
-
122
-
123
-
124
-
125
-
126
-
127
-
128
-
129
-
130
-
131
 |
 |