Thermador PRG366WG Instructions for Use - Page 17
Before you begin
 |
View all Thermador PRG366WG manuals
Add to My Manuals
Save this manual to your list of manuals |
Page 17 highlights
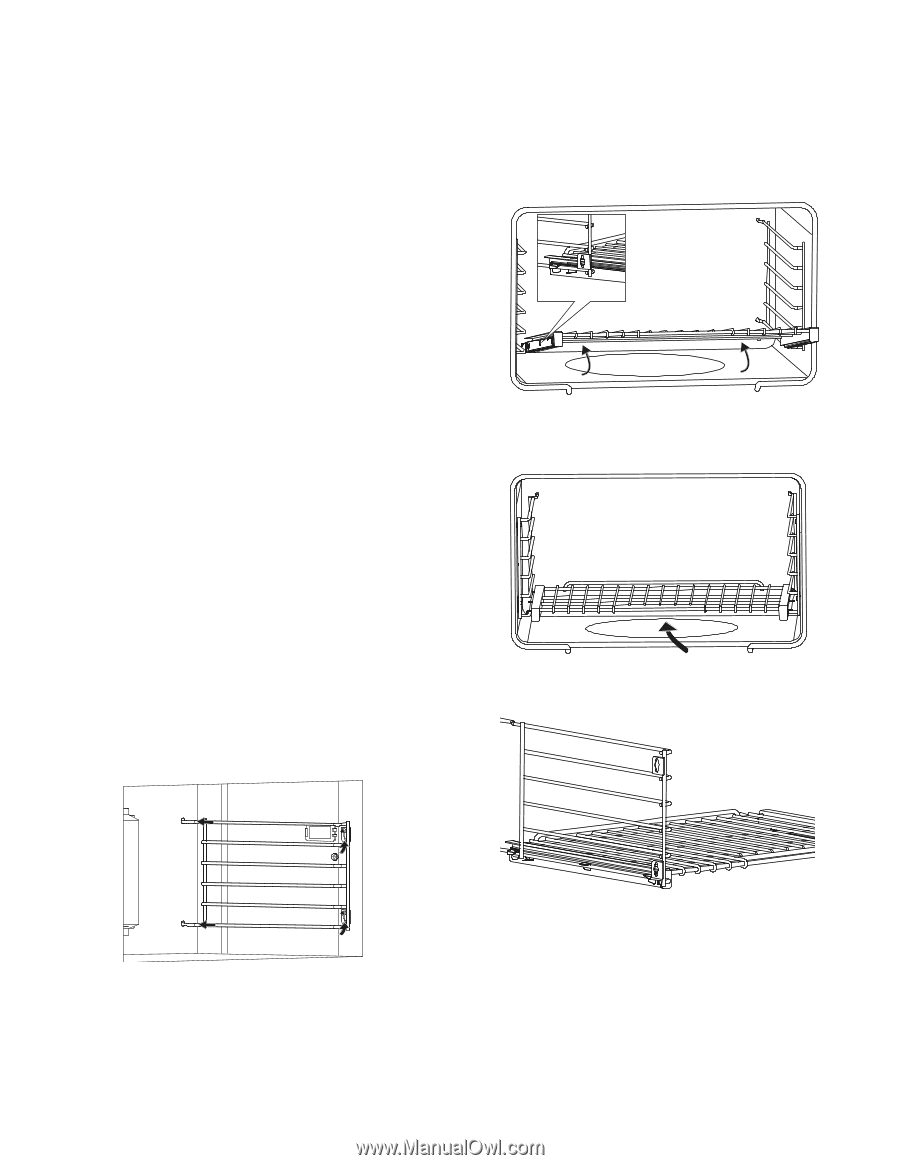
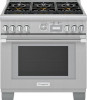
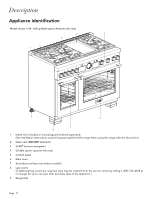
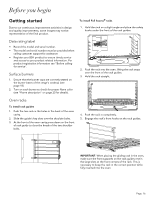
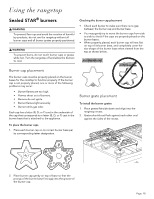
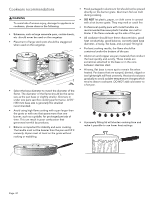
Before you begin Getting started Due to our continuous improvement activities in design and quality improvements, some images may not be representative of the final product. To install Full Access® racks 1. Hold the rack on a slight angle and place the safety hooks under the front of the rack guides. Data rating label • Record the model and serial number. • The model and serial number must be provided when calling customer support for assistance. • Register your BSH product to ensure timely service and access to your product related information. For product registration information see "Before calling for service". Surface burners 1. Ensure that the burner caps are correctly seated on the burner bases of the range's cooktop (see page 18). 2. Turn on each burner to check for proper flame color (see "Flame description" on page 20 for details). 2. Push the rack into the oven, lifting the rack stops over the front of the rack guides. 3. Hold the rack straight. Oven racks To install rack guides 1. Push the two rails in the holes in the back of the oven cavity. 2. Slide the guide's key slots over the shoulder bolts. 3. At the front of the oven cavity press down on the front of rack guide to clear the heads of the two shoulder bolts. 4. Push the rack in completely. 5. Engage the rack's front hooks on the rack guides. IMPORTANT: When placing the gliding rack in the oven, make sure the front supports on the rack guides rest in the large slots at the front corners of the rack. This is necessary to keep the rack in the correct position while fully inserted into the oven. Page. 16
-
 1
1 -
2
-
3
-
4
-
5
-
6
-
7
-
8
-
9
-
10
-
11
-
 12
12 -
 13
13 -
 14
14 -
 15
15 -
 16
16 -
 17
17 -
 18
18 -
 19
19 -
 20
20 -
 21
21 -
 22
22 -
23
-
24
-
25
-
26
-
27
-
28
-
29
-
30
-
31
-
32
-
33
-
34
-
35
-
36
-
37
-
38
-
39
-
40
-
41
-
42
-
43
-
44
-
45
-
46
-
47
-
48
-
49
-
50
-
51
-
52
-
53
-
54
-
55
-
56
-
57
-
58
-
59
-
60
-
61
-
62
-
63
-
64
-
65
-
66
-
67
-
68
-
69
-
70
-
71
-
72
-
73
-
74
-
75
-
76
-
77
-
78
-
79
-
80
-
81
-
82
-
83
-
84
-
85
-
86
-
87
-
88
-
89
-
90
-
91
-
92
-
93
-
94
-
95
-
96
-
97
-
98
-
99
-
100
-
101
-
102
-
103
-
104
-
105
-
106
-
107
-
108
-
109
-
110
-
111
-
112
-
113
-
114
-
115
-
116
-
117
-
118
-
119
-
120
-
121
-
122
-
123
-
124
-
125
-
126
-
127
-
128
-
129
-
130
-
131
-
132
-
133
-
134
-
135
-
136
-
137
-
138
-
139
-
140
-
141
-
142
-
143
-
144
-
145
-
146
-
147
-
148
-
149
-
150
-
151
-
152
-
153
-
154
-
155
-
156
-
157
-
158
-
159
-
160
-
161
-
162
-
163
-
164
-
165
-
166
-
167
-
168
-
169
-
170
-
171
-
172
-
173
-
174
-
175
-
176
-
177
-
178
-
179
-
180
-
181
 |
 |