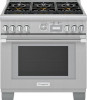
Thermador PRG366WG Instructions for Use - Page 36
Convection conversion, Fine tuning the oven, Meat probe
 |
View all Thermador PRG366WG manuals
Add to My Manuals
Save this manual to your list of manuals |
Page 36 highlights
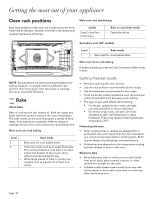
Convection conversion About the convection conversion • To convert most baked items for use with convection bake and true convection (cookies, cakes, pies, etc.), the oven temperature often needs to be decreased by 25°F. The convection conversion setting reduces the temperature you enter for you automatically. • The unit will continue to run the convection conversion value indefinitely until the user manually changes it in the settings, or until the unit loses power, in which case convection conversion will need to be reset. • Convection conversion is available for the convection bake and true convection modes only. • For meats and poultry, the temperature should not be reduced. The same temperature recommended in recipes and cooking charts for meats and poultry should be used. To set the convection conversion 1. Begin from the STANDBY mode and select SETTINGS. 2. Press the left ( or ) to scroll to CONVECT CONVERSION. 3. Press the right ( or ) and select ON. 4. Press ENTER. 5. Turn the mode knob to CONV BAKE and the TEMPERATURE knob to the recipe temperature. - The oven automatically reduces the input temperature by 25°F (10 °C) to the correct temperature. 6. Allow oven to preheat and place food inside. Fine tuning the oven About offset The offset feature allows the cook to further fine-tune their cooking parameters to their own personal optimal settings by allowing them to adjust the temperature offset of the oven by +/-35°F in increments of 5°F. This feature is useful if you find that food is consistently either too brown or too light for your tastes. • The offset feature is available for all modes except self-clean. • By default, the temperature is set at 0°. • The unit will continue to run the input offset value indefinitely until the user manually changes it, or until the unit loses power, in which case offset will need to be reset. To set offset 1. Begin from the STANDBY mode and select SETTINGS. 2. Press the left ( or ) to scroll TEMP OFFSET: RIGHT/ LEFT OVEN. 3. Press the right ( or ) to set the temperature. 4. Press ENTER. Meat probe About the meat probe The meat probe allows you more control over how your foods are cooked by automatically disabling the specified cooking mode when a dish's desired temperature, defined by the cook, has been reached. The probe expresses the current temperature of the meat as it cooks. The following are the heating modes that work with the temperature probe: • Bake • Convection bake • Roast • Convection roast The temperature probe will not work with the oven timer or with the end timer. IMPORTANT: • To avoid damaging your meat probe, DO NOT pull on the cable when trying to remove it from a dish. • DO NOT use tongs or other instruments to pry on the meat probe when removing it or to 'hammer' the meat probe into a food dish. • To prevent possible burns, wait until the oven has cooled before trying to remove the meat probe from the outlet. • DO NOT store the meat probe inside the oven. For best results • To avoid damaging the meat probe, ensure that the meat is fully defrosted before inserting the meat probe. • Insert the meat probe until its tip is rested in the center of the thickest, meatiest portion of the meat. Ensure that the meat probe does not touch bone, fat, or gristle. • For poultry, the meat probe should be inserted into the interior thigh muscle. • The meat probe should not touch any part of the cooking dish or parts of the oven, as this will affect the accuracy of the results. Page. 35
-
 1
1 -
2
-
3
-
4
-
5
-
6
-
7
-
8
-
9
-
10
-
11
-
12
-
13
-
14
-
15
-
16
-
17
-
18
-
19
-
20
-
21
-
22
-
23
-
24
-
25
-
26
-
27
-
28
-
29
-
30
-
 31
31 -
 32
32 -
 33
33 -
 34
34 -
 35
35 -
 36
36 -
 37
37 -
 38
38 -
 39
39 -
 40
40 -
 41
41 -
42
-
43
-
44
-
45
-
46
-
47
-
48
-
49
-
50
-
51
-
52
-
53
-
54
-
55
-
56
-
57
-
58
-
59
-
60
-
61
-
62
-
63
-
64
-
65
-
66
-
67
-
68
-
69
-
70
-
71
-
72
-
73
-
74
-
75
-
76
-
77
-
78
-
79
-
80
-
81
-
82
-
83
-
84
-
85
-
86
-
87
-
88
-
89
-
90
-
91
-
92
-
93
-
94
-
95
-
96
-
97
-
98
-
99
-
100
-
101
-
102
-
103
-
104
-
105
-
106
-
107
-
108
-
109
-
110
-
111
-
112
-
113
-
114
-
115
-
116
-
117
-
118
-
119
-
120
-
121
-
122
-
123
-
124
-
125
-
126
-
127
-
128
-
129
-
130
-
131
-
132
-
133
-
134
-
135
-
136
-
137
-
138
-
139
-
140
-
141
-
142
-
143
-
144
-
145
-
146
-
147
-
148
-
149
-
150
-
151
-
152
-
153
-
154
-
155
-
156
-
157
-
158
-
159
-
160
-
161
-
162
-
163
-
164
-
165
-
166
-
167
-
168
-
169
-
170
-
171
-
172
-
173
-
174
-
175
-
176
-
177
-
178
-
179
-
180
-
181
 |
 |
