Toshiba DVR3 Owners Manual - Page 16
Setting Up the, DisplayVideo Options, Setting Up the Audio, Options
 |
View all Toshiba DVR3 manuals
Add to My Manuals
Save this manual to your list of manuals |
Page 16 highlights
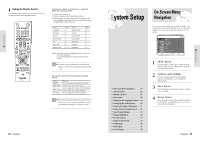
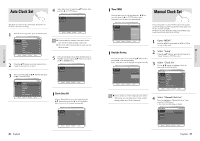
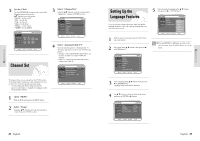
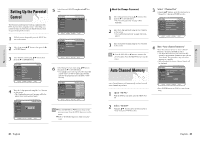
System Setup System Setup Setting Up the Audio Options If you set the player menu, disc menu, audio and subtitle language in advance, they will come up automatically every time you watch a movie. 1 With the unit in Stop mode, press the MENU button on the remote. 2 Select Setup using œ❷¤buttons, then press the ❿ or ENTER button. 5 Use the œ❷ buttons to select the desired item. Then press the RIGHT or ENTER button. Press the RETURN or ➛ button to return to the Note previous menu. Press the MENU button to exit the menu. Digital Output 1. PCM : 2. Bitstream : Converts to PCM(2CH) 48kHz audio. Select PCM when using the Analog Audio Outputs. Converts to Dolby Digital Bitstream (5.1CH). Select Bitstream when using the Digital Audio Output. Be sure to select the correct Digital Output or no Note audio will be heard. 3 Select Audio using œ❷ buttons, then press the ❿ or ENTER button. Audio setup menu will be displayed. DTS 1. Off : 2. On : Doesn't output digital signal. Outputs DTS Bitstream via digital output only. Select DTS when connecting to a DTS Decoder. When DTS soundtrack is played, sound is not outNote put from Analog Audio Output. 4 Use œ❷ buttons to select the desired sub menu and press the ENTER or ❿ button. PCM Bitstream Dynamic Compression 1. On : 2. Off : To select dynamic compression. To select the standard range. Setting Up the Display(Video) Options This function allows you to setup the TV screen settings. 5 Use the œ❷ buttons to select the desired item. Then press the RIGHT or ENTER button. Press the RETURN or ➛ button to return to the Note previous menu. Press the MENU button to exit the menu. 1 With the unit in Stop mode, press the MENU button on the remote. You can't use the Setup functions during playback. 2 Select Setup using œ❷ buttons, then press the ❿ or ENTER button. 3 Select Video using œ❷ buttons, then press the ❿ or ENTER button. Video option menu will be displayed. 4 Select the sub menu using œ❷ buttons, then press the ❿ or ENTER button. Display(Video) Options This function depends on disc type. It may not work for some disc types. TV Aspect Depending on the type of television you have, you may want to adjust the screen setting. (aspect ratio) • 4:3 Letter Box : Select when you want to see the total 16:9 ratio screen DVD supplies, even though you have a TV with a 4:3 ratio screen. Black bars will appear at the top and bottom of the screen. • 4:3 Pan - Scan : Select this for conventional size TV when you want to see the central portion of the 16:9 screen. (Extreme left and right side of movie picture will be cut off.) • 16:9 Wide : You can view the full 16:9 picture on your widescreen TV. Black Level Adjusts the brightness of the screen. • 0 IRE : This is the standard NTSC reference black level for consistent bright- ness/contrast across all sources. • 7.5 IRE : This will enhance the black level for increased brightness/contrast when viewing DVDs. 3D NR(Noise Reduction) • On : Select to reduce noise from the screen • Off : Normal 30 - English English - 31
-
 1
1 -
2
-
3
-
4
-
5
-
6
-
7
-
8
-
9
-
10
-
 11
11 -
 12
12 -
 13
13 -
 14
14 -
 15
15 -
 16
16 -
 17
17 -
 18
18 -
 19
19 -
 20
20 -
 21
21 -
22
-
23
-
24
-
25
-
26
-
27
-
28
-
29
-
30
-
31
-
32
-
33
-
34
-
35
-
36
-
37
-
38
-
39
-
40
-
41
-
42
-
43
-
44
-
45
-
46
-
47
-
48
-
49
-
50
-
51
-
52
-
53
-
54
-
55
-
56
-
57
-
58
-
59
-
60
 |
 |
