Toshiba L875D-S7332 User Guide - Page 43
Creating a PBR Push Button Reset USB, Recovery, Micro USB to USB On-the-Go Adapter - drivers
 |
View all Toshiba L875D-S7332 manuals
Add to My Manuals
Save this manual to your list of manuals |
Page 43 highlights
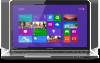
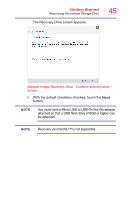
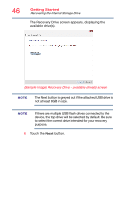
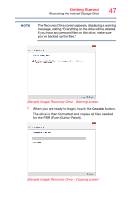
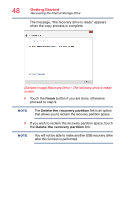
Getting Started Recovering the Internal Storage Drive 43 NOTE During the recovery process your device must first be fully charged via the USB/AC adaptor. NOTE When you create recovery media, only the operating system files and drivers originally shipped with the device are backed up to the external media and can be restored from this media. Any files that you created are not backed up on the recovery media. You will need to separately back up the files you created; for more information, see "Backing up your work" on page 63. When you create recovery media, the system will prompt you to connect a USB flash drive (8GB minimum capacity) to your device. All information stored on your USB flash drive will be erased during the process of creating the recovery media. Be sure to save the information stored on your external media to another storage device before executing this procedure, or use blank media. Creating a PBR (Push Button Reset) USB Recovery NOTE You will need two items before proceeding: 1. USB Flash Drive (minimum 8GB) (sold separately) 2. Micro USB to USB On-the-Go Adapter (sold separately) 1 From the Start or Desktop screen, swipe in from the right edge of the screen. When the Windows® charms appear touch the Search ( ) charm and, in the Search field, type Create Recovery Media. In the list that appears, touch your selection. A pop-up screen displays the following message, "Do you want to allow the following program to make changes to this computer?"
-
 1
1 -
2
-
3
-
4
-
5
-
6
-
7
-
8
-
9
-
10
-
11
-
12
-
13
-
14
-
15
-
16
-
17
-
18
-
19
-
20
-
21
-
22
-
23
-
24
-
25
-
26
-
27
-
28
-
29
-
30
-
31
-
32
-
33
-
34
-
35
-
36
-
37
-
 38
38 -
 39
39 -
 40
40 -
 41
41 -
 42
42 -
 43
43 -
 44
44 -
 45
45 -
 46
46 -
 47
47 -
 48
48 -
49
-
50
-
51
-
52
-
53
-
54
-
55
-
56
-
57
-
58
-
59
-
60
-
61
-
62
-
63
-
64
-
65
-
66
-
67
-
68
-
69
-
70
-
71
-
72
-
73
-
74
-
75
-
76
-
77
-
78
-
79
-
80
-
81
-
82
-
83
-
84
-
85
-
86
-
87
-
88
-
89
-
90
-
91
-
92
-
93
-
94
-
95
-
96
-
97
-
98
-
99
-
100
-
101
-
102
-
103
-
104
-
105
-
106
-
107
-
108
-
109
-
110
-
111
-
112
-
113
-
114
-
115
-
116
-
117
-
118
-
119
-
120
-
121
-
122
-
123
-
124
-
125
-
126
-
127
-
128
-
129
-
130
 |
 |
