Toshiba Portege Z10t-ASP3260FM User Guide - Page 86
Connecting your device to a network, Exploring audio features, Recording sounds, Accessing a network
 |
View all Toshiba Portege Z10t-ASP3260FM manuals
Add to My Manuals
Save this manual to your list of manuals |
Page 86 highlights
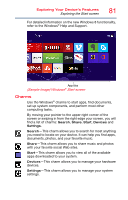
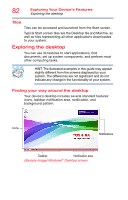
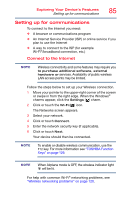
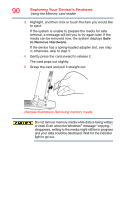
86 Exploring Your Device's Features Exploring audio features Connecting your device to a network You can connect your device to a network to increase its capabilities and functionality. Accessing a network For specific information about connecting to the network, consult your network administrator. Many hotels, airports, and offices offer Wi-Fi® access. Exploring audio features You can use your device to record sounds using the device's internal microphones (available on certain models) or an optional external microphone. You can listen to sound files or audio CDs using the built-in speakers, headphones, or external speakers. Recording sounds You may record sounds using the device's internal microphones or by connecting an optional external microphone. Using a microphone NOTE To locate your headphone/microphone jack, please refer to your Quick Start document. 1 If you want to use an external microphone, connect it to the device. 2 From the Start screen begin typing Sound Recorder and click or touch your selection. If you are in the Desktop, move your pointer to the upper-right corner of the screen or swipe in from the right edge. When the Windows® charms appear click or touch the Search ( ) charm and, in the Search field, type Sound Recorder. Start Recording/Stop Recording button (Sample Image) Sound Recorder screen 3 Click or touch the Start Recording button. 4 Speak normally into the microphone.
-
 1
1 -
2
-
3
-
4
-
5
-
6
-
7
-
8
-
9
-
10
-
11
-
12
-
13
-
14
-
15
-
16
-
17
-
18
-
19
-
20
-
21
-
22
-
23
-
24
-
25
-
26
-
27
-
28
-
29
-
30
-
31
-
32
-
33
-
34
-
35
-
36
-
37
-
38
-
39
-
40
-
41
-
42
-
43
-
44
-
45
-
46
-
47
-
48
-
49
-
50
-
51
-
52
-
53
-
54
-
55
-
56
-
57
-
58
-
59
-
60
-
61
-
62
-
63
-
64
-
65
-
66
-
67
-
68
-
69
-
70
-
71
-
72
-
73
-
74
-
75
-
76
-
77
-
78
-
79
-
80
-
 81
81 -
 82
82 -
 83
83 -
 84
84 -
 85
85 -
 86
86 -
 87
87 -
 88
88 -
 89
89 -
 90
90 -
 91
91 -
92
-
93
-
94
-
95
-
96
-
97
-
98
-
99
-
100
-
101
-
102
-
103
-
104
-
105
-
106
-
107
-
108
-
109
-
110
-
111
-
112
-
113
-
114
-
115
-
116
-
117
-
118
-
119
-
120
-
121
-
122
-
123
-
124
-
125
-
126
-
127
-
128
-
129
-
130
-
131
-
132
-
133
-
134
-
135
-
136
-
137
-
138
-
139
-
140
-
141
-
142
-
143
-
144
-
145
-
146
-
147
-
148
-
149
-
150
-
151
-
152
-
153
-
154
-
155
-
156
 |
 |