Toshiba Tecra A6-S513 User Guide - Page 75
Deleting the Hard Disk Recovery Utility, Start, Programs, Hard Disk Recovery Utilities
 |
View all Toshiba Tecra A6-S513 manuals
Add to My Manuals
Save this manual to your list of manuals |
Page 75 highlights
Getting Started Hard Drive Recovery Utilities 75 Deleting the Hard Disk Recovery Utility You can delete the HDD recovery partition without losing your data. 1 Click Start, All Programs, Hard Disk Recovery Utilities, then Delete Hard Disk Recovery Partition. The Delete Hard Disk Recovery Utility warning screen displays. Sample Delete Hard Disk Recovery Utility screen 2 Click OK to continue. 3 When the following warning screen displays, click Yes to confirm. Sample Delete Hard Disk Recovery Utility confirmation screen After the Delete Hard Disk Recovery Utility has completed, it assigns the appropriate drive letter (for example, E: drive) for the extra space and formats the drive.
-
 1
1 -
2
-
3
-
4
-
5
-
6
-
7
-
8
-
9
-
10
-
11
-
12
-
13
-
14
-
15
-
16
-
17
-
18
-
19
-
20
-
21
-
22
-
23
-
24
-
25
-
26
-
27
-
28
-
29
-
30
-
31
-
32
-
33
-
34
-
35
-
36
-
37
-
38
-
39
-
40
-
41
-
42
-
43
-
44
-
45
-
46
-
47
-
48
-
49
-
50
-
51
-
52
-
53
-
54
-
55
-
56
-
57
-
58
-
59
-
60
-
61
-
62
-
63
-
64
-
65
-
66
-
67
-
68
-
69
-
 70
70 -
 71
71 -
 72
72 -
 73
73 -
 74
74 -
 75
75 -
 76
76 -
 77
77 -
 78
78 -
 79
79 -
 80
80 -
81
-
82
-
83
-
84
-
85
-
86
-
87
-
88
-
89
-
90
-
91
-
92
-
93
-
94
-
95
-
96
-
97
-
98
-
99
-
100
-
101
-
102
-
103
-
104
-
105
-
106
-
107
-
108
-
109
-
110
-
111
-
112
-
113
-
114
-
115
-
116
-
117
-
118
-
119
-
120
-
121
-
122
-
123
-
124
-
125
-
126
-
127
-
128
-
129
-
130
-
131
-
132
-
133
-
134
-
135
-
136
-
137
-
138
-
139
-
140
-
141
-
142
-
143
-
144
-
145
-
146
-
147
-
148
-
149
-
150
-
151
-
152
-
153
-
154
-
155
-
156
-
157
-
158
-
159
-
160
-
161
-
162
-
163
-
164
-
165
-
166
-
167
-
168
-
169
-
170
-
171
-
172
-
173
-
174
-
175
-
176
-
177
-
178
-
179
-
180
-
181
-
182
-
183
-
184
-
185
-
186
-
187
-
188
-
189
-
190
-
191
-
192
-
193
-
194
-
195
-
196
-
197
-
198
-
199
-
200
-
201
-
202
-
203
-
204
-
205
-
206
-
207
-
208
-
209
-
210
-
211
-
212
-
213
-
214
-
215
-
216
-
217
-
218
-
219
-
220
-
221
-
222
-
223
-
224
-
225
-
226
-
227
-
228
-
229
-
230
-
231
-
232
-
233
-
234
-
235
-
236
-
237
-
238
-
239
-
240
-
241
-
242
-
243
-
244
-
245
-
246
-
247
-
248
-
249
-
250
-
251
-
252
-
253
-
254
-
255
-
256
-
257
-
258
-
259
-
260
-
261
-
262
-
263
-
264
-
265
-
266
-
267
-
268
-
269
-
270
-
271
-
272
-
273
-
274
-
275
-
276
-
277
-
278
-
279
-
280
-
281
-
282
-
283
-
284
-
285
-
286
-
287
-
288
-
289
-
290
-
291
-
292
-
293
-
294
-
295
-
296
-
297
-
298
-
299
-
300
-
301
 |
 |

75
Getting Started
Hard Drive Recovery Utilities
Deleting the Hard Disk Recovery Utility
You can delete the HDD recovery partition without losing
your data.
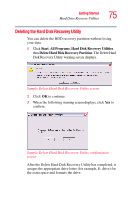
1
Click
Start
,
All
Programs
,
Hard Disk Recovery Utilities
,
then
Delete Hard Disk Recovery Partition
. The Delete Hard
Disk Recovery Utility warning screen displays.
Sample Delete Hard Disk Recovery Utility screen
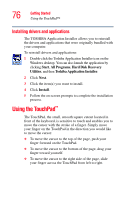
2
Click
OK
to continue.
3
When the following warning screen displays, click
Yes
to
confirm.
Sample Delete Hard Disk Recovery Utility confirmation
screen
After the Delete Hard Disk Recovery Utility has completed, it
assigns the appropriate drive letter (for example, E: drive) for
the extra space and formats the drive.