Toshiba Tecra C50-C1510 Users Guide for A50-C / C50-C / R50-C / Z50-C English - Page 79
Removing a memory module, Start -> Windows
 |
View all Toshiba Tecra C50-C1510 manuals
Add to My Manuals
Save this manual to your list of manuals |
Page 79 highlights
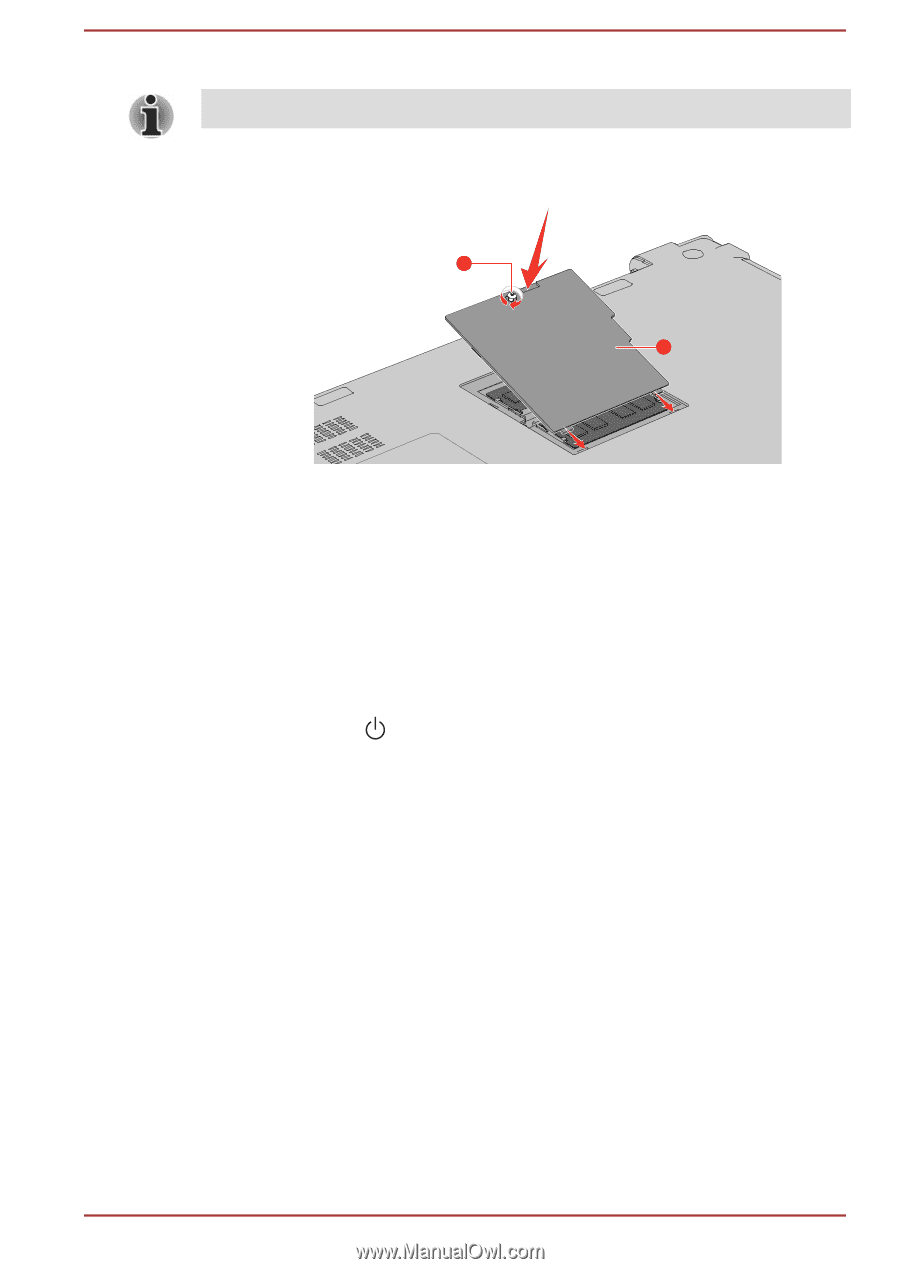
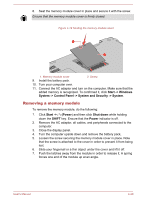
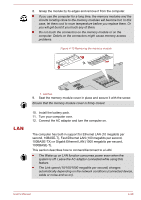
8. Seat the memory module cover in place and secure it with the screw. Ensure that the memory module cover is firmly closed. Figure 4-12 Seating the memory module cover 2 1 1. Memory module cover 2. Screw 9. Install the battery pack. 10. Turn your computer over. 11. Connect the AC adaptor and turn on the computer. Make sure that the added memory is recognized. To confirmed it, click Start -> Windows System -> Control Panel -> System and Security -> System. Removing a memory module To remove the memory module, do the following: 1. Click Start -> (Power) and then click Shut down while holding down the SHIFT key. Ensure that the Power indicator is off. 2. Remove the AC adaptor, all cables, and peripherals connected to the computer. 3. Close the display panel. 4. Turn the computer upside down and remove the battery pack. 5. Loosen the screw securing the memory module cover in place. Note that the screw is attached to the cover in order to prevent it from being lost. 6. Slide your fingernail or a thin object under the cover and lift it off. 7. Push the latches away from the module in order to release it. A spring forces one end of the module up at an angle. User's Manual 4-29
-
 1
1 -
2
-
3
-
4
-
5
-
6
-
7
-
8
-
9
-
10
-
11
-
12
-
13
-
14
-
15
-
16
-
17
-
18
-
19
-
20
-
21
-
22
-
23
-
24
-
25
-
26
-
27
-
28
-
29
-
30
-
31
-
32
-
33
-
34
-
35
-
36
-
37
-
38
-
39
-
40
-
41
-
42
-
43
-
44
-
45
-
46
-
47
-
48
-
49
-
50
-
51
-
52
-
53
-
54
-
55
-
56
-
57
-
58
-
59
-
60
-
61
-
62
-
63
-
64
-
65
-
66
-
67
-
68
-
69
-
70
-
71
-
72
-
73
-
 74
74 -
 75
75 -
 76
76 -
 77
77 -
 78
78 -
 79
79 -
 80
80 -
 81
81 -
 82
82 -
 83
83 -
 84
84 -
85
-
86
-
87
-
88
-
89
-
90
-
91
-
92
-
93
-
94
-
95
-
96
-
97
-
98
-
99
-
100
-
101
-
102
-
103
-
104
-
105
-
106
-
107
-
108
-
109
-
110
-
111
-
112
-
113
-
114
-
115
-
116
-
117
-
118
-
119
-
120
-
121
-
122
-
123
-
124
-
125
-
126
-
127
-
128
-
129
-
130
-
131
-
132
-
133
-
134
-
135
-
136
-
137
-
138
-
139
-
140
-
141
-
142
-
143
-
144
-
145
-
146
-
147
-
148
-
149
-
150
-
151
-
152
-
153
-
154
-
155
-
156
-
157
-
158
-
159
-
160
-
161
-
162
-
163
-
164
-
165
-
166
-
167
-
168
-
169
-
170
-
171
-
172
-
173
-
174
-
175
-
176
-
177
-
178
-
179
-
180
-
181
-
182
-
183
 |
 |