Uniden APPCAM25HD English Owner's Manual - Page 12
At this point, both the red and green LEDs are steady on.
 |
View all Uniden APPCAM25HD manuals
Add to My Manuals
Save this manual to your list of manuals |
Page 12 highlights
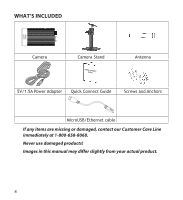
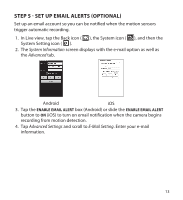
Your camera will reboot and reconnect to the router. If using the wired set up process, unplug the Ethernet cable from the router and camera during the reboot process. Wait 2 - 3 minutes until the camera's LEDs both return to the steady on state to continue. 4. The camera screen indicates that it is disconnected. Tap the System icon and then the Refresh icon. The camera refreshes and reconnects to the router you chose. The app displays a snapshot of the video image. At this point, both the red and green LEDs are steady on. STEP 4 - SET TIME ZONE/DAYLIGHT SAVINGS TIME It is important to set the correct time zone and daylight savings time indication on your camera to ensure correct date/time stamp on the video files. 1. Access the Advanced Settings list (see Connect Camera and WiFi Router, described previously. 2. From the Advancd Settings list, scroll to Time Zone. 3. Select your time zone. The most commonly used time zones are: ͳͳ GMT-05:00 - Eastern Standard ͳͳ GMT-06:00 - Central Standard ͳͳ GMT-07:00 - Mountain Standard ͳͳ GMT-08:00 - Pacific Standard ͳͳ GMT-09:00 - Yukon Standard ͳͳ GMT-10:00 - Alaska-Hawaii Standard 4. Set the Daylight Savings Time indicator. 5. Tap Back, and exit the Advanced Settings list. 12
-
 1
1 -
2
-
3
-
4
-
5
-
6
-
 7
7 -
 8
8 -
 9
9 -
 10
10 -
 11
11 -
 12
12 -
 13
13 -
 14
14 -
 15
15 -
 16
16 -
 17
17 -
18
-
19
-
20
-
21
-
22
-
23
-
24
-
25
-
26
-
27
-
28
-
29
-
30
-
31
-
32
-
33
-
34
-
35
-
36
-
37
-
38
 |
 |
