Viking VMOC206SS Use and Care Manual - Page 6
Installation Instructions - professional series
 |
View all Viking VMOC206SS manuals
Add to My Manuals
Save this manual to your list of manuals |
Page 6 highlights
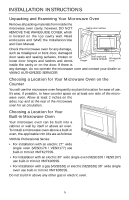
INSTALLATION INSTRUCTIONS Unpacking and Examining Your Microwave Oven Remove all packing materials from inside the microwave oven cavity; however, DO NOT REMOVE THE WAVEGUIDE COVER, which is located on the top cavity wall. Read enclosures and SAVE the Installation/Use and Care Manual. Check the microwave oven for any damage, such as misaligned or bent door, damaged door seals and sealing surfaces, broken or loose door hinges and latches and dents inside the cavity or on the door. If there is any damage, do not operate the microwave oven and contact your dealer or VIKING AUTHORIZED SERVICER. Choosing a Location for Your Microwave Oven on the Counter You will use the microwave oven frequently so plan its location for ease of use. It's wise, if possible, to have counter space on at least one side of the micro- wave oven. Allow at least 2 inches on the sides, top and at the rear of the microwave oven for air circulation. Built-in Trim Kit Frame Assembly Choosing a Location for Your Built-in Microwave Oven Your microwave oven can be built into a cabinet or wall by itself or above an oven. To install a microwave oven above a built-in oven, the applicable trim kits are as follows: VIKING Professional Series: • For installation with an electric 27" wide single oven (VESO176 / VESO177) use built-in trim kit VMTK275SS. Microwave oven Front • For installation with an electric 30" wide single oven (VESO105 / VESO107) use built-in trim kit VMTK305SS. • For installation with a gas (VGS0166) or electric (VES0165) 36" wide single oven use built-in trim kit VMTK365SS. Do not build in above any other gas or electric oven. 5
-
 1
1 -
 2
2 -
 3
3 -
 4
4 -
 5
5 -
 6
6 -
 7
7 -
 8
8 -
 9
9 -
 10
10 -
 11
11 -
 12
12 -
13
-
14
-
15
-
16
-
17
-
18
-
19
-
20
-
21
-
22
-
23
-
24
-
25
-
26
-
27
-
28
-
29
-
30
-
31
-
32
-
33
-
34
-
35
-
36
-
37
-
38
-
39
-
40
-
41
-
42
-
43
-
44
-
45
-
46
-
47
-
48
-
49
-
50
-
51
-
52
-
53
-
54
-
55
-
56
-
57
-
58
-
59
-
60
-
61
-
62
-
63
-
64
-
65
-
66
-
67
-
68
-
69
-
70
-
71
-
72
-
73
-
74
-
75
-
76
-
77
-
78
-
79
-
80
-
81
-
82
-
83
-
84
-
85
-
86
-
87
-
88
-
89
-
90
-
91
-
92
-
93
-
94
-
95
-
96
-
97
-
98
-
99
-
100
-
101
-
102
-
103
-
104
-
105
-
106
-
107
-
108
-
109
-
110
-
111
-
112
-
113
-
114
-
115
-
116
-
117
-
118
-
119
-
120
-
121
-
122
-
123
-
124
-
125
-
126
-
127
-
128
 |
 |
