Vtech VT20-2481 User Manual - Page 4
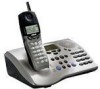
Getting Started - handset
 |
UPC - 735078001382
View all Vtech VT20-2481 manuals
Add to My Manuals
Save this manual to your list of manuals |
Page 4 highlights
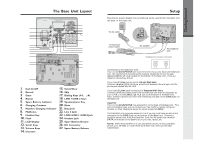
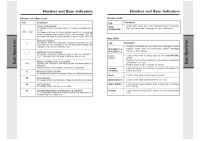
The Base Unit Layout 11 1 12 13 2 14 15 3 4 16 5 17 6 7 8 18 9 19 10 20 21 22 25 23 26 27 + ! 8L55 24 1. Itad On/Off 2. Record 3. Erase 4. Repeat 5. Spare Battery Indicator 6. Charging Contacts 7. Handset Charging Indicator 8. Mailboxes 9. Headset Key 10. Flash 11. LCD Display 12. Scroll Keys 13. Volume Keys 14. Intercom 6 15. Select/Clear 16. Skip 17. Dialing Keys (0-9, * , #) 18. LINE 1/LINE 2 Keys 19. Speakerphone Key 20. Mute 21. Data Jack 22. Line 2 Jack 23. LINE 1/LINE 1 + LINE 2 Jack 24. Headset Jack 25. Spare Battery Drawer 26. DC Connector 27. Spare Battery Release Setup Plug the AC power adapter into an electrical outlet, and the DC connector into the back of the base unit. To AC outlet To telephone socket outlet AC adapter To telephone jack Examples of 1-Line and 2-Line Cords RJ-11 One line cord RJ-14 2 line cord Connecting to the telephone lines Your 2-Line GIGAPHONE will work fine even if you only have one telephone line. We recommend connecting the modular telephone cord to the jack labeled LINE 1 / L1 + L2, located on the bottom of the Base Unit. Here are steps for connecting 2 lines: If you have 2 Lines coming out of a Single Wall Jack: Connect a 4-wire (RJ-14) modular phone cord between the wall jack and the phone jack labeled L1 / L1 + L2. If you have 2 Lines, each coming out of Separate Wall Jacks: Connect a modular phone cord from the wall jack you want to designate as your LINE 1, to the LINE 1 / L1 + L2 jack on the bottom of the Base Unit. Next, connect a phone cord from the remaining wall jack to the LINE 2 jack on the Base Unit. Data Port Your 2-Line GIGAPHONE has a Data Port on the back of the Base Unit. This port provides an easy way to connect your fax machine, laptop computer, modem or other telephone device for direct access to LINE 2. The Data Port only provides access to Line 2, so you must have an active line connected to the LINE 2 jack on the bottom of the Base Unit. Connect a modular phone cord from the Data Port (look for the small door marked DATA on the back of the Base Unit) to your fax, laptop, etc. NOTE: While the Data Port is in use, accidental use of Line 2 by a parallel phone, your 20-2481, or a Call Waiting ID alert may interrupt the data transmission. 7 + ! 8L55 Getting Started
-
 1
1 -
 2
2 -
 3
3 -
 4
4 -
 5
5 -
 6
6 -
 7
7 -
 8
8 -
 9
9 -
 10
10 -
11
-
12
-
13
-
14
-
15
-
16
-
17
-
18
-
19
-
20
-
21
-
22
-
23
-
24
-
25
-
26
-
27
-
28
-
29
 |
 |
