Weed Eater ONE Owner Manual
Weed Eater ONE Manual
 |
View all Weed Eater ONE manuals
Add to My Manuals
Save this manual to your list of manuals |
Weed Eater ONE manual content summary:
- Weed Eater ONE | Owner Manual - Page 1
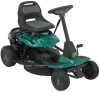
09.08.11 CL Printed in the U.S.A. Operator's Manual Manual de Operario WE261 Please read the operator's manual carefully and make sure you understand the instructions before using the machine. Por favor lea cuidadosamente y comprenda estas intrucciones antes de usar esta maquina. Patents Pending - Weed Eater ONE | Owner Manual - Page 2
of operatorship. After ninety (90) days, we will exchange the Battery, charging you 1/12 of the price of a new Battery for each full month from the date of the original sale. Battery must be maintained in accordance with the instructions furnished. 4. The Warranty does not apply to any products used - Weed Eater ONE | Owner Manual - Page 3
la lista de este manual. 10 Orificios del other adjusting or making repairs, riding mower. tended. Always turn off blade, set parking brake, stop engine, and remove keys before dismounting. • Disengage blade when not mowing. Shut WARNING: Engine exhaust, some of off engine and wait for all parts - Weed Eater ONE | Owner Manual - Page 4
Academy of Pediatrics recommends that children be a minimum of 12 year of age before operating a pedestrian controlled lawn mower and a minimum of 16 years of age before operating a riding lawn mower. Tragic accidents can occur if the operator is not alert to the presence of children. Children are - Weed Eater ONE | Owner Manual - Page 5
any adjustments or repairs with the engine running. • Check grass catcher components and the discharge chute frequently and replace with manufacturer's recommended parts, when necessary. • Mower blade is sharp. Wrap the blade or wear gloves, and use extra caution when servicing them. • Check brake - Weed Eater ONE | Owner Manual - Page 6
wheel). TO REMOVE RIDING MOWER FROM CARTON UNPACK CARTON 1. Cut along dotted lines on all four panels of carton. Remove carton and top frame as one unit. 2. Remove packing materials from riding mower. NOTE: Only cut carton with a short blade utility knife, a long blade or saw can puncture tires - Weed Eater ONE | Owner Manual - Page 7
and tighten adjustment knob securely. CHECK BATTERY Make sure battery is securely fastened, and that all wires are securely connected. • Battery is located under the seat. • Battery has been fully charged from the factory, before installation. Seat 6. Remove steering wheel adapter from steering - Weed Eater ONE | Owner Manual - Page 8
replacing the mower drive belt in the service and adjustment section of this manual. Verify that the belt is routed correctly. CHECK BRAKE SYSTEM After you learn how to operate your riding mower, check to see that the brake is operating properly. See "TO ADJUST BRAKE" in the Service and Adjustments - Weed Eater ONE | Owner Manual - Page 9
IGNITION SWITCH ENGINE OFF REVERSE ENGINE ON OPERATION SYSTEM (ROS) ENGINE START PARKING BRAKE PARKING BRAKE PARKING BRAKE LOCKED UNLOCKED OVER TEMP LIGHT FUEL OIL PRESSURE BATTERY REVERSE FORWARD MOWER HEIGHT 15 MOWER LIFT 15 ATTACHMENT ATTACHMENT CLUTCH ENGAGED CLUTCH DISENGAGED - Weed Eater ONE | Owner Manual - Page 10
safety standards of the American National Standards Institute. DECK CLUTCH LEVER - Used to engage the mower blade. BRAKE PEDAL - Used for braking the riding mower and starting the engine. HEIGHT ADJUSTMENT LEVER - Used to adjust mower cutting height. IGNITION SWITCH - Used for starting and stopping - Weed Eater ONE | Owner Manual - Page 11
Position STOPPING MOWER BLADE - • To stop mower blade, move deck clutch lever to disengaged position. GROUND DRIVE - • To stop ground drive, depress brake pedal all the way down. ENGINE - • Turn ignition key to "STOP" position and remove key. Always remove key when leaving riding mower to prevent - Weed Eater ONE | Owner Manual - Page 12
mower blade by engaging deck clutch lever. TO STOP MOWER BLADE- Disengage deck clutch lever. Deck Clutch Lever "Disengaged" Position Mower Height Adjustment High Position Mower Height Adjustment (Consulte la parte de "AJUSTE DEL FRENO" en la sección de Servicio y Ajustes de este manual). LLANTAS • - Weed Eater ONE | Owner Manual - Page 13
brake and clutch/brake pedal. • Make all turns slowly. TO TRANSPORT When pushing or towing your riding mower, be sure to disengage transmission by placing freewheel control in freewheel position. Freewheel control is located at the rear drawbar of the riding mower. • Raise mower height adjustment - Weed Eater ONE | Owner Manual - Page 14
. See "TO LEVEL MOWER HOUSING" in the Service and Adjustments section of this manual. • The left hand side of mower should be used for trimming. • Drive so that clippings are discharged onto the area that has already been cut. Have the cut area to the right of the riding mower. This will result in - Weed Eater ONE | Owner Manual - Page 15
maintain your riding mower. At least once a season, check to see if you should make any of the adjustments described in the Service and Adjustments section of this manual. • At least once a year you should replace the spark plug, clean or replace air filter, and check blade and belt for wear - Weed Eater ONE | Owner Manual - Page 16
any maintenance. BRAKE OPERATION If riding mower requires more than four (4) feet to stop at highest speed in highest gear on a level, dry concrete or paved surface, then brake must be serviced. (See "TO ADJUST BRAKE" in the Service and Adjustments section of this manual). TIRES • Maintain proper - Weed Eater ONE | Owner Manual - Page 17
expected before oil change. All oil must meet API service classification SG-SL. • Ensure riding mower is on level surface. • Oil will drain more freely when warm. • Oil can be pumped from the engine with a mechanical or electric siphon pump. 1. Remove oil fill cap/dipstick. Be careful not to allow - Weed Eater ONE | Owner Manual - Page 18
manual. CLEANING • Clean engine, battery, seat, finish, etc. of all foreign matter. • Keep finished surfaces and wheels free of all gasoline, oil, etc. • Protect painted surfaces with automotive type wax. We do not recommend using a garden hose or pressure washer to clean your riding mower unless - Weed Eater ONE | Owner Manual - Page 19
5. Make sure the blade and all moving parts have completely stopped. 6. Disconnect spark plug wire from spark plug and place wire where it cannot come in contact with plug. RIDING MOWER TO REMOVE MOWER 1. Place deck clutch in "DISENGAGED" position. 2. Move mower height adjustment lift lever forward - Weed Eater ONE | Owner Manual - Page 20
side-to-side adjustment. TO REPLACE MOWER BLADE DRIVE BELT MOWER DRIVE BELT REMOVAL 1. Park riding mower on a level surface. 2. Set parking brake. 3. Lower mower to its lowest position. 4. Remove mandrel cover from mower deck. 5. Remove rear engine plate from unit. 6. Remove rear belt keeper from - Weed Eater ONE | Owner Manual - Page 21
steering wheel and reassemble per instructions in the "INSTALL STEERING COLUMN"section of this manual. TO REMOVE WHEEL FOR REPAIRS FRONT WHEEL 1. Block up front axle securely. 2. Remove dust cover, retaining ring, and washer to allow wheel removal. 3. Repair tire and reassemble. 4. Replace washer - Weed Eater ONE | Owner Manual - Page 22
, take your riding mower to a qualified service center for repair and/or adjustment. Your carburetor is not adjustable. If your engine does not operate properly due to suspected carburetor problems, take your riding mower to a qualified service center for repair and/or adjustment. IMPORTANT: Never - Weed Eater ONE | Owner Manual - Page 23
. Store in a clean, dry area. 1. Clean entire riding mower (See "CLEANING" in the Maintenance section of this manual). 2. Inspect and replace belt, if necessary (See belt replacement instructions in the Service and Adjustments section of this manual). 3. Lubricate as shown in the Maintenance section - Weed Eater ONE | Owner Manual - Page 24
. 6 Engine valves out of adjustment. 1 Clean/replace air filter. 2 Replace spark plug. 3 Recharge or replace battery. 4 Empty fuel tank and refill tank with fresh, clean gasoline. 5 Check all wiring. 6 Contact a qualified service center. 1 Clutch/brake pedal not depressed. 1 Depress clutch/brake - Weed Eater ONE | Owner Manual - Page 25
battery. 2 Check/clean all connections. 3 Replace alternator. Loss of drive 1 Freewheel control in "DISENGAGED" position. 2 Axle key missing. 1 Place freewheel control in "ENGAGED" position. 2 Install axle key at rear wheel. See "TO REMOVE WHEEL" in the Service and Adjustments section. Engine - Weed Eater ONE | Owner Manual - Page 26
SUGGESTED GUIDE FOR SIGHTING SLOPES FOR SAFE OPERATION TFHIOSL IDSAAL1O5NDGEDGORTETEESDLLIONPEE ONLY RIDE UP AND DOWN HILL, NOT ACROSS acoplamiento son responsabilidad del comprador. Los cargos de transporte por las partes enviadas para reemplazo bajo esta garantía deben ser pagados por el comprador
-
 1
1 -
 2
2 -
 3
3 -
 4
4 -
 5
5 -
 6
6 -
 7
7 -
8
-
9
-
10
-
11
-
12
-
13
-
14
-
15
-
16
-
17
-
18
-
19
-
20
-
21
-
22
-
23
-
24
-
25
-
26
 |
 |

09.08.11 CL
Printed in the U.S.A.
532 44 57-64 Rev. 1
Patents Pending
Gasoline containing up to 10% ethanol (E10) is acceptable for use in this machine.
The use of any gasoline exceeding 10% ethanol (E10) will void the product warranty.
Esta máquina puede utilizar gasolina con un contenido de hasta el 10% de etanol (E10).
El uso de una gasolina que supere el 10% de etanol (E10) anulará la garantía del producto.
Please read the operator's manual carefully and make sure
you understand the instructions before using the machine.
Por favor lea cuidadosamente y comprenda
estas intrucciones antes de usar esta maquina.
Operator’s Manual
Manual de Operario
WE261