Weider 7000 Crosstrainer English Manual - Page 10
through, Bracket
 |
View all Weider 7000 Crosstrainer manuals
Add to My Manuals
Save this manual to your list of manuals |
Page 10 highlights
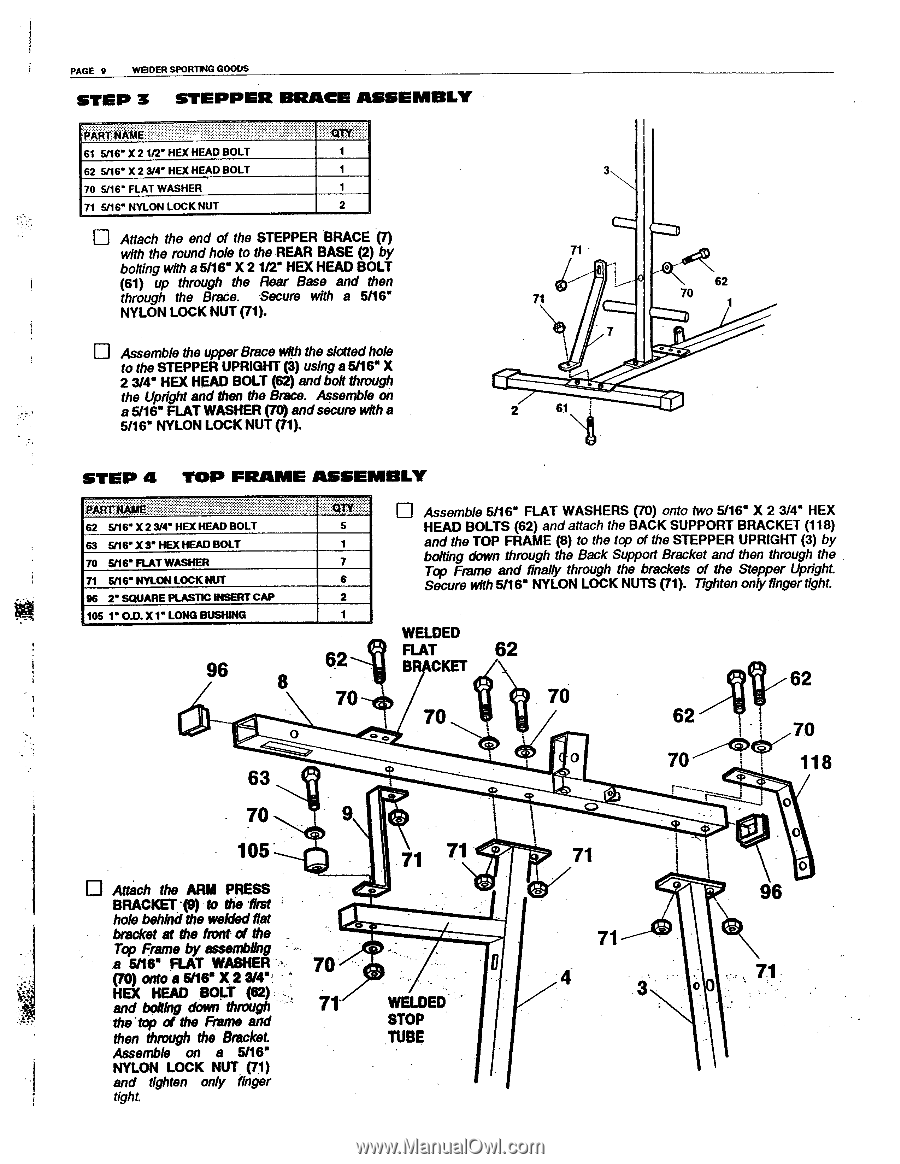
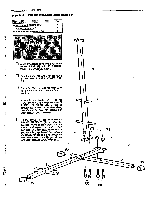
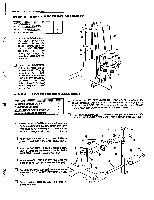
PAGE 9 W9DER SPORTING GOODS STEP 3 STEPPER Aiiiiiiiii : 61 5/16" X 2 1/2" HEX HEAD BOLT 62 5/16" X 2 3/4" HEX HEAD BOLT 70 5/16" FLAT WASHER 71 5/16' NYLON LOCK NUT BRACE ASSEMBLY i:i 1 1 1 _ 2 Attach the end of the STEPPER BRACE (7) with the round hole to the REAR BASE (2) by bolting with a 5/16" X 21/2" HEX HEAD BOLT (61) up through the Rear Base and then through the Brace. Secure with a 5/16" NYLON LOCK NUT (71). Assemble the upper Brace with the slotted hole to the STEPPER UPRIGHT (3) using a 5/16" X 2 3/4" HEX HEAD BOLT (62) andbolt through the Upright and then the Brace. Assemble on a 5/16° FLAT WASHER (70) andsecure with a 5/16" NYLON LOCK NUT (71). 71 71 7 2 61 N 62 70 1 STEP 4 TOP FRAME ASSEMBLY ... . ... .M..E 62 5f16" X 2 3/4" HEX HEAD BOLT S 63 5/16" X 3' HEX HEAD BOLT 1 70 5/16" FLAT WASHER 7 71 5/16' NYLON LOCK NUT 6 96 2" SQUARE PLASTIC INSERT CAP 2 105 1' O.D. X 1" LONG BUSHING 1 96 62 8 70 0 0 63 $ 70 9 O Assemble 5/16" FLAT WASHERS (70) onto two 5/16' X 2 3/4" HEX HEAD BOLTS (62) and attach the BACK SUPPORT BRACKET (118) and the TOP FRAME (8) to the top of the STEPPER UPRIGHT (3) by bolting down through the Back Support Bracket and then through the Top Frame and finalty through the brackets of the Stepper Upright. Secure with 5/16" NYLON LOCK NUTS (71). Tighten only finger tight. WELDED FLAT 62 B• CKET 70 CD 70 0 62 62 70 70 i 118 O 0 105 u Attach the ARM PRESS BRACICET19) to the fist hole behind the welded flat bracket at the front of the _ Top Frame by assembling a 5/16" FLAT WASHER (70) onto a 5/16" X 2 3/411 HEX HEAD BOLT (62) and booking down through the -top of the Frame and then through the Bracket Assemble on a 5/16° NYLON LOCK NUT (71) and tighten only finger tight. 70 71' 71 71 WELDED STOP TUBE 71 Q 0 71 4 3 0 96 6,4r,34, 7.1
-
 1
1 -
2
-
3
-
4
-
 5
5 -
 6
6 -
 7
7 -
 8
8 -
 9
9 -
 10
10 -
 11
11 -
 12
12 -
 13
13 -
 14
14 -
 15
15 -
16
-
17
-
18
-
19
-
20
-
21
-
22
-
23
-
24
-
25
-
26
-
27
-
28
 |
 |