Weider 7000 Crosstrainer English Manual - Page 26
assembling
 |
View all Weider 7000 Crosstrainer manuals
Add to My Manuals
Save this manual to your list of manuals |
Page 26 highlights
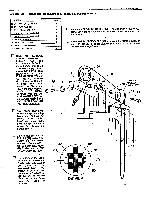
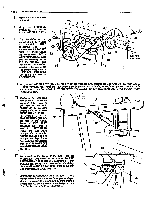
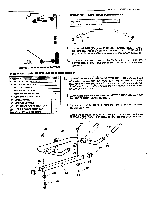
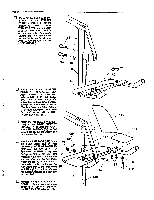
PAGE 25 WEDER SPORTING GOODS u Attach the AB FLEX ARM (45) assembly to the STEPPER FRAME UPRIGHT (3) by first assembling 5/16" FLAT WASHERS (70) onto two 5/16" X 2 3/4' HEX HEAD BOLTS (62) and then bolting through the Upright and then through the welded bracket on the Ab Rex Arm. Secure with 5/16" NYLON LOCK NUTS (71). 62 70 O O O 62 70 3 71 u Fasten the BACK SUPPORT BRACKET (118) to the AB FLEX ARM CONNECTOR TUBE (44) es using a 5/16° X 2' HEX HEAD BOLT (66) to bolt through the bottom hole of the Bracket and then through the center hole in the Ab Flex Ann Connector Tube. Place a 5/16' FLAT WASHER (70) onto the Bolt and secure with a 5/16" NYLON LOCK NUT (71). Attach the AB FLEX BACKREST (116) to the BACK SUPPORT BRACKET (118) using 1/4' X 3/4" MACHINE SCREWS (81) to bolt through the back of the Bracket and then into the Backrest. 81 Attach the ARM PADS (117) to the AB FLEX ARM (45) by first 71 assembling 1/4' FLAT WASHERS (86) • onto two 1/4' X 1 1/4" MACHINE SCREWS (119) and bolting up through the front hole 70 locations of the arms of the Ab Rex Ann and then into the Ann Pads. Attach the rear of the Ann Pads to the welded brackets on the Ab Flex Ann using 1/4" X 3/4" MACHINE 45 SCREWS (81) to bolt up through the welded brackets and then into the Ann Pads 3 Remove the VERTICAL AB FLEX DECAL (126) from the backing and attach to the UPRIGHT (3) below the AB FLEX ARM (45) assembly. O Cs 116 117 118 66 126 86 81 444 119
-
 1
1 -
2
-
3
-
4
-
5
-
6
-
7
-
8
-
9
-
10
-
11
-
12
-
13
-
14
-
15
-
16
-
17
-
18
-
19
-
20
-
 21
21 -
 22
22 -
 23
23 -
 24
24 -
 25
25 -
 26
26 -
 27
27 -
 28
28
 |
 |
