Weider 7000 Crosstrainer English Manual - Page 15
Step 10, Arm Press Assembly
 |
View all Weider 7000 Crosstrainer manuals
Add to My Manuals
Save this manual to your list of manuals |
Page 15 highlights
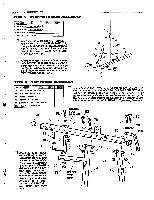
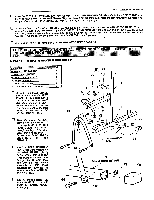
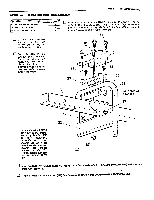
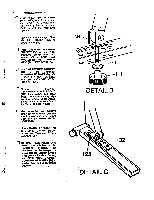
STEP 10 ARM PRESS ASSEMBLY PAGE 14 wEIDER SPORTING GOODS PART NAmE ... -"' tily 81 1/4' X 3/4' MACHINE SCREW 4 87 1/4' NYLON LOCK NUT 4 88 #8 SHEET METAL SCREW 2 Lift the Arm Press unit over the end of the TOP FRAME (8) and align on , the flat weldedbracket. 11 Press the two sections of the ARM PRESS BUSHING (23) onto the top of the ARM PRESS ASSEMBLY (22). These Bushings will not snap tight to the surface so they will have to be held tight as complete assembly is placed on the TOP FRAME (8). 81 81 I Press the ARM PRESS CAP (24) on top of the Arm Press unit aligning bolt holes. CAUTION: Double check the Arm Press Bushing Sections to Insure they are sitting squarely against the bracket. 88 23 8 24 88 22 23 O) 87 WELDED FLAT BRACKET 87 87 0'1 122 Secure the ARM PRESS CAP (24) to the bracket by bolting With four 1/4' X 3/4" MACHINE SCREWS (81) down through the top of the Arm Press Cap and then through the welded bracket on the Top Frame. Secure with 1/4" NYLON LOCK NUTS On. et% O 87 El Insert two #8 SHEET METAL SCREWS (88) Into the holes located on the top of the Ann Press Assembly on both sides of the Arm Press Cap. u Remove POWER STACK DECAL (122) frombackingandadhere it onto the ARM PRESS ASSEMBLY (22).
-
 1
1 -
2
-
3
-
4
-
5
-
6
-
7
-
8
-
9
-
 10
10 -
 11
11 -
 12
12 -
 13
13 -
 14
14 -
 15
15 -
 16
16 -
 17
17 -
 18
18 -
 19
19 -
 20
20 -
21
-
22
-
23
-
24
-
25
-
26
-
27
-
28
 |
 |
