Weider X5 Power Guide English Manual - Page 15
Squat, Upright, Assembly
 |
View all Weider X5 Power Guide manuals
Add to My Manuals
Save this manual to your list of manuals |
Page 15 highlights
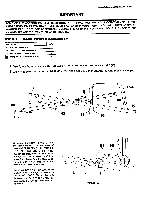
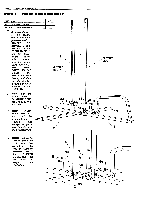
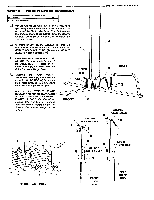
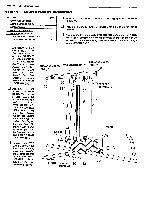
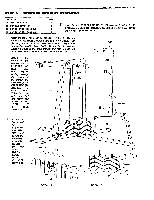
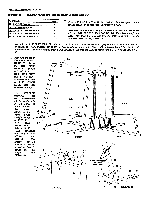
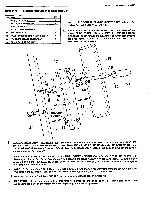
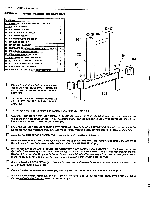
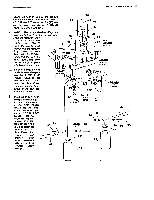
PAGE 13 WEIDER SPORTING GOODS STEP 6 HACK SQUAT UPRIGHT ASSEMBLY PART NAME 50 5/16" FLAT WASHER 51 5116" NYLON LOCK NUT 52 5/16" X 21/2" HEX HEAD BOLT 57 5116" X 31/2" HEX HEAD BOLT 82 1" X 3" PLASTIC INSERT CAP QTY u Press a 1" X 3" PLASTIC INSERT CAP (82) into the top end of the 3 HACK SQUAT UPRIGHT (14). (SEE DETAIL "A") 4 3 u Assemble the BASE PLATES (15) to the sides of the CENTER BASE 1 (1) using 5/16" X 2 1/2" HEX HEAD BOLTS (52) to bolt through one 1 Base Plate, then the Base, and then the other Base Plate. Secure with 5/16" NYLON LOCK NUTS (51). u Assemble a 5/16" FLAT WASHER (50) onto a 5/16" X 3 1/2" HEX HEAD BOLT (57) and attach the HACK SQUAT UPRIGHT (14) to the CENTER BASE (1) by straddling the Upright over the Base and then bolting through the Upright and then the Base. Assemble another 5/16" FLAT WASHER (50) onto the Bolt and fasten with a 5/16" NYLON LOCK NUT (51). Assemble the top of the HACK SQUAT UPRIGHT (14) to the TOP MAIN UPRIGHT (11) with a 5/16" X 2 1/2" HEX HEAD BOLT (52), a 5/16" FLAT WASHER (50), and a 5/16" NYLON LOCK NUT (51) (SEE DETAIL A). 52 I 14 11 0 51 50 The STOPPER BRACKET (39) was pre-assembled into the center hole in the series of three holes on the lower portion of the 50 Hack Squat 50 51 Upright , using a 5/16" X 1 314" HEX 57 HEAD BOLT (59), a 5/16" 52 FLAT WASHER 15 (50), and a 5/16" NYLON LOCK NUT (51). This Bracket can be adjusted to the top or bottom hole to adjust for your 11 height (SEE DETAIL B). 51 50 0 13 O ,4 DETAIL A LEFT 15 51 0 411.j net - 0 FRONT 82 52 THREE ADJUSTMENT HOLES FOR HACK SQUAT 1 14 57 50 52 REAR RIGHT 39 14 50 51 0 15 51 15 DETAIL B
-
 1
1 -
2
-
3
-
4
-
5
-
6
-
7
-
8
-
9
-
 10
10 -
 11
11 -
 12
12 -
 13
13 -
 14
14 -
 15
15 -
 16
16 -
 17
17 -
 18
18 -
 19
19 -
 20
20 -
21
-
22
-
23
-
24
-
25
-
26
-
27
-
28
-
29
-
30
-
31
-
32
-
33
-
34
-
35
-
36
 |
 |
