Weider X5 Power Guide English Manual - Page 18
®/7a70
 |
View all Weider X5 Power Guide manuals
Add to My Manuals
Save this manual to your list of manuals |
Page 18 highlights
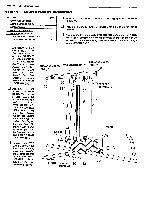
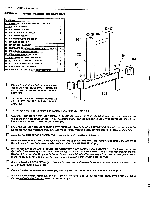
PAGE 16 WEIDER SPORTING GOODS u Secure the ARM PRESS ARMS (25) and (26) onto the Pivot Tubes with two each 1" I.D. SPRING RETAINER RINGS (95) and cap the Tube end with a 1" ROUND PLASTIC COVER CAP (85). 70 / ®/7a70 24 NOTE: The Spring Retainer Rings are made so that the teeth bend to one side. 76 Align the Retainer Rings 23 22 so that the teeth are pointed down. The 1" Cover Cap can be used 88 11 FLAT 23 WELDED PLATE to help drive the Retainer Rings onto the Pivot Tube. Align the Retainer Rings and Cap with the 77 Tube and lightly drive 8 46,70 71 7 71 WELDED the assembly in place PULLEY with the aid ofa hammer. I BRACKET u Squeeze a small amount of liquid dish detergent PULLEY into the 3 3/4" X 8" FOAM ROLLERS (21) and slide the rollers onto the Arm Press Arms and position them about 5" up from the Arm Press Arm end. Insert the 1" X 7" ARM PRESS HANDLES (27) into the bottom section Cr, 95 9 0553 I R2I 5 132 85 WELDED PIVOT TUBE 26 LEFT WELDED PIVOT TUBE of the ARM PRESS ARMS (25). Fit a 5/16" 27 FLAT WASHER (50) and a 1/2" O.D. X 3/8" LONG METAL 51 50 0 SPACER (89) onto a 5/16" X 2 1/4" HEX HEAD BOLT (55) and attach the Handle into the 0 51 89 50 55 c4-0- 0 89 50 55 132 Arm Press Arm. Fasten with 0 another 5/16" FLAT WASHER 132 21 (50) and a' 5/16' NYLON LOCK NUT (51). 27 C=. 21
-
 1
1 -
2
-
3
-
4
-
5
-
6
-
7
-
8
-
9
-
10
-
11
-
12
-
 13
13 -
 14
14 -
 15
15 -
 16
16 -
 17
17 -
 18
18 -
 19
19 -
 20
20 -
 21
21 -
 22
22 -
 23
23 -
24
-
25
-
26
-
27
-
28
-
29
-
30
-
31
-
32
-
33
-
34
-
35
-
36
 |
 |
