Weider X5 Power Guide English Manual - Page 19
Backrest, Assembly, Round, Plastic, Insert
 |
View all Weider X5 Power Guide manuals
Add to My Manuals
Save this manual to your list of manuals |
Page 19 highlights
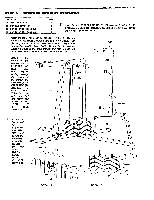
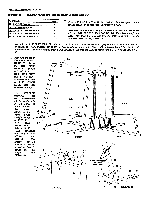
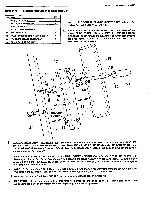
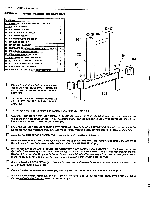
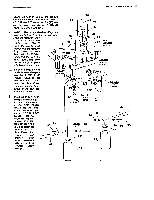
PAGE 17 WEIDER SPORTING GOODS STEP 9 BACKREST, SEAT & LEG CURL ASSEMBLY PART NAME 89 1W FLAT WASHER 70 1/4" NYLON LOCK NUT 71 1/4" X 3/4" ROUND HEAD MACHINE SCREW 72 114" X 21/2" ROUND HEAD MACHINE SCREW 73 114" X r CARRIAGE BOLT 86 11/2" SQUARE PLASTIC INSERT CAP 87 314" ROUND PLASTIC INSERT CAP 94 KNOB PIN QTY 4 2 4 2 2 2 4 1 1E1 Assemble the ARM PRESS BACKREST (29) to the MAIN UPRIGHT (11) by first assembling 1/4" FLAT WASHER (69) onto two 114" X 2 1/2" ROUND HEAD MACHINE SCREWS (72) and then bolting through the back of the Upright and into the Backrest. a Cap the ends of the SEAT FRAME (32) with 1 1/2" SQUARE PLASTIC INSERT CAPS (86). Orient the Seat Frame so that the end of the Frame turns upward. Insert the Seat Frame into the opening in the MAIN UPRIGHT (11) and secure with a KNOB PIN (94). 0 29 72 6 11 34 87 G. 33 87 31 73 4 8 32 71 O 38 70-e 69 34 34 70 87 33 2 87 4 0 69 72 Attach the SEAT MOUNTING PLATES (31) (These are flat brackets 2" X 6" with.. too round holes and a square hole in the center.) to the top ;side of the SEAT FRAME (32) by bolting down through the Seat Mounting Plates and then through the Seat Frame with 1/4" X 2" CARRIAGE BOLTS (73). Assemble 1/4" FLAT WASHER (69) onto the Bolts and secure with 114" NYLON LOCK NUTS (70). DO NOT TIGHTEN AT THIS TIME. Locate the ARM PRESS SEAT (30) over the SEAT MOUNTING PLATES (31) so that the wide end of the Seat is to the front of the unit. Assemble up through the Plates and into the bottom of the Seat with 1/4" X 3/4" ROUND HEAD MACHINE SCREWS (71). Now, tighten the Carriage Bolts holding the Plates. Press a 3/4"-- ROUND PLASTIC INSERT CAP (87) into the ends of a 314" X 15 1/4" LONG PAD BAR (33). IWpe a small amount of liquid dish detergent along the length of the Pad Bar. This will help in the assembly of the Foam Roller. When the detergent dries, it will also act as an adhesive. Insert the Pad Bar into a 3 1/4" X 7" FOAM ROLLER (34). Insert the Pad Bar assembly into the larger access hole at the end of the SEAT FRAME (32) and slide on a second 3 1/4" X 7" FOAM ROLLER (34). Insert a 3/4" ROUND PLASTIC INSERT CAP (87) into each end of a 314" X 15 1/4" PAD BAR (33). Wipe a small amount ofliquid dish detergent along the length of the Pad Bar and push into a 3 1/4" X 7" FOAM ROLLER (34). a Insert the Pad Bar assembly into the larger access hole at the bottom of the LEG EXTENSION (38) and slide on another 3 1/4" X 7" FOAM ROLLER (34).
-
 1
1 -
2
-
3
-
4
-
5
-
6
-
7
-
8
-
9
-
10
-
11
-
12
-
13
-
 14
14 -
 15
15 -
 16
16 -
 17
17 -
 18
18 -
 19
19 -
 20
20 -
 21
21 -
 22
22 -
 23
23 -
 24
24 -
25
-
26
-
27
-
28
-
29
-
30
-
31
-
32
-
33
-
34
-
35
-
36
 |
 |
