Weider X5 Power Guide English Manual - Page 22
STATION, ASSEMBLY, Assemble, PULLEY, assembling
 |
View all Weider X5 Power Guide manuals
Add to My Manuals
Save this manual to your list of manuals |
Page 22 highlights
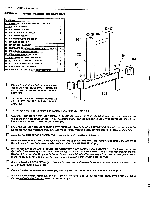
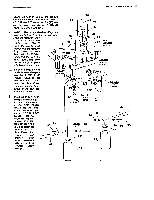
PAGE 20 WEIDER SPORTING GOODS ;STEP II DIP STATION ASSEMBLY 'PART NAME 50 5/16"FLAT WASHER JJ II 51 5/16" NYLON LOCK NUT L52 5/16" X 21/2" HEX HEAD BOLT 60 3/8" FLAT WASHER 61 318" NYLON LOCK NUT 67 3/8" X 21/4" HEX HEAD BOLT 68 5/16" X 2" HEX HEAD BOLT 69 114" FLAT WASHER 72 1/4" X 21/2" ROUND HEAD SCREW 74 1/4" X 2" ROUND HEAD SCREW 86 11/2" SQUARE PLASTIC INSERT CAP 117 112" O.O. X 13/4" LONG METAL BUSHING QTY 4 4 2 2 1 1 2 6 2 4 2 1 D Cap the front ends of the DIP ARMS (48) with 1 1/2" SQUARE PLASTIC INSERT CAPS (86). u Attach the DIP ARMS (48) to the side of the STEPPER UPRIGHT (13) with two 5/16" X 2 1/2" HEX HEAD BOLTS (52) and 5/16" NYLON LOCK NUTS (51). u Bolt the DIP HANDLES (49) into the DIP ARMS (48) with 5/16" X 2" HEX HEAD BOLTS (68). First fit a 5/16" FLAT WASHER (50) over the Bolt and then bolt through the Arm and the Handles. Fasten with a 5/16" FLAT WASHER (50) and a 5/16" NYLON LOCK NUT (51). 48 51 72 OM( Ill 111,11 28 72 69 5 5 68 50 6 86 74 60 69 13 105 i0 61 / -0-49 52 28 115 49 68 50 r,.=› 48 69 51 50 74 116 114 117 67 Attach SMALL ARM PADS (115) to the Dip Arms using 1/4" X 2" ROUND HEAD SCREWS (74) and 1/4" FLAT WASHERS (69). Assemble the DIP STATION BACKREST (116) to the STEPPER UPRIGHT (13) by assembling 1/4" FLAT WASHERS (69) onto two 1/4" X 2 1/2" ROUND HEAD SCREWS (72) and bolting through the back of the Upright and into the back of the Backrest. El Remove the DIP STATION DECAL (105) from the backing sheet and adhere to the STEPPER UPRIGHT (13) directly under the DIP ARMS (48). Assemble the 2 718" PULLEY (114) into the slot in the STEPPER UPRIGHT (13) by first assembling a 318" FLAT WASHER (60) and a 1/2" O.D. X 1 3/4" LONG METAL BUSHING (117) onto a 3/8" X 2 1/4" HEX HEAD BOLT (67) and then bolting through the Upright, then through the Pulley, and then on through the Upright. Assemble another 3/8" FLAT WASHER (60) onto the Bolt and then secure with a 3/8" NYLON LOCK NUT (61).
-
 1
1 -
2
-
3
-
4
-
5
-
6
-
7
-
8
-
9
-
10
-
11
-
12
-
13
-
14
-
15
-
16
-
 17
17 -
 18
18 -
 19
19 -
 20
20 -
 21
21 -
 22
22 -
 23
23 -
 24
24 -
 25
25 -
 26
26 -
 27
27 -
28
-
29
-
30
-
31
-
32
-
33
-
34
-
35
-
36
 |
 |
