Xerox 8200N User Guide - Page 79
Maintenance, gently tugging on it. If it isn°t snapped into place, it may
 |
UPC - 095205082098
View all Xerox 8200N manuals
Add to My Manuals
Save this manual to your list of manuals |
Page 79 highlights
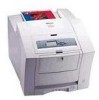
5. Make sure the thin, white dust shield is lying on top of the metal shaft. Then, reinstall the Rapid Release Guide, pressing down on the green tabs to snap the guide into place. 0726-22 Note Verify that the Rapid Release Guide is fully installed by gently tugging on it. If it isn't snapped into place, it may cause jams and print-quality problems. 6. Close the exit cover. Maintenance User Guide 65
-
 1
1 -
2
-
3
-
4
-
5
-
6
-
7
-
8
-
9
-
10
-
11
-
12
-
13
-
14
-
15
-
16
-
17
-
18
-
19
-
20
-
21
-
22
-
23
-
24
-
25
-
26
-
27
-
28
-
29
-
30
-
31
-
32
-
33
-
34
-
35
-
36
-
37
-
38
-
39
-
40
-
41
-
42
-
43
-
44
-
45
-
46
-
47
-
48
-
49
-
50
-
51
-
52
-
53
-
54
-
55
-
56
-
57
-
58
-
59
-
60
-
61
-
62
-
63
-
64
-
65
-
66
-
67
-
68
-
69
-
70
-
71
-
72
-
73
-
 74
74 -
 75
75 -
 76
76 -
 77
77 -
 78
78 -
 79
79 -
 80
80 -
 81
81 -
 82
82 -
 83
83 -
 84
84 -
85
-
86
-
87
-
88
-
89
-
90
-
91
-
92
-
93
-
94
-
95
-
96
-
97
-
98
-
99
-
100
-
101
-
102
-
103
-
104
-
105
-
106
-
107
-
108
-
109
 |
 |

User Guide
65
Maintenance
5.
Make sure the thin, white dust shield is lying on top of the metal
shaft. Then, reinstall the Rapid Release Guide, pressing down on
the green tabs to snap the guide into place.
Note
Verify that the Rapid Release Guide is fully installed by
gently tugging on it. If it isn°t snapped into place, it may
cause jams and print-quality problems.
6.
Close the exit cover.
0726-22