Xerox C2424 User Guide Section 5: Printing - Page 13
Overview of Steps for 2-Sided Printing, Selecting 2-Sided Printing in the Driver, Windows 2000
 |
UPC - 095205676532
View all Xerox C2424 manuals
Add to My Manuals
Save this manual to your list of manuals |
Page 13 highlights
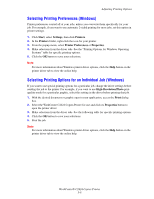
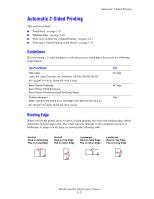
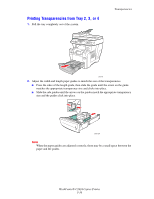
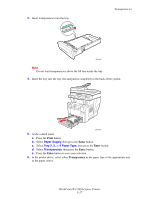
Automatic 2-Sided Printing Overview of Steps for 2-Sided Printing To select automatic 2-sided printing: 1. Insert paper into the tray. For more information, see the Loading Media chapter of this guide, or go to Getting Started/Loading Media on the User Documentation CD-ROM. ■ Tray 1: Insert side one faceup with the bottom of the page against the rollers. ■ Trays 2, 3, or 4: Insert side one facedown with the top of the page toward the back of the tray. 2. In the printer driver, select 2-sided printing. The location of the selections depends on your computer's operating system. 3. Click OK to accept the printer driver settings, then click OK to print. Selecting 2-Sided Printing in the Driver To select automatic 2-sided printing in a supported driver: ■ Windows 98, Windows Me PostScript driver: On the Setup tab under Page Layout, select Print on 2 Sides. If desired, you can also select Bind on Top Edge. ■ Windows 2000, Windows XP, Windows Server 2003 PostScript driver: On the Layout tab under Print on Both Sides (Duplex), select either Flip on Long Edge or Flip on Short Edge depending on the binding edge you want for the output. ■ Windows NT PostScript driver: On the Page Setup tab under Print on Both Sides (Duplex Printing), select either Flip on Long Edge or Flip on Short Edge depending on the binding edge you want for the output. ■ Mac OS 9 driver: In the Print dialog box, select Layout from the drop-down list, select Print on Both Sides, then click the Binding icon that matches the edge to bind. ■ Mac OS X (version 10.1 and higher) driver: In the Print dialog box, select Duplex from the drop-down list, select Print on Both Sides, then click the Binding icon that matches the edge to bind. WorkCentre® C2424 Copier-Printer 5-13
-
 1
1 -
2
-
3
-
4
-
5
-
6
-
7
-
 8
8 -
 9
9 -
 10
10 -
 11
11 -
 12
12 -
 13
13 -
 14
14 -
 15
15 -
 16
16 -
 17
17 -
 18
18 -
19
-
20
-
21
-
22
-
23
-
24
-
25
-
26
-
27
-
28
-
29
-
30
-
31
-
32
-
33
-
34
-
35
-
36
-
37
-
38
-
39
-
40
-
41
-
42
-
43
-
44
-
45
-
46
-
47
-
48
-
49
-
50
-
51
-
52
-
53
-
54
-
55
-
56
-
57
-
58
-
59
-
60
-
61
-
62
-
63
-
64
-
65
 |
 |
