Xerox C2424 User Guide Section 5: Printing - Page 17
Paper Supply, Tray 2
 |
UPC - 095205676532
View all Xerox C2424 manuals
Add to My Manuals
Save this manual to your list of manuals |
Page 17 highlights
3. Insert transparencies into the tray. Transparencies 2424-097 Note Do not load transparencies above the fill line inside the tray. 4. Insert the tray into the tray slot and push it completely to the back of the system. 2424-004 5. At the control panel: a. Press the Print button. b. Select Paper Supply, then press the Enter button. c. Select Tray 2, 3, or 4 Paper Type, then press the Enter button. d. Select Transparency, then press the Enter button. e. Press the Enter button to save your selection. 6. In the printer driver, select either Transparency as the paper type or the appropriate tray as the paper source. WorkCentre® C2424 Copier-Printer 5-17
-
 1
1 -
2
-
3
-
4
-
5
-
6
-
7
-
8
-
9
-
10
-
11
-
 12
12 -
 13
13 -
 14
14 -
 15
15 -
 16
16 -
 17
17 -
 18
18 -
 19
19 -
 20
20 -
 21
21 -
 22
22 -
23
-
24
-
25
-
26
-
27
-
28
-
29
-
30
-
31
-
32
-
33
-
34
-
35
-
36
-
37
-
38
-
39
-
40
-
41
-
42
-
43
-
44
-
45
-
46
-
47
-
48
-
49
-
50
-
51
-
52
-
53
-
54
-
55
-
56
-
57
-
58
-
59
-
60
-
61
-
62
-
63
-
64
-
65
 |
 |

Transparencies
WorkCentre® C2424 Copier-Printer
5-17
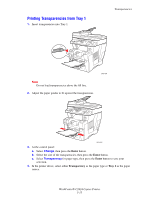
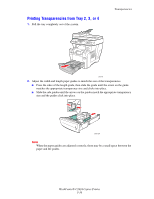
3.
Insert transparencies into the tray.
Note
Do not load transparencies above the fill line inside the tray.
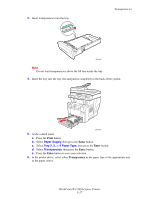
4.
Insert the tray into the tray slot and push it completely to the back of the system.
5.
At the control panel:
a.
Press the
Print
button.
b.
Select
Paper Supply
, then press the
Enter
button.
c.
Select
Tray 2, 3,
or
4 Paper Type
, then press the
Enter
button.
d.
Select
Transparency
, then press the
Enter
button.
e.
Press the
Enter
button to save your selection.
6.
In the printer driver, select either
Transparency
as the paper type or the appropriate tray
as the paper source.
2424-097
2424-004