Xerox M118i Quick Reference Guide - Page 53
Reduce/Enlarge, Lighten/Darken, Presets, Manual Entry
 |
UPC - 095205219265
View all Xerox M118i manuals
Add to My Manuals
Save this manual to your list of manuals |
Page 53 highlights
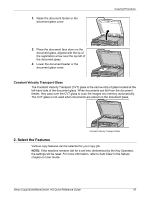
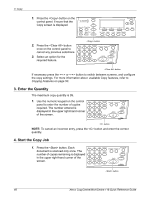
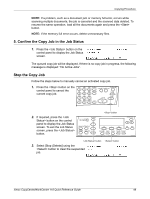
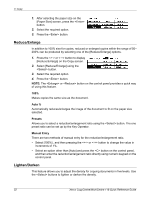
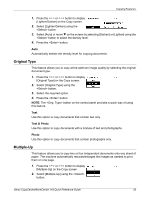
3 Copy 1. After selecting the paper size on the [Paper Size] screen, press the button. 2. Select the required option. 3. Press the button. Reduce/Enlarge In addition to 100% size for copies, reduced or enlarged copies within the range of 50- 200% can be produced by selecting one of the [Reduce/Enlarge] options. 1. Press the or button to display [Reduce/Enlarge] on the Copy screen. 2. Select [Reduce/Enlarge] using the button. 3. Select the required option. 4. Press the button. NOTE: The or button on the control panel provides a quick way of using this feature. 100% Makes copies the same size as the document. Auto % Automatically reduces/enlarges the image of the document to fit on the paper size selected. Presets Allows you to select a reduction/enlargement ratio using the button. The one preset ratio can be set up by the Key Operator. Manual Entry There are two methods of manual entry for the reduction/enlargement ratio. • Select [100%] , and then pressing the or button to change the value in increments of 1%. • Select an option other than [Auto] and press the button on the control panel, and then enter the reduction/enlargement ratio directly using numeric keypad on the control panel. Lighten/Darken This feature allows you to adjust the density for copying documents in five levels. Use the buttons to lighten or darken the density. 52 Xerox CopyCentre/WorkCentre 118 Quick Reference Guide
-
 1
1 -
2
-
3
-
4
-
5
-
6
-
7
-
8
-
9
-
10
-
11
-
12
-
13
-
14
-
15
-
16
-
17
-
18
-
19
-
20
-
21
-
22
-
23
-
24
-
25
-
26
-
27
-
28
-
29
-
30
-
31
-
32
-
33
-
34
-
35
-
36
-
37
-
38
-
39
-
40
-
41
-
42
-
43
-
44
-
45
-
46
-
47
-
 48
48 -
 49
49 -
 50
50 -
 51
51 -
 52
52 -
 53
53 -
 54
54 -
 55
55 -
 56
56 -
 57
57 -
 58
58 -
59
-
60
-
61
-
62
-
63
-
64
-
65
-
66
-
67
-
68
-
69
-
70
-
71
-
72
-
73
-
74
-
75
-
76
-
77
-
78
-
79
-
80
-
81
-
82
-
83
-
84
-
85
-
86
-
87
-
88
-
89
-
90
-
91
-
92
-
93
-
94
-
95
-
96
-
97
-
98
-
99
-
100
-
101
-
102
-
103
-
104
-
105
-
106
-
107
-
108
-
109
-
110
-
111
-
112
-
113
-
114
-
115
 |
 |
