Yamaha AW4416 Owner's Manual - Page 117
Press the REC TRACK SELECT [ST] key., Press the Locate RTZ] key
 |
View all Yamaha AW4416 manuals
Add to My Manuals
Save this manual to your list of manuals |
Page 117 highlights
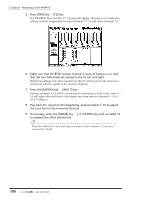
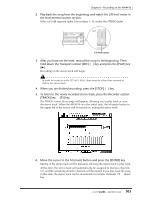
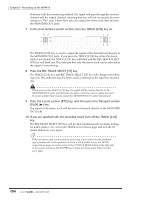
Chapter5-Recording on the AW4416 However with this monitoring method, the signal will pass through the monitor channel and the output channel, meaning that you will not necessarily be monitoring in a "flat" state. Here's how you can output the stereo track directly from the MONITOR OUT jacks. 7. In the level meters/counter section, turn the TRACK [CUE] key on. TRACK REC TRACK SELECT CUE 1 2 3 4 5 6 7 8 ST ALL SAFE 9 10 11 12 13 14 15 16 The TRACK [CUE] key is used to output the signal of the desired track directly to the MONITOR OUT jacks. If you press the TRACK [CUE] key when the stereo track is not muted, the TRACK [CUE] key will blink and the REC TRACK SELECT [ST] key will blink red. This indicates that only the stereo track can be selected as the signal for monitoring. 8. Press the REC TRACK SELECT [ST] key. The TRACK [CUE] key and REC TRACK SELECT [ST] key will change from blinking to lit. This indicates that the stereo track is selected as the signal for monitoring. When you use the TRACK [CUE] key, the signal will be output directly to the MONITOR OUT jacks, and therefore the fader cannot be used to adjust the level. To avoid sudden loud sounds, lower the MONITOR OUT control beforehand. 9. Press the Locate section [RTZ] key, and then press the Transport section [PLAY] (®) key. The signal of the stereo track will be sent in monaural directly to the MONITOR OUT jacks. 10. If you are satisfied with the recorded result, turn off the TRACK [CUE] key. The REC TRACK SELECT [ST] key will go dark simultaneously. To defeat muting for audio tracks 1-16, access the TRACK screen Stereo page and turn the M (mute) button on once again. Tip! Only one stereo track can be used for each song. If you wish to try the mixdown again, perform the Undo operation. If Undo is not possible, access the TRACK screen Stereo page, move the cursor to the ST TRACK ERASE button in the right side of the screen, and press the [ENTER] key to erase the stereo track. Then record it once again. 104 - Operation Guide
-
 1
1 -
2
-
3
-
4
-
5
-
6
-
7
-
8
-
9
-
10
-
11
-
12
-
13
-
14
-
15
-
16
-
17
-
18
-
19
-
20
-
21
-
22
-
23
-
24
-
25
-
26
-
27
-
28
-
29
-
30
-
31
-
32
-
33
-
34
-
35
-
36
-
37
-
38
-
39
-
40
-
41
-
42
-
43
-
44
-
45
-
46
-
47
-
48
-
49
-
50
-
51
-
52
-
53
-
54
-
55
-
56
-
57
-
58
-
59
-
60
-
61
-
62
-
63
-
64
-
65
-
66
-
67
-
68
-
69
-
70
-
71
-
72
-
73
-
74
-
75
-
76
-
77
-
78
-
79
-
80
-
81
-
82
-
83
-
84
-
85
-
86
-
87
-
88
-
89
-
90
-
91
-
92
-
93
-
94
-
95
-
96
-
97
-
98
-
99
-
100
-
101
-
102
-
103
-
104
-
105
-
106
-
107
-
108
-
109
-
110
-
111
-
 112
112 -
 113
113 -
 114
114 -
 115
115 -
 116
116 -
 117
117 -
 118
118 -
 119
119 -
 120
120 -
 121
121 -
 122
122 -
123
-
124
-
125
-
126
-
127
-
128
-
129
-
130
-
131
-
132
-
133
-
134
-
135
-
136
-
137
-
138
-
139
-
140
-
141
-
142
-
143
-
144
-
145
-
146
-
147
-
148
-
149
-
150
-
151
-
152
-
153
-
154
-
155
-
156
-
157
-
158
-
159
-
160
-
161
-
162
-
163
-
164
-
165
-
166
-
167
-
168
-
169
-
170
-
171
-
172
-
173
-
174
-
175
-
176
-
177
-
178
-
179
-
180
-
181
-
182
-
183
-
184
-
185
-
186
-
187
-
188
-
189
-
190
-
191
-
192
-
193
-
194
-
195
-
196
-
197
-
198
-
199
-
200
-
201
-
202
-
203
-
204
-
205
-
206
-
207
-
208
-
209
-
210
-
211
-
212
-
213
-
214
-
215
-
216
-
217
-
218
-
219
-
220
-
221
-
222
-
223
-
224
-
225
-
226
-
227
-
228
-
229
-
230
-
231
-
232
-
233
-
234
-
235
-
236
-
237
-
238
-
239
-
240
-
241
-
242
-
243
-
244
-
245
-
246
-
247
-
248
-
249
-
250
-
251
-
252
-
253
-
254
-
255
-
256
-
257
-
258
-
259
-
260
-
261
-
262
-
263
-
264
-
265
-
266
-
267
-
268
-
269
-
270
-
271
-
272
-
273
-
274
-
275
-
276
-
277
-
278
-
279
 |
 |
