Yamaha AW4416 Owner's Manual - Page 202
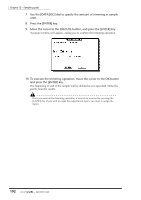
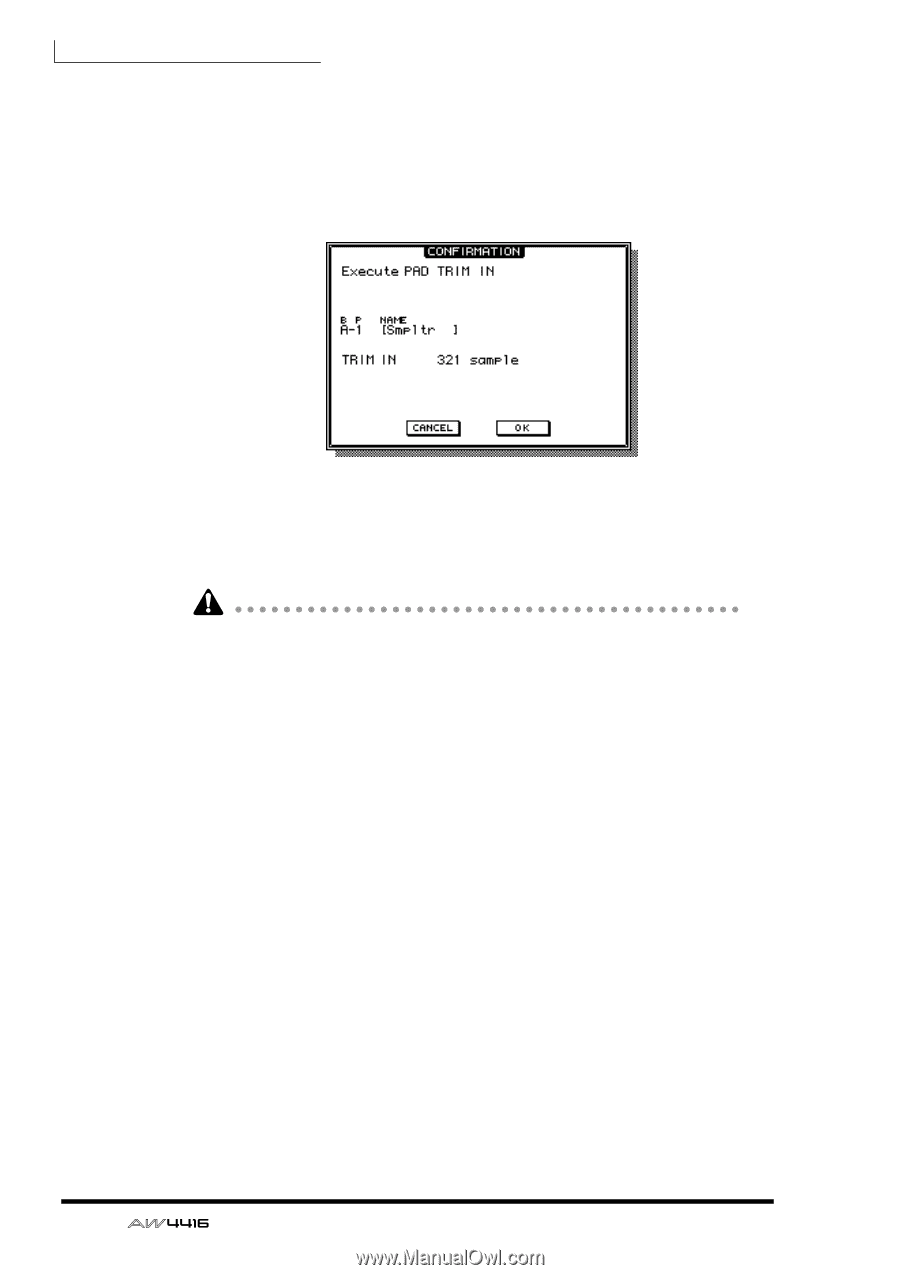
Move the cursor to the EXECUTE button, and press the [ENTER] key., To execute the trimming operation
 |
View all Yamaha AW4416 manuals
Add to My Manuals
Save this manual to your list of manuals |
Page 202 highlights
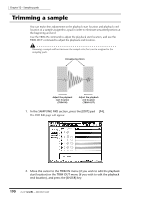
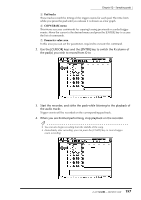
Chapter12-Sampling pads 7. Use the [DATA/JOG] dial to specify the amount of trimming in sample units. 8. Press the [ENTER] key. 9. Move the cursor to the EXECUTE button, and press the [ENTER] key. A popup window will appear, asking you to confirm the trimming operation. 10. To execute the trimming operation, move the cursor to the OK button and press the [ENTER] key. The beginning or end of the sample will be deleted as you specified. Strike the pad to hear the results. Once you execute the trimming operation, it cannot be reversed by pressing the [UNDO] key. If you wish to make fine adjustments again, you must re-assign the region. 192 - Operation Guide
-
 1
1 -
2
-
3
-
4
-
5
-
6
-
7
-
8
-
9
-
10
-
11
-
12
-
13
-
14
-
15
-
16
-
17
-
18
-
19
-
20
-
21
-
22
-
23
-
24
-
25
-
26
-
27
-
28
-
29
-
30
-
31
-
32
-
33
-
34
-
35
-
36
-
37
-
38
-
39
-
40
-
41
-
42
-
43
-
44
-
45
-
46
-
47
-
48
-
49
-
50
-
51
-
52
-
53
-
54
-
55
-
56
-
57
-
58
-
59
-
60
-
61
-
62
-
63
-
64
-
65
-
66
-
67
-
68
-
69
-
70
-
71
-
72
-
73
-
74
-
75
-
76
-
77
-
78
-
79
-
80
-
81
-
82
-
83
-
84
-
85
-
86
-
87
-
88
-
89
-
90
-
91
-
92
-
93
-
94
-
95
-
96
-
97
-
98
-
99
-
100
-
101
-
102
-
103
-
104
-
105
-
106
-
107
-
108
-
109
-
110
-
111
-
112
-
113
-
114
-
115
-
116
-
117
-
118
-
119
-
120
-
121
-
122
-
123
-
124
-
125
-
126
-
127
-
128
-
129
-
130
-
131
-
132
-
133
-
134
-
135
-
136
-
137
-
138
-
139
-
140
-
141
-
142
-
143
-
144
-
145
-
146
-
147
-
148
-
149
-
150
-
151
-
152
-
153
-
154
-
155
-
156
-
157
-
158
-
159
-
160
-
161
-
162
-
163
-
164
-
165
-
166
-
167
-
168
-
169
-
170
-
171
-
172
-
173
-
174
-
175
-
176
-
177
-
178
-
179
-
180
-
181
-
182
-
183
-
184
-
185
-
186
-
187
-
188
-
189
-
190
-
191
-
192
-
193
-
194
-
195
-
196
-
 197
197 -
 198
198 -
 199
199 -
 200
200 -
 201
201 -
 202
202 -
 203
203 -
 204
204 -
 205
205 -
 206
206 -
 207
207 -
208
-
209
-
210
-
211
-
212
-
213
-
214
-
215
-
216
-
217
-
218
-
219
-
220
-
221
-
222
-
223
-
224
-
225
-
226
-
227
-
228
-
229
-
230
-
231
-
232
-
233
-
234
-
235
-
236
-
237
-
238
-
239
-
240
-
241
-
242
-
243
-
244
-
245
-
246
-
247
-
248
-
249
-
250
-
251
-
252
-
253
-
254
-
255
-
256
-
257
-
258
-
259
-
260
-
261
-
262
-
263
-
264
-
265
-
266
-
267
-
268
-
269
-
270
-
271
-
272
-
273
-
274
-
275
-
276
-
277
-
278
-
279
 |
 |
Chapter12
—
Sampling pads
192
— Operation Guide
7.
Use the [DATA/JOG] dial to specify the amount of trimming in sample
units.
8.
Press the [ENTER] key.
9.
Move the cursor to the EXECUTE button, and press the [ENTER] key.
A popup window will appear, asking you to con
fi
rm the trimming operation.
10. To execute the trimming operation, move the cursor to the OK button
and press the [ENTER] key.
The beginning or end of the sample will be deleted as you speci
fi
ed. Strike the
pad to hear the results.
Once you execute the trimming operation, it cannot be reversed by pressing the
[UNDO] key. If you wish to make fine adjustments again, you must re-assign the
region.