Yamaha CLP-150 Owner's Manual - Page 42
TRACK 2] button.
 |
View all Yamaha CLP-150 manuals
Add to My Manuals
Save this manual to your list of manuals |
Page 42 highlights
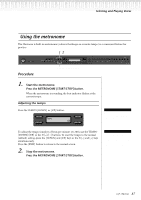
Recording Your Performance Ending methods: Replace - The data after the point you stop recording will also be erased. Punch Out - The data after the point you stop recording will remain. 3-2 Keep holding down the [REC] button and press the [TRACK 1] button. The [TRACK 1] indicator flashes in red. (To stop recording, press the [REC] button again or press the [TOP] button.) Follow the procedure beginning with Step 4 on page 39. TIP If you cancel recording by pressing the [REC] button, recording stops when you press the button. If you cancel recording by pressing the [TOP] button, the Clavinova locates the top of the song. Recording to [TRACK2] This section explains how to record another part on the second track. 2 1 MIN MAX MASTER VOLUME SONG KEYBOARD SONG BALANCE DEMO TRACK TRACK EXTRA METRONOME 1 2 TRACKS FILE START/STOP SETTING A SONG SELECT TOP START/STOP REC SONG SETTING DOWN UP NEW SONG SYNCHRO START SONG TEMPO C B CONTRAST GRAND PIANO 1 GRAND PIANO 2 E.PIANO E.PIANO 1 2 HARPSI- E.CLAVICHORD CHORD VIBRAPHONE VOICE GUITAR SETTING SPLIT AFC REVERB CHORUS ON/OFF MIDI SETTING EXIT CHURCH JAZZ SYNTH. WOOD ORGAN ORGAN STRINGS CHOIR PAD BASS E.BASS XG VARIATION BRILLIANCE MELLOW BRIGHT AFC SETTING OTHER SETTING D VOICE EFFECT Procedure 1. Select a voice. Select a voice (or voices) for recording. Repeat Step 2 on page 39. 2. Enter record mode and select a recording track. Press and hold down the [REC] button and press the [TRACK 2] button. The [TRACK 2] indicator flashes in red. (To cancel recording, press the [REC] or [TOP] button.) TIP Pressing the [TRACK 1] button repeatedly toggles between playback on (the indicator lights up in green) and off (the indicator turns off). Make the recording by following the procedure beginning with Step 4 on page 39. You can record a new part while listening to playback of the recorded [TRACK 1] data. 42 CLP-170/150
-
 1
1 -
2
-
3
-
4
-
5
-
6
-
7
-
8
-
9
-
10
-
11
-
12
-
13
-
14
-
15
-
16
-
17
-
18
-
19
-
20
-
21
-
22
-
23
-
24
-
25
-
26
-
27
-
28
-
29
-
30
-
31
-
32
-
33
-
34
-
35
-
36
-
 37
37 -
 38
38 -
 39
39 -
 40
40 -
 41
41 -
 42
42 -
 43
43 -
 44
44 -
 45
45 -
 46
46 -
 47
47 -
48
-
49
-
50
-
51
-
52
-
53
-
54
-
55
-
56
-
57
-
58
-
59
-
60
-
61
-
62
-
63
-
64
-
65
-
66
-
67
-
68
-
69
-
70
-
71
-
72
-
73
-
74
-
75
-
76
-
77
-
78
-
79
-
80
-
81
-
82
-
83
-
84
-
85
-
86
-
87
-
88
-
89
-
90
-
91
-
92
-
93
-
94
-
95
-
96
-
97
-
98
-
99
-
100
-
101
-
102
-
103
-
104
-
105
-
106
-
107
-
108
-
109
-
110
-
111
-
112
-
113
-
114
-
115
-
116
-
117
-
118
-
119
-
120
-
121
-
122
-
123
-
124
 |
 |
