Yamaha CLP-150 Owner's Manual - Page 50
Deletes a song from the Clavinova's save memory or
 |
View all Yamaha CLP-150 manuals
Add to My Manuals
Save this manual to your list of manuals |
Page 50 highlights
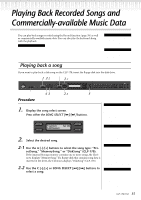
Saving Recorded Songs and Handling the Files...[FILE] Deletes a song from the Clavinova's save memory or (CLP-170 only) from a floppy disk...[DeleteSong] This deletes a song from memory or (CLP-170 only) from disk. It is not possible to delete a preset song or the current song. A B NO YES C D Procedure TIP To delete a Current song, select "ALL" for the ChannelClear parameter in the "SONG SETTING" menu (page 74). Alternatively, press the SONG SELECT [ ]/[ ] buttons simultaneously to display "Song Changed Save?". This means "A song has been edited. Do you wish to save the change?" Press the B [- (NO)] button. The Current song is deleted and a blank "NewSong" is selected. See page 47 for basic operation information. The following is a detailed procedure of Step 4. 4-1 Select a song to delete. Use the C [-]/[+] buttons to select a song. 4-2 Execute the operation. Press the B [+ (YES)] button located next to "Execute?→." Follow the instructions on screen. → TIP If you select a Memory song or Disk song, deleting the song does not erase song data from Current memory. However, if you return to the song select screen, song information other than the song name is replaced by TIP After you delete a song, the Clavinova automatically updates the song numbers. TIP When you delete a folder from disk, all files within that folder will be deleted. (CLP-170) TIP If a folder is displayed for a disk song (CLP-170), the [ / ] indicator is displayed in the lower right of the screen. In this case, you can use the D [+] key to open the folder. Press the D [-] key to return to the previous (upper) level. CAUTION Never turn off the power or remove the floppy disk while [Executing] is displayed. → 50 CLP-170/150
-
 1
1 -
2
-
3
-
4
-
5
-
6
-
7
-
8
-
9
-
10
-
11
-
12
-
13
-
14
-
15
-
16
-
17
-
18
-
19
-
20
-
21
-
22
-
23
-
24
-
25
-
26
-
27
-
28
-
29
-
30
-
31
-
32
-
33
-
34
-
35
-
36
-
37
-
38
-
39
-
40
-
41
-
42
-
43
-
44
-
 45
45 -
 46
46 -
 47
47 -
 48
48 -
 49
49 -
 50
50 -
 51
51 -
 52
52 -
 53
53 -
 54
54 -
 55
55 -
56
-
57
-
58
-
59
-
60
-
61
-
62
-
63
-
64
-
65
-
66
-
67
-
68
-
69
-
70
-
71
-
72
-
73
-
74
-
75
-
76
-
77
-
78
-
79
-
80
-
81
-
82
-
83
-
84
-
85
-
86
-
87
-
88
-
89
-
90
-
91
-
92
-
93
-
94
-
95
-
96
-
97
-
98
-
99
-
100
-
101
-
102
-
103
-
104
-
105
-
106
-
107
-
108
-
109
-
110
-
111
-
112
-
113
-
114
-
115
-
116
-
117
-
118
-
119
-
120
-
121
-
122
-
123
-
124
 |
 |
