Yamaha CVP-69 Owner's Manual - Page 139
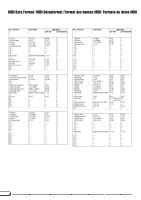
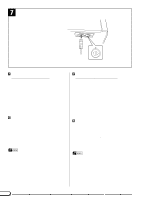
CVP-79A: Assembly, CVP-79A: Zusammenbau
 |
View all Yamaha CVP-69 manuals
Add to My Manuals
Save this manual to your list of manuals |
Page 139 highlights
1 5 x 20 mm screws x 28 Schrauben (5 x 20 mm) x 28 Vis de 5 x 20 mm x 28 Tornillos de 5 x 20 mm x 28 q AC power cord q Netzkabel q Cordon d'alimentation q Cable de alimentación de CA CVP-79A: Assembly CVP-79A: Zusammenbau • We do not recommend attempting to assemble the Clavinova alone. The job can be easily accomplished, however, with only two people. • Use only the screws provided or replacements of exactly the specified size. Using screws of the wrong size can result in damage to the instrument. ZOpen the box and remove all the parts. On opening the box you should find the parts shown in the illustration above. Check to make sure that all the required parts are provided. XCarefully lean the main unit against a wall. To make it easier to install the legs, place a soft blanket or similar material on the floor near a wall, close the Clavinova keyboard cover, place the front panel of the Clavinova (the side with the keyboard) on the blanket and gently lean the unit against the wall - MAKING SURE THAT IT CAN NOT FALL - as shown in the illustration. CAttach the front legs. Securely attach the two front legs using three screws for each leg (use a Philips "+" screwdriver) as shown in the illustration. Make sure that the screws are firmly tightened. • Wir raten Ihnen davon ab, das Clavinova alleine zusammenzubauen und aufzustellen. Zwei Personen können diese Arbeit jedoch problemlos ausführen. • Verwenden Sie ausschließlich die mitgeliefenten Schrauben oder Ersatzschrauben identischer Größe. Die Verwendung von Schrauben mit abweichenden Maßen kann eine Beschädigung des Instruments zur Folge haben. ZDen Versandkarton öffnen und alle Teile auspacken. Der Karton sollte alle in der Abbildung gezeigten Teile enthalten. Vergewissern Sie sich, daß alle Teile vollzählig vorhanden sind. XDie Haupteineit vorsichtig an eine Wand lehnen. Um das Anschrauben der Beine zu erleichtern, breiten Sie eine Decke oder ein weiches Tuch neben der Wand auf dem Boden aus, schließen den Tastaturdeckel des Clavinova, stellen das Instrument mit der Vorderkante (Seite mit der Tastatur) vorsichtig auf die Decke und lehnen es an die Wand, wie in der Abbildung gezeigt. VERGEWISSERN SIE SICH, DASS DAS INSTRUMENT NICHT KIPPEN ODER WEGRUTSCHEN KANN! CDie vorderen Beine montieren. Schrauben Sie die beiden vorderen Beine mit jeweils drei Schrauben (Kreuzschlitzschraubendreher verwenden!) gut am Clavinova fest, wie in der Abbildung gezeigt. Ziehen Sie die Schrauben fest an. 136
-
 1
1 -
2
-
3
-
4
-
5
-
6
-
7
-
8
-
9
-
10
-
11
-
12
-
13
-
14
-
15
-
16
-
17
-
18
-
19
-
20
-
21
-
22
-
23
-
24
-
25
-
26
-
27
-
28
-
29
-
30
-
31
-
32
-
33
-
34
-
35
-
36
-
37
-
38
-
39
-
40
-
41
-
42
-
43
-
44
-
45
-
46
-
47
-
48
-
49
-
50
-
51
-
52
-
53
-
54
-
55
-
56
-
57
-
58
-
59
-
60
-
61
-
62
-
63
-
64
-
65
-
66
-
67
-
68
-
69
-
70
-
71
-
72
-
73
-
74
-
75
-
76
-
77
-
78
-
79
-
80
-
81
-
82
-
83
-
84
-
85
-
86
-
87
-
88
-
89
-
90
-
91
-
92
-
93
-
94
-
95
-
96
-
97
-
98
-
99
-
100
-
101
-
102
-
103
-
104
-
105
-
106
-
107
-
108
-
109
-
110
-
111
-
112
-
113
-
114
-
115
-
116
-
117
-
118
-
119
-
120
-
121
-
122
-
123
-
124
-
125
-
126
-
127
-
128
-
129
-
130
-
131
-
132
-
133
-
 134
134 -
 135
135 -
 136
136 -
 137
137 -
 138
138 -
 139
139 -
 140
140 -
 141
141 -
 142
142 -
 143
143 -
 144
144 -
145
-
146
-
147
-
148
-
149
-
150
-
151
-
152
-
153
-
154
-
155
-
156
-
157
-
158
-
159
-
160
-
161
-
162
-
163
 |
 |
