Yamaha CVP-69 Owner's Manual - Page 78
Multi-track Recording & Playback
 |
View all Yamaha CVP-69 manuals
Add to My Manuals
Save this manual to your list of manuals |
Page 78 highlights
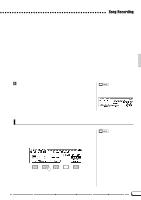
Song Recording Multi-track Recording & Playback ZInsert a Formatted Disk, Engage the Record Mode & Select a Song ...The first three steps in the multi-track recording process are exactly the same as those for quick recording: insert a formatted disk, press the [RECORD] button to engage the record mode, and select a song number - see steps 1, 2, and 3, above. XSelect the TRACK RECORD Page Use the PAGE buttons to select the TRACK RECORD page (RECORD display page 2). The status of each track is shown above the TRACK LCD buttons. Tracks which are enabled for playback are indicated by a box surrounding the track number, and tracks which are record-enabled are indicated by a filled box and inverse number. Tracks which do not contain data appear as dots. CSet The Track Modes as Required Use the TRACK < and > buttons to select a track (an underline cursor appears under the selected track). The data dial and [+]/[-] buttons can also be used to select tracks. Use the REC/PLAY/OFF LCD button to record-enable, play-enable, or turn off (mute) the selected track. Only tracks which contain data can be play-enabled. The track number box disappears when the track is muted. 75
-
 1
1 -
2
-
3
-
4
-
5
-
6
-
7
-
8
-
9
-
10
-
11
-
12
-
13
-
14
-
15
-
16
-
17
-
18
-
19
-
20
-
21
-
22
-
23
-
24
-
25
-
26
-
27
-
28
-
29
-
30
-
31
-
32
-
33
-
34
-
35
-
36
-
37
-
38
-
39
-
40
-
41
-
42
-
43
-
44
-
45
-
46
-
47
-
48
-
49
-
50
-
51
-
52
-
53
-
54
-
55
-
56
-
57
-
58
-
59
-
60
-
61
-
62
-
63
-
64
-
65
-
66
-
67
-
68
-
69
-
70
-
71
-
72
-
 73
73 -
 74
74 -
 75
75 -
 76
76 -
 77
77 -
 78
78 -
 79
79 -
 80
80 -
 81
81 -
 82
82 -
 83
83 -
84
-
85
-
86
-
87
-
88
-
89
-
90
-
91
-
92
-
93
-
94
-
95
-
96
-
97
-
98
-
99
-
100
-
101
-
102
-
103
-
104
-
105
-
106
-
107
-
108
-
109
-
110
-
111
-
112
-
113
-
114
-
115
-
116
-
117
-
118
-
119
-
120
-
121
-
122
-
123
-
124
-
125
-
126
-
127
-
128
-
129
-
130
-
131
-
132
-
133
-
134
-
135
-
136
-
137
-
138
-
139
-
140
-
141
-
142
-
143
-
144
-
145
-
146
-
147
-
148
-
149
-
150
-
151
-
152
-
153
-
154
-
155
-
156
-
157
-
158
-
159
-
160
-
161
-
162
-
163
 |
 |
