Yamaha DTX402K DTX402K/DTX432K/DTX452K Owners Manual - Page 14
Assembly Guide
 |
View all Yamaha DTX402K manuals
Add to My Manuals
Save this manual to your list of manuals |
Page 14 highlights
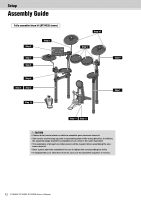
Setup Assembly Guide Fully assembled drum kit (DTX452K shown) Step 8 Step 7 Step 6 Step 4 Step 2 Step 3 Step 9 Step 12 Step 10 Step 5 Step 9 Step 1 Step 11 Step 12 CAUTION • Choose a flat, hard surface on which to assemble your electronic drum kit. • Take care to avoid mixing up parts or assembling them in the wrong direction. In addition, the assembly steps should be completed one at a time in the order described. • The assistance of at least one other person will be required when assembling the elec- tronic drum kit. • Once a piece has been assembled, be sure to tighten the corresponding key bolts. • To disassemble your electronic drum kit, carry out the assembly sequence in reverse. 12 DTX402K DTX432K DTX452K Owner's Manual
-
 1
1 -
2
-
3
-
4
-
5
-
6
-
7
-
8
-
 9
9 -
 10
10 -
 11
11 -
 12
12 -
 13
13 -
 14
14 -
 15
15 -
 16
16 -
 17
17 -
 18
18 -
 19
19 -
20
-
21
-
22
-
23
-
24
-
25
-
26
-
27
-
28
-
29
-
30
-
31
-
32
-
33
-
34
-
35
-
36
-
37
-
38
-
39
-
40
-
41
-
42
-
43
-
44
-
45
-
46
-
47
-
48
-
49
-
50
-
51
-
52
-
53
-
54
-
55
-
56
-
57
-
58
-
59
-
60
-
61
-
62
-
63
-
64
-
65
-
66
-
67
-
68
-
69
-
70
-
71
-
72
 |
 |
Setup
12
DTX402K DTX432K DTX452K Owner’s Manual
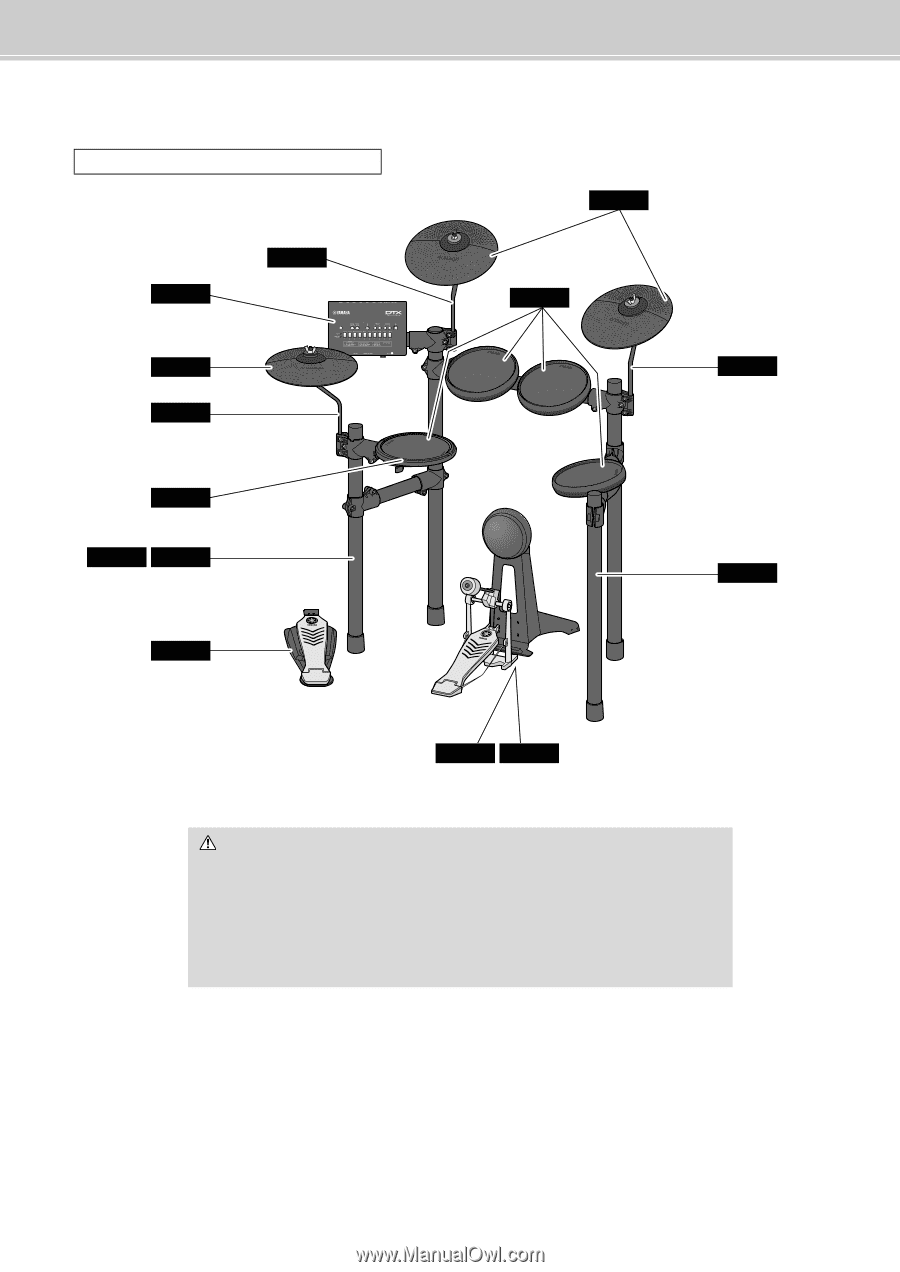
Assembly Guide
Fully assembled drum kit (DTX452K shown)
CAUTION
• Choose a flat, hard surface on which to assemble your electronic drum kit.
• Take care to avoid mixing up parts or assembling them in the wrong direction. In addition,
the assembly steps should be completed one at a time in the order described.
• The assistance of at least one other person will be required when assembling the elec-
tronic drum kit.
• Once a piece has been assembled, be sure to tighten the corresponding key bolts.
• To disassemble your electronic drum kit, carry out the assembly sequence in reverse.
Step 8
Step 7
Step 6
Step 4
Step 3
Step 2
Step 12
Step 9
Step 10
Step 5
Step 9
Step 1
Step 12
Step 11