Yamaha DTX402K DTX402K/DTX432K/DTX452K Owners Manual - Page 59
Integrating Separately Sold Accessories, For DTX402K Owners, For DTX432K & DTX452K Owners
 |
View all Yamaha DTX402K manuals
Add to My Manuals
Save this manual to your list of manuals |
Page 59 highlights
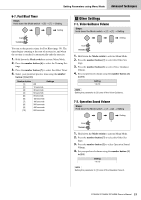
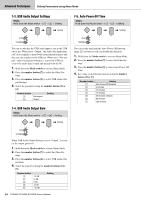
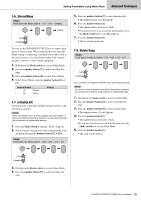
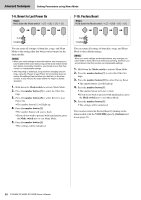
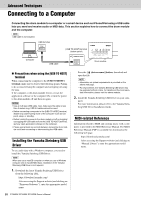
Advanced Techniques Integrating Separately Sold Accessories As described below, you can add various accessories* to your electronic drum kit for an even more enjoyable drumming experience. (*: Sold separately) Please note that these optional external pads were up-to-date as of printing of this manual. Details regarding any subsequently released models will be made available via the following web site. https://www.yamaha.com/dtx/ For DTX402K Owners By upgrading the KU100 Kick Unit and/or the hi-hat controller included as part of the DTX402K, you can make your electronic drum kit feel much closer to the real thing. When you upgrade your KU100 to a KP65, you will need a foot pedal to play the new kick pad. When using a KP65, you can add pads such as a PCY95AT Cymbal Pad. (For details, refer to "Adding a PCY95AT Cymbal Pad" under "For DTX432K & DTX452K Owners.") Replacing the KU100 Kick Unit with a KP65 Kick Pad 1. Assemble the KP65 Kick Pad. For details, see Step 11 on page 18. 2. Turn off the drum module. The KP65 Kick Pad must be connected with the drum module turned off. 3. Disconnect the cable from the KU100 and plug it into the [OUT > DTX] jack on the back on the KP65. Replacing the bundled hi-hat controller with an HH65 Hi-hat Controller 1. Turn off the drum module. The HH65 Hi-hat Controller must be connected with the drum module turned off. 2. Disconnect the cable from the bundled hi-hat controller and plug it into the [OUTPUT] jack on the HH65. 3. Turn on the drum module. 4. Set the hi-hat controller type to "HH65". For more details, see the description of the Pedal Types parameter from Menu Mode (page 50). 5. Play the HH65 Hi-hat Controller. For DTX432K & DTX452K Owners Adding a PCY95AT Cymbal Pad 1. Turn off the drum module. The PCY95AT Cymbal Pad must be connected with the drum module turned off. 2. Using the cable that came with the cymbal pad, connect it to the [PAD > IN] jack on the KP65 Kick Pad. 4. Turn on the drum module. 5. Set the kick type to "KP65". For more details, see the description of the Pedal Types parameter from Menu Mode (page 50). 6. Play the KP65 Kick Pad. 3. Turn on the drum module. 4. Play the newly added cymbal pad. DTX402K DTX432K DTX452K Owner's Manual 57
-
 1
1 -
2
-
3
-
4
-
5
-
6
-
7
-
8
-
9
-
10
-
11
-
12
-
13
-
14
-
15
-
16
-
17
-
18
-
19
-
20
-
21
-
22
-
23
-
24
-
25
-
26
-
27
-
28
-
29
-
30
-
31
-
32
-
33
-
34
-
35
-
36
-
37
-
38
-
39
-
40
-
41
-
42
-
43
-
44
-
45
-
46
-
47
-
48
-
49
-
50
-
51
-
52
-
53
-
 54
54 -
 55
55 -
 56
56 -
 57
57 -
 58
58 -
 59
59 -
 60
60 -
 61
61 -
 62
62 -
 63
63 -
 64
64 -
65
-
66
-
67
-
68
-
69
-
70
-
71
-
72
 |
 |