Yamaha DTX402K DTX402K/DTX432K/DTX452K Owners Manual - Page 26
Bottom Panel, Top Panel, USB TO HOST] terminal
 |
View all Yamaha DTX402K manuals
Add to My Manuals
Save this manual to your list of manuals |
Page 26 highlights
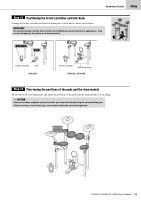
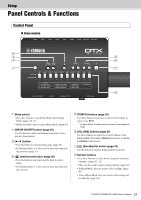
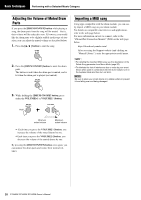
Setup Panel Controls & Functions Bottom Panel . ⁄0 ⁄1 ⁄2 ⁄3 . [USB TO HOST] terminal (page 58) Connect a computer or smart device such as an iPhone or iPad to send and receive digital signals (audio and MIDI). Additional parts are required for connecting an iPhone or iPad. For more information, refer to "iPhone/iPad Connection Manual" (PDF). ⁄0 [AUX IN] jack (page 21) The Auxiliary Input stereo mini-jack is used to input audio from an external source. For example, you can use this jack to connect a portable music player or another similar device and play along with your favorite tunes. ⁄1 [PHONES/OUTPUT] jack (page 21) Use this standard stereo-audio jack to connect headphones, an amplifier, a mixer, or other similar equipment. ⁄2 Cord clip (page 21) Wrap the AC adaptor cord around this clip to prevent accidental unplugging during use. ⁄3 [ ] connector (page 21) Use this connector for the AC adaptor that came with your drum module. Top Panel ⁄4 ⁄5 ⁄6 ⁄4 Trigger input jacks (page 20) Use these jacks to connect the snare, tom, and cymbal pads. ⁄5 [HI-HAT CTL] jack (page 20) The Hi-hat Control jack is used to connect a hi-hat controller. ⁄6 [KICK/PAD] jack (page 20) Use this jack to connect a kick pad or pedal. By connecting a KP65, you can add another pad using the PAD > IN jack on the KP65 (page 57). 24 DTX402K DTX432K DTX452K Owner's Manual
-
 1
1 -
2
-
3
-
4
-
5
-
6
-
7
-
8
-
9
-
10
-
11
-
12
-
13
-
14
-
15
-
16
-
17
-
18
-
19
-
20
-
 21
21 -
 22
22 -
 23
23 -
 24
24 -
 25
25 -
 26
26 -
 27
27 -
 28
28 -
 29
29 -
 30
30 -
 31
31 -
32
-
33
-
34
-
35
-
36
-
37
-
38
-
39
-
40
-
41
-
42
-
43
-
44
-
45
-
46
-
47
-
48
-
49
-
50
-
51
-
52
-
53
-
54
-
55
-
56
-
57
-
58
-
59
-
60
-
61
-
62
-
63
-
64
-
65
-
66
-
67
-
68
-
69
-
70
-
71
-
72
 |
 |
