Yamaha HTR 5860 MCXSP10 Manual
Yamaha HTR 5860 - XM-Ready A/V Surround Receiver Manual
 |
UPC - 027108922096
View all Yamaha HTR 5860 manuals
Add to My Manuals
Save this manual to your list of manuals |
Yamaha HTR 5860 manual content summary:
- Yamaha HTR 5860 | MCXSP10 Manual - Page 1
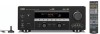
U HTR-5860 AV Receiver OWNER'S MANUAL - Yamaha HTR 5860 | MCXSP10 Manual - Page 2
INSTRUCTIONS IMPORTANT SAFETY INSTRUCTIONS CAUTION RISK OF ELECTRIC SHOCK DO NOT OPEN CAUTION: TO REDUCE THE RISK OF ELECTRIC SHOCK, DO NOT REMOVE COVER (OR BACK). NO USER-SERVICEABLE PARTS INSIDE. REFER SERVICING TO QUALIFIED SERVICE pool; and the like. 8 Accessories - Do not place this product - Yamaha HTR 5860 | MCXSP10 Manual - Page 3
SERVICE GROUNDING ELECTRODE SYSTEM (NEC ART 250. PART H) FCC INFORMATION (for US customers) 1 IMPORTANT NOTICE: DO NOT MODIFY THIS UNIT! This product, when installed as indicated in the instructions contained in this manual, meets FCC requirements. Modifications not expressly approved by Yamaha - Yamaha HTR 5860 | MCXSP10 Manual - Page 4
back user YAMAHA service personnel when any service TROUBLESHOOTING" section on common operating errors before concluding that this unit is faulty. 17 Before moving this unit, press STANDBY/ON to set turned Owner's Manual in a safe place for future reference. We Want You Listening For A Lifetime YAMAHA - Yamaha HTR 5860 | MCXSP10 Manual - Page 5
Speaker impedance setting 22 Turning on the power 23 AUTO SETUP 24 Introduction 24 Optimizer microphone setup 24 Starting the setup 25 BASIC OPERATION PLAYBACK 30 Basic operations 30 Selecting sound field programs 32 Selecting input modes 36 FM/AM TUNING 38 Automatic and manual tuning 38 - Yamaha HTR 5860 | MCXSP10 Manual - Page 6
accessory", sold separately) Other features ◆ YPAO: YAMAHA Parametric Room Acoustic Optimizer for automatic speaker setup ◆ 192-kHz/24-bit D/A converter ◆ A SET MENU that provides you with items for optimizing this unit for your audio/video system ◆ 8 additional input jacks for discrete multi - Yamaha HTR 5860 | MCXSP10 Manual - Page 7
INTRODUCTION GETTING STARTED Supplied accessories Please check that you received all of the following parts. Remote control CODE SET TRANSMIT POWER TV POWER AV STANDBY CD MD/CD-R TUNER SYSTEM POWER SLEEP DVD DTV/CBL V-AUX MULTI CH IN VCR 1 DVR/VCR2 AMP Batteries (4) (AAA, R03, UM-4) - Yamaha HTR 5860 | MCXSP10 Manual - Page 8
/TUNING/CH LEVEL + STRAIGHT PROGRAM TONE CONTROL INPUT MODE EFFECT MEMORY MAN'L/AUTO FM TUNING MODE DISPLAY AUTO/MAN'L MONO INPUT MULTI CH INPUT VIDEO AUX S VIDEO VIDEO L AUDIO R OPTICAL BCD E F GH I J K 1 STANDBY/ON Turns on this unit or sets it to the standby mode. When you - Yamaha HTR 5860 | MCXSP10 Manual - Page 9
balance (in conjunction with TONE CONTROL). G TONE CONTROL Use to adjust the bass/treble balance for the front left and right, center, presence and subwoofer channels (see pages 31). H INPUT MODE Sets the priority (AUTO, DTS, ANALOG) for the type of signals received when one component is connected - Yamaha HTR 5860 | MCXSP10 Manual - Page 10
function of each control on the remote control used to control this unit. To operate other components, see "REMOTE CONTROL FEATURES" on page 74. 1 2 3 CODE SET TRANSMIT POWER TV POWER AV STANDBY CD MD/CD-R TUNER SYSTEM POWER SLEEP DVD DTV/CBL V-AUX MULTI CH IN VCR 1 DVR/VCR2 AMP TV VOL - Yamaha HTR 5860 | MCXSP10 Manual - Page 11
or multi-channel) are output directly from their respective speakers without effect processing. I SET MENU, SRCH MODE* Activates the SET MENU function. * Available only when the unit is in the XM Satellite Radio mode (see page 45). CONTROLS AND FUNCTIONS Using the remote control The remote control - Yamaha HTR 5860 | MCXSP10 Manual - Page 12
position Right surround DSP sound field Surround back DSP sound field 6 CINEMA DSP indicator Lights up when you select a CINEMA DSP sound field program. 7 YPAO indicator Lights up during the auto setup procedure and when the auto setup speaker settings are used without any modifications. 8 AUTO - Yamaha HTR 5860 | MCXSP10 Manual - Page 13
Lights up when a DTS 96/24 signal is input to this unit. M LFE indicator Lights up when the input signal contains the LFE signal. N Input channel indicators Indicate the channel components of the current digital input signal. CONTROLS AND FUNCTIONS 9 - Yamaha HTR 5860 | MCXSP10 Manual - Page 14
CD-R OUT (REC) DTV/ CBL IN DVD FRONT VCR 1 OUT SUB SURROUND FRONT SURROUND WOOFER BACK PRESENCE SPEAKERS DTV/CBL SURROUND SURROUND CD BACK DVD COAXIAL DIGITAL INPUT SUB WOOFER CENTER MULTI CH INPUT IN DVR/ VCR 2 OUT MONITOR OUT VIDEO S VIDEO A B FRONT SURROUND CENTER SURROUND - Yamaha HTR 5860 | MCXSP10 Manual - Page 15
SETUP Speaker placement The speaker layout below shows the standard ITU-R* speaker setting. You can use it to enjoy CINEMA DSP and multi-channel audio sources. * ITU-R is the radio communication sector of the ITU (International Telecommunication Union). PL PR C FL FR 30˚ SL 60˚ SL back - Yamaha HTR 5860 | MCXSP10 Manual - Page 16
SETUP Speaker connections Be sure to connect the left channel (L), right channel setting to 4 ohms before using (see page 22). • Before connecting the speakers, make sure that the power of this unit is off. • Do not let the bare speaker wires touch each other or do not let them touch any metal part - Yamaha HTR 5860 | MCXSP10 Manual - Page 17
do not output sound simultaneously. • The surround back speakers output the surround back channel included in Dolby Digital EX and DTS-ES software and only operate when the Dolby Digital EX, DTS-ES or Dolby Pro Logic IIx decoder is turned on. • The presence speakers output ambient effects created - Yamaha HTR 5860 | MCXSP10 Manual - Page 18
SPEAKER SETUP ■ FRONT terminals Connect SURROUND BACK terminals Connect surround back speakers (9, 10) to these terminals. If you only connect one surround back YAMAHA Active Servo Processing Subwoofer System, to this jack. ■ SYSTEM CONNECTOR jack Use this jack to control the power of your YAMAHA - Yamaha HTR 5860 | MCXSP10 Manual - Page 19
When you are not using the optical jack, be sure to put the cap back in place. This cap protects the jack from dust. ■ Video jacks This unit VIDEO Input S VIDEO Output (MONITOR OUT) VIDEO Only when VIDEO CONV. is set to ON (see page 70). Note When signals are input through both the S - Yamaha HTR 5860 | MCXSP10 Manual - Page 20
connect your video monitor to this unit if V.CONV (see page 70) is set to OFF. For example, if you connect your video monitor to this unit using to this unit using the VIDEO connections. (Even when V.CONV is set to OFF, S-video signals input from your video source component are automatically - Yamaha HTR 5860 | MCXSP10 Manual - Page 21
SURROUND, left and right SURROUND BACK and SUBWOOFER) for discrete multi-channel input from a multi-format player, external decoder, sound Multi-format player/ External decoder Surround back out Surround out Notes • When you select MULTI CH INPUT as the input source, this unit automatically turns - Yamaha HTR 5860 | MCXSP10 Manual - Page 22
your video monitor to this unit if VIDEO CONV. (see page 70) is set to OFF. For example, if you connect your video monitor to this unit using components to this unit using the VIDEO connections. (Even when V.CONV is set to OFF, S-video signals input from your video source component are automatically - Yamaha HTR 5860 | MCXSP10 Manual - Page 23
PREPARATION Connecting audio components ■ Connections for audio components Optical in O Optical out O MD recorder or tape deck Audio out L R L R Audio in DIGITAL OUTPUT MD/CD-R CD AUDIO OPTICAL MD/CD-R IN (PLAY) MD/ CD-R OUT (REC) CD COAXIAL DIGITAL INPUT CONNECTIONS Audio out L R CD - Yamaha HTR 5860 | MCXSP10 Manual - Page 24
by the TONE CONTROL settings. • If SPEAKERS A is turned off and SP B is set to ZONE B (see page 71), signals will only be output from the FRONT PRE OUT jacks. 1 23 4 PRE OUT CENTER SINGLE SUB SURROUND FRONT SURROUND WOOFER BACK 5 1 FRONT PRE OUT jacks Front channel line output jacks - Yamaha HTR 5860 | MCXSP10 Manual - Page 25
antenna may improve the quality. Consult the nearest authorized YAMAHA dealer or service center about outdoor antennas. 75Ω UNBAL. FM ANT is a metal stake driven into moist earth. ■ Connecting the AM loop antenna 1 Set up the AM loop antenna, then connect it to the terminals on this unit. 2 - Yamaha HTR 5860 | MCXSP10 Manual - Page 26
in the front panel display. STRAIGHT EFFECT While holding down, press STANDBY /ON SP IMP. 2 Press STRAIGHT (EFFECT) repeatedly to select "4 Ω MIN". STRAIGHT EFFECT 3 Press STANDBY/ON to turn off the power. STANDBY /ON The setting you made is reflected the next time this unit's power is - Yamaha HTR 5860 | MCXSP10 Manual - Page 27
VIDEO L AUDIO R OPTICAL CODE SET TRANSMIT POWER TV POWER AV STANDBY CD MD/CD-R TUNER SYSTEM POWER SLEEP DVD DTV/CBL V-AUX MULTI CH IN VCR 1 DVR/VCR2 AMP 1 TV VOL TV CH VOLUME TV MUTE TV INPUT 1 Press STANDBY/ON (or SYSTEM POWER on the remote control) to turn on the power of this - Yamaha HTR 5860 | MCXSP10 Manual - Page 28
AUTO SETUP AUTO SETUP Introduction This receiver employs YAMAHA Parametric Room Acoustic Optimizer (YPAO) technology which lets you avoid troublesome listening-based speaker setup and achieves highly accurate sound adjustments. The supplied optimizer microphone collects and analyzes the sound your - Yamaha HTR 5860 | MCXSP10 Manual - Page 29
;MANUAL SETUP ;SIGNAL INFO. [ ]/[ ]:Up/Down [ENTER]:Enter p 2 AUTO:CHECK INITIALZING . WIRING . SIZE/DISTANCE . EQUALIZING . LEVEL CHECK CH=CENTER [ ]: Exit PRESET/CH A-E/CAT. ENTER A-E/CAT. p p RESULT:EXIT . WARNING (3) RESULT SP : 5/4/0.1 DIST: 10.0/ 12.0ft LVL : -9.0/ +6.5dB . >SET - Yamaha HTR 5860 | MCXSP10 Manual - Page 30
RESULT SP : 5/4/0.1 DIST: 10.0/ 12.0ft LVL : -9.0/ +6.5dB . >SET CANCEL [ ]/[ ]:Up/Down [ENTER]:Enter SET CANCEL To apply the auto setup (YPAO) settings. To cancel the auto setup (YPAO) without making any changes. y If you are not satisfied with the result or want to manually adjust each setup - Yamaha HTR 5860 | MCXSP10 Manual - Page 31
. . Reverse Channel . FL __ . CENTER . PL PR . SL SR . SBL SBR []:Select [ENTER]:Return W-1 warning screen For details about each message, see page 29. y • Warnings let you know about potential problems detected during auto setup. Warnings will not cancel the auto - Yamaha HTR 5860 | MCXSP10 Manual - Page 32
surround back speaker(s). • Check the surround speaker connections. The optimizer microphone was unplugged during the auto setup procedure. • Do not touch the optimizer microphone during the auto setup procedure. The optimizer microphone does not detect test • Check the microphone setting. tones - Yamaha HTR 5860 | MCXSP10 Manual - Page 33
, check the cause of the problem, then perform the auto setup procedure again. • If warning W-1 appears, corrections are made, but they may not be optimal. • If warning W-2 or W-3 appears, no corrections are made. • If error E-10 occurs repeatedly, please contact a qualified YAMAHA service center - Yamaha HTR 5860 | MCXSP10 Manual - Page 34
the operating instructions for the component. 6 Adjust the volume to the desired output level. VOLUME 2 Turn on the video monitor connected to this unit. 3 Press SPEAKERS A or B (or press AMP to select the AMP mode, then press SPEAKERS A or B on the remote control). Each press turns the respective - Yamaha HTR 5860 | MCXSP10 Manual - Page 35
. AMP PROGRAM Front panel or STEREO 1 MUSIC 2 ENTERTAIN 3 MOVIE 4 STANDARD SELECT EXTD SUR. PURE DIRECT 5 6 7 8 A SPEAKERS B 9 0 NIGHT 10 STRAIGHT ENT. EFFECT Remote control ■ To listen with headphones ("SILENT CINEMA") "SILENT CINEMA" allows you to enjoy multi-channel music - Yamaha HTR 5860 | MCXSP10 Manual - Page 36
Remote control operation AMP CODE SET TRANSMIT POWER TV POWER AV STANDBY CD MD/CD-R TUNER SYSTEM POWER SLEEP DVD DTV/CBL V-AUX MULTI CH IN VCR 1 DVR/VCR2 AMP VCR1 V-AUX DTV/CBL DVD MD/CD-R TUNER CD PHONO VOLUME SP A HiFi DSP TV Sports dB L R Program name DVR/VCR2 VCR1 - Yamaha HTR 5860 | MCXSP10 Manual - Page 37
be selected when "SUR. B L/R SP" is set to SMLx1 or LRGx1 (see page 64). ■ Enjoying 2-channel software in surround Signals input from 2-channel sources can also be played back on multiple channels. Press AMP to select the AMP mode, then press STANDARD on the remote control to switch between the SUR - Yamaha HTR 5860 | MCXSP10 Manual - Page 38
the remote control when the decoder type is displayed in the short message display. Note The Pro Logic IIx decoder is not available when "SUR. B L/R SP" is set to settings are restored. Notes • To avoid unexpected noise, do not play DTS-encoded CDs in this mode. • When a multi-channel signal - Yamaha HTR 5860 | MCXSP10 Manual - Page 39
AMP to select the AMP mode, then press STRAIGHT on the remote control) to select STRAIGHT. STRAIGHT or EFFECT Front panel AMP STRAIGHT ENT. EFFECT Remote control STRAIGHT Press STRAIGHT (EFFECT) again so that "STRAIGHT" disappears from the display when you want to turn the sound effect back - Yamaha HTR 5860 | MCXSP10 Manual - Page 40
AUTO. INPUT MODE Notes • When playing a DTS-CD/LD, be sure to set INPUT MODE to DTS. • If the digital output data of the player has been MULTI CH IN VCR 1 DVR/VCR2 AMP Front panel DVR/VCR2 VCR1 V-AUX DTV/CBL DVD MD/CD-R TUNER CD PHONO VOLUME SP A dB L R 2 Press AMP to select the AMP - Yamaha HTR 5860 | MCXSP10 Manual - Page 41
When the unit cannot detect a digital signal it automatically switches to analog input. Number of source channels in the input signal. For example, a multi-channel soundtrack with 3 front channels, 2 surround channels and LFE, is displayed as "3/2/LFE". Sampling frequency. When the unit is unable to - Yamaha HTR 5860 | MCXSP10 Manual - Page 42
OPTIMIZER MIC PHONES SPEAKERS A B SILENT CINEMA VOLUME PRESET/TUNING SEARCH MODE EDIT FM/AM XM A/B/C/D/E CATEGORY NEXT PRESET/TUNING/CH LEVEL + STRAIGHT PROGRAM TONE CONTROL INPUT MODE EFFECT MEMORY MAN'L/AUTO FM TUNING MODE DISPLAY AUTO/MAN'L MONO INPUT MULTI turn V-AUX SP A - Yamaha HTR 5860 | MCXSP10 Manual - Page 43
. STANDBY /ON PURE DIRECT OPTIMIZER MIC PHONES SPEAKERS A B CONTROL INPUT MODE EFFECT MEMORY MAN'L/AUTO FM TUNING MODE DISPLAY AUTO/MAN'L MONO INPUT MULTI AUX SP A DTV/CBL DVD MD/CD-R TUNER AUTO TUNED 3 Press PRESET/TUNING/CH l / h to tune into the desired station manually. Hold - Yamaha HTR 5860 | MCXSP10 Manual - Page 44
up to E8. 2 Press PRESET/TUNING (EDIT) to turn off the colon (:) and then press PRESET/TUNING/CH l to begin tuning toward the lower frequencies. Memory back-up The memory back-up circuit prevents the stored data from being lost even if this unit is set in the standby mode, the power cord is - Yamaha HTR 5860 | MCXSP10 Manual - Page 45
. DVR/VCR2 VCR1 V-AUX SP A DTV/CBL DVD MD DIRECT OPTIMIZER MIC CONTROL INPUT MODE EFFECT MEMORY MAN'L/AUTO FM TUNING MODE DISPLAY AUTO/MAN'L MONO INPUT MULTI remote control, first press TUNER to set the remote to tuner mode. 1 Press A/B/C/D/E (NEXT) (or A-E/CAT. j / i on the remote control - Yamaha HTR 5860 | MCXSP10 Manual - Page 46
Remote control OPTIMIZER MIC PHONES SPEAKERS A B SILENT CINEMA VOLUME PRESET/TUNING SEARCH MODE EDIT FM/AM XM A/B/C/D/E CATEGORY NEXT PRESET/TUNING/CH LEVEL + STRAIGHT PROGRAM TONE CONTROL INPUT MODE EFFECT MEMORY MAN'L/AUTO FM TUNING MODE DISPLAY AUTO/MAN'L MONO INPUT MULTI - Yamaha HTR 5860 | MCXSP10 Manual - Page 47
/CH l / h. "A5" and the MEMORY indicator flash in the front panel display. A/B/C/D/E CATEGORY NEXT l PRESET/TUNING/CH h LEVEL DVR/VCR2 VCR1 V-AUX SP A DTV/CBL DVD MD/CD-R TUNER CD TUNED MEMORY 4 Press PRESET/TUNING (EDIT) again. The stations stored at the two preset assignments are - Yamaha HTR 5860 | MCXSP10 Manual - Page 48
details, see the operating instructions provided with the XM Connect and Play digital antenna accessory). XM jack Because XM Satellite Radio is a subscription service, you will need to set up an account and activate service with XM using your XM Satellite Radio ID number. To check XM your ID number - Yamaha HTR 5860 | MCXSP10 Manual - Page 49
controls are only available when the unit is in the TUNER mode and the XM Connect and Play digital antenna accessory Remote control functions Note The following controls BAND PRESET/CH STRAIGHT ENT. EFFECT SET MENU MENU SRCH MODE A-E/CAT. RETURN XM information such as channel number/name, category, - Yamaha HTR 5860 | MCXSP10 Manual - Page 50
band. FM/AM XM or LEVEL TITLE BAND Front panel Remote control DVR/VCR2 VCR1 V-AUX DTV/CBL DVD MD/CD-R TUNER CD SP A XM XM RADIO Lights If "CHECK ANTENNA" appears in the front panel display, the XM Connect and Play digital antenna accessory may not be connected to the XM jack on the - Yamaha HTR 5860 | MCXSP10 Manual - Page 51
displayed: DVR/VCR2 VCR1 V-AUX DTV/CBL DVD MD/CD-R TUNER CD SP A XM [040] Deep Tra When the channel category is displayed: 2 Press XM (or BAND on the remote control) to select "XM" as the reception band. Information (such as channel number/name, category, or artist name/song title) for the - Yamaha HTR 5860 | MCXSP10 Manual - Page 52
]:CHANNEL []:CATEGORY y • In the SET MENU (see page 71), you can set the MULTI CH INPUT 2 3 1 Carry out "Selecting the XM Satellite Radio mode" on page 47. 2 Press SEARCH MODE (or SRCH MODE on the remote control) repeatedly to select "ALL CH SEARCH". PRESET/TUNING SEARCH MODE EDIT or SET - Yamaha HTR 5860 | MCXSP10 Manual - Page 53
MULTI CH INPUT 2 Press SEARCH MODE (or SRCH MODE on the remote control) repeatedly to select "CAT SEARCH". PRESET/TUNING SEARCH MODE EDIT or Front panel SET MENU MENU SRCH MODE Remote control DVR/VCR2 VCR1 V-AUX DTV/CBL DVD MD/CD-R TUNER CD SP A XM CAT SEARCH 3 To change the channel - Yamaha HTR 5860 | MCXSP10 Manual - Page 54
repeatedly to select "ALL CH SEARCH" or "CAT SEARCH". PRESET/TUNING SEARCH MODE EDIT or Front panel SET MENU MENU SRCH MODE Remote control DVR/VCR2 VCR1 V-AUX DTV/CBL DVD MD/CD-R TUNER CD SP A XM PRESET SEARCH 3 To change the preset group (A to E), press CATEGORY (or A-E/CAT. j / i on the - Yamaha HTR 5860 | MCXSP10 Manual - Page 55
Search the XM Satellite Radio channel you want to set as a preset channel. To search the desired channel, carry out "All Channel Search mode" on page CD-R TUNER CD SP A XM [040] Deep Tra When the channel number "040" is selected 2 Press MEMORY on the unit (or remote control during the TUNER - Yamaha HTR 5860 | MCXSP10 Manual - Page 56
preset the selected XM Satellite Radio channel. A colon appears next to the preset number for confirmation, and the MEMORY indicator turns off. MEMORY MAN'L/AUTO FM or RETURN MEMORY Front panel Remote control DVR/VCR2 C VCR1 V-AUX DTV/CBL DVD MD/CD-R TUNER SP A XM [040] Deep CD MEMORY - Yamaha HTR 5860 | MCXSP10 Manual - Page 57
- Cause Remedy The XM Connect and Play digital antenna accessory is not connected, or does not work properly. • Check the XM Connect and Play digital antenna accessory connections. The XM user encryption code is being updated. • Wait until the encryption code is updated. The signal is too weak - Yamaha HTR 5860 | MCXSP10 Manual - Page 58
CODE SET TRANSMIT POWER TV POWER AV STANDBY CD MD/CD-R TUNER SYSTEM POWER SLEEP DVD DTV/CBL V-AUX MULTI CH IN VCR 1 DVR/VCR2 AMP 1 TV VOL TV CH VOLUME TV MUTE TV INPUT 1 Turn SLEEP DVD DTV/CBL V-AUX MULTI CH IN VCR 1 DVR/VCR2 AMP Remote control 3 Start playback (or select - Yamaha HTR 5860 | MCXSP10 Manual - Page 59
movie theaters. y The YAMAHA CINEMA DSP modes are compatible with all Dolby Digital, DTS, and Dolby Surround sources. Set the input mode to Remote control button Program Features Sources STEREO: 1 2ch Stereo Downmixes multi-channel sources to 2 channels (left and right) or plays back 2-channel - Yamaha HTR 5860 | MCXSP10 Manual - Page 60
SOUND FIELD PROGRAM DESCRIPTIONS Remote control button Program Features Sources MOVIE THEATER: Spectacle CINEMA ideal for precisely reproducing the sound design 2-CH Adventure of the newest 70-mm and multi-channel soundtrack films. The sound field is made to be similar to that of the newest - Yamaha HTR 5860 | MCXSP10 Manual - Page 61
to 35. Remote control button Program STEREO: 2ch Stereo 1 STEREO: 6ch Stereo MUSIC: Hall in Vienna MUSIC: 2 The Bttm Line MUSIC: The Roxy Thtr ENTERTAINMENT: 3 Disco SUR. STANDARD 5 SUR. ENHANCED Features Sources 2-channel left of the hall. MULTI 2-CH HiFi DSP - Yamaha HTR 5860 | MCXSP10 Manual - Page 62
source. The sleep timer also automatically turns off any external components connected to AC OUTLET(S). ■ Setting the sleep timer CODE SET TRANSMIT POWER TV POWER AV STANDBY CD MD/CD-R TUNER SYSTEM POWER SLEEP DVD DTV/CBL V-AUX MULTI CH IN VCR 1 DVR/VCR2 AMP 2 TV VOL TV CH VOLUME TV - Yamaha HTR 5860 | MCXSP10 Manual - Page 63
on the remote control (or STANDBY/ON on the front panel) to set this unit to the standby mode. ADVANCED OPERATIONS Manually adjusting speaker levels You can adjust the output level of each speaker while listening to a music source. This is also possible when playing sources through the MULTI CH - Yamaha HTR 5860 | MCXSP10 Manual - Page 64
Use to specify which speaker parameters auto setup will adjust, and to activate the auto setup procedure (see page 24). ■ MANUAL SETUP Use to manually adjust speaker and system parameters. 1 SOUND MENU Use to manually adjust any speaker setting, alter the quality and tone of the sound output by - Yamaha HTR 5860 | MCXSP10 Manual - Page 65
of sound field programs. D)MULTI ZONE SET Specifies the location of the speakers connected to the SPEAKERS B terminals. E)XM RADIO SET Displays the current reception level for the XM Connect and Play digital antenna accessory. SET MENU Page 70 70 71 71 71 ■ SIGNAL INFO Use to check audio Signal - Yamaha HTR 5860 | MCXSP10 Manual - Page 66
MENU Using SET MENU Use the remote control to access and adjust each parameter. VCR 1 DVR/VCR2 AMP 1 TV VOL TV CH VOLUME AMP. AMP 2 Press SET MENU. SET MENU MENU SRCH MODE 3 Press u / d to select MANUAL SETUP. PRESET/CH A-E/CAT. ENTER A-E/CAT. p p SET MENU ;AUTO SETUP . ;MANUAL SETUP - Yamaha HTR 5860 | MCXSP10 Manual - Page 67
you run auto setup (see page 24). Center speaker CENTER SP Choices: LRG, SML, NONE CENTER SP SET MENU p 1 SOUND MENU 1/2 . A)SPEAKER SET B)SPEAKER LEVEL C)SP DISTANCE D)EQUALIZER [ ]/[ ]:Up/Down [ENTER]:Enter ■ Speaker settings A)SPEAKER SET Use to manually adjust any speaker setting. y If you - Yamaha HTR 5860 | MCXSP10 Manual - Page 68
SET MENU Surround back speakers SUR. B L/R SP Choices: LRGx2, LRGx1, SMLx2, SMLx1, NONE SUR. B L/R SP SMLx1 )SMLx2 • Select LRGx1 if you have a large surround back speaker. The unit directs the entire range of the surround back channel signal to the left surround back speaker. • Select LRGx2 if you - Yamaha HTR 5860 | MCXSP10 Manual - Page 69
)NORMAL REVERSE SET MENU ■ Speaker level B)SPEAKER LEVEL Use these settings to manually balance the speaker back speaker in SUR. B L/R SP (page 64). p PRch )SBch • Select PRch to use presence speakers even when surround back channel signals are input. The signals for the surround back channel - Yamaha HTR 5860 | MCXSP10 Manual - Page 70
SET MENU ■ Speaker distance C)SP DISTANCE Use this feature to manually input the distance of each speaker and adjust the delay applied to respective channel , EQ OFF • Select AUTO PEQ to use the equalizer adjusted in auto setup. • Select CNTR GEQ to adjust the built-in 5-band graphic equalizer so - Yamaha HTR 5860 | MCXSP10 Manual - Page 71
when TREBLE and BASS are set to 0 dB (see page 31). Choices: AUTO, OFF • Select AUTO if you want signals to bypass tone control circuitry to provide the purest signal possible. • Select OFF if you do not want signals to bypass tone control circuitry. F)DYNAMIC RANGE . SP: MIN STD)MAX HP: MIN - Yamaha HTR 5860 | MCXSP10 Manual - Page 72
if this unit's initial settings do not correspond to your the front panel or the input selector buttons on the remote control. For COMPONENT VIDEO jacks A (CMPNT-V INPUT [A]) and CBL, V-AUX, VCR1, DVR/VCR2 Notes • You cannot select a specific item more than once for the same type of jack. • When - Yamaha HTR 5860 | MCXSP10 Manual - Page 73
when you turn on this unit (see page 36 for details about the input mode). Choices: AUTO, LAST B)INPUT MODE )AUTO LAST SET MENU ■ an input selector button to select the input you want to change the name of. 2 Press AMP. 3 Press j / i to place the _ (under-bar) under the space or the character - Yamaha HTR 5860 | MCXSP10 Manual - Page 74
adjust the optional system parameters. 3 OPTION MENU . A)DISPLAY SET B)MEMORY GUARD C)PARAM. INI D)MULTI ZONE SET [ ]/[ ]:Up/Down [ENTER]:Enter ■ Display settings A)DISPLAY SET A)DISPLAY SET . DIMMER;;;;;;;;;0 VIDEO CONV.;;;ON OSD SHIFT;;;;;;0 GRAY BACK;;;AUTO CMPNT OSD;;;;;ONXM INFO [ ]/[ ]:Up/Down - Yamaha HTR 5860 | MCXSP10 Manual - Page 75
, check the antenna connections (see page 44). E)XM RADIO SET XM DISPLAY;;;10S XM ANTENNA;;;75% []:Select [ENTER]:Return Speaker B setting SP B Use this feature to select the location of the front speakers connected to the SPEAKERS B terminals. Choices: FRONT, ZONE B • Select FRONT to turn on - Yamaha HTR 5860 | MCXSP10 Manual - Page 76
using this unit to play back audio or video signals. 2 Rotate PROGRAM to move through the menu and select the item you want to set up. See the end of this section for a complete list of available parameters. PROGRAM STANDBY /ON PURE DIRECT OPTIMIZER MIC PHONES SPEAKERS A B SILENT CINEMA - Yamaha HTR 5860 | MCXSP10 Manual - Page 77
SETUP MENU Remote REMOTE Use to switch the ID for the remote control of this unit. Choices: ID1, ID2 • Select ID1 to operate this unit using the default code. • Select ID2 to operate this unit using an alternative code. Note You must also make settings for the remote control (see page 77). SP - Yamaha HTR 5860 | MCXSP10 Manual - Page 78
unit. Component control area You can control up to 9 different components by setting appropriate remote control codes (see page 75). CODE SET TRANSMIT POWER TV POWER AV STANDBY SYSTEM POWER CD DVD PMODW/CEDR-R TV DTV/CBL PTOUWNEERR AV V-AUX SLEEP MULTI CH IN VCR 1 DVR/VCR2 AMP TV VOL - Yamaha HTR 5860 | MCXSP10 Manual - Page 79
YAMAHA remote control code is initially set as listed above. In this case, try to set other YAMAHA remote control code(s). 1 Press an input selector button or to select the component you want to set up. CD MD/CD-R TUNER SLEEP DVD DTV/CBL V-AUX MULTI CH IN VCR 1 DVR/VCR2 AMP 2 Press CODE SET - Yamaha HTR 5860 | MCXSP10 Manual - Page 80
component you want to operate. The remote control automatically switches to the appropriate control mode for that component. 1 2 CODE SET TRANSMIT POWER TV POWER AV STANDBY CD MD/CD-R TUNER SYSTEM POWER SLEEP DVD DTV/CBL V-AUX MULTI CH IN 3 VCR 1 DVR/VCR2 AMP 4 TV VOL TV CH VOLUME - Yamaha HTR 5860 | MCXSP10 Manual - Page 81
is changed. AMP library code (remote control setting) Function 9991 To operate this unit using the default code. 9992 To operate this unit using an alternative code. Remote control ID (unit setting: see page 73) ID1 (initial setting) ID2 When using multiple YAMAHA receivers/amplifiers, you - Yamaha HTR 5860 | MCXSP10 Manual - Page 82
walls, ceiling, the back of the room - taken together help us to YAMAHA has done with the digital sound field processor. Changing parameter settings CODE SET TRANSMIT POWER TV POWER AV STANDBY CD MD/CD-R TUNER SYSTEM POWER SLEEP DVD DTV/CBL V-AUX MULTI CH IN VCR 1 DVR/VCR2 AMP - Yamaha HTR 5860 | MCXSP10 Manual - Page 83
/CH A-E/CAT. ENTER A-E/CAT. EDITING SOUND FIELD PARAMETERS ■ Resetting parameters to the factory presets Use PARAM. INI (see page 71). 5 Press j / i to change the parameter value. When you set a parameter to a value other than the factory-set value, an asterisk mark (*) appears by the parameter - Yamaha HTR 5860 | MCXSP10 Manual - Page 84
the sound source seems to the listener. The larger the value, the farther it seems. For a small room, set to a small value. For a large room, set to a large value. Control range: 1 to 99 msec Source Sound Early Reflections Level Level Level Delay Time Sound Source Delay Time Delay Time - Yamaha HTR 5860 | MCXSP10 Manual - Page 85
can only adjust this parameter when at least two front channels and two surround channels are used. Control Range: 1 to 49 msec ■ S. ROOM SIZE (Surround virtual walls in the surround sound field. Control Range: 0 to 10 ■ SB INI. DLY (Surround back initial delay) Function: Adjusts the delay - Yamaha HTR 5860 | MCXSP10 Manual - Page 86
size of the acoustic environment over an extremely wide range. Description: Set a longer reverberation time for "dead" sources and listening room environments, makes you feel like you are in a larger acoustic environment. Control Range: 0 to 250 msec Source Sound Level (dB) Reverberation - Yamaha HTR 5860 | MCXSP10 Manual - Page 87
SP" set to SMALL and "BASS OUT" set to SWFR, front left and right speaker lowfrequency signals are redirected to the subwoofer. For 7ch Stereo: Function: These parameters adjust the volume level for each channel in 7-channel stereo mode. Control Range: 0 - 100% ■ CT LEVEL (Center level) ■ SL - Yamaha HTR 5860 | MCXSP10 Manual - Page 88
SOUND FIELD PARAMETER DESCRIPTIONS For DTS Neo:6 Music: ■ C. IMAGE (Center image) Function: Adjusts the center image from all three front speakers to varying degrees. Control range: 0 to 1.0 Initial setting: 0.3 Note This parameter can be set only when SUR. STANDARD is selected. 84 - Yamaha HTR 5860 | MCXSP10 Manual - Page 89
display mode. Set "GRAY BACK" to AUTO to always show the OSD. Connect the cables properly. If the problem persists, the cables may be defective. Disconnect the optimizer microphone. Select AUTO. Select an appropriate input source with INPUT, MULTI CH INPUT (or MULTI CH IN on the remote control) or - Yamaha HTR 5860 | MCXSP10 Manual - Page 90
protection circuitry has been activated Check that the impedance selector setting is correct. 73 because of a short circuit, etc. Check that the speaker wires are not touching each - other and then turn this unit back on. The sleep timer has turned the unit off. Turn on the power, and play - Yamaha HTR 5860 | MCXSP10 Manual - Page 91
TROUBLESHOOTING Problem CHECK SP WIRES" appears in the front panel display. Cause The connected component is not set to output Dolby Digital or DTS digital signals. The input mode is set to ANALOG. Incorrect cable connections. The component connected to the OUT (REC) jacks of this unit is turned - Yamaha HTR 5860 | MCXSP10 Manual - Page 92
TROUBLESHOOTING Problem There is noise interference from digital or radio frequency equipment, or this unit. The picture is disturbed. There is noise when the OSD is displayed. This unit suddenly turns Use the manual tuning method. Use an outdoor antenna and a ground wire. This will help somewhat, - Yamaha HTR 5860 | MCXSP10 Manual - Page 93
The remote control code was not correctly Set the remote control code correctly using "LIST OF 75 set. REMOTE CONTROL CODES" at the end of this manual. Try to set another code for the same manufacturer 75 using "LIST OF REMOTE CONTROL CODES" at the end of this manual. The remote control ID - Yamaha HTR 5860 | MCXSP10 Manual - Page 94
CATEGORY NEXT PRESET/TUNING/CH LEVEL + STRAIGHT PROGRAM TONE CONTROL INPUT MODE EFFECT MEMORY MAN'L/AUTO FM TUNING MODE DISPLAY AUTO/MAN'L MONO INPUT MULTI CH INPUT VIDEO AUX S VIDEO VIDEO L AUDIO R OPTICAL RESET CANCEL To reset the unit to its factory presets. To cancel without - Yamaha HTR 5860 | MCXSP10 Manual - Page 95
a new technology enabling discrete multi-channel playback from 2-channel or multi-channel sources. There is a Music channel reproduction by adding the surround back channel to existing 5.1-channel format. ■ Neo:6 Neo:6 decodes the conventional 2-channel sources for 6 channel playback by the specific - Yamaha HTR 5860 | MCXSP10 Manual - Page 96
YAMAHA has developed a natural, realistic sound effect DSP algorithm for headphones. Parameters for headphones have been set other 5/6 channels in Dolby Digital or DTS 5.1/6.1-channel systems. time. Standing for "pulse code modulation", the analog signal that can be played back is determined based on - Yamaha HTR 5860 | MCXSP10 Manual - Page 97
Video signal information ■ Component video signal With the component video signal system, the video signal is separated into the Y signal for the luminance and the PB and PR signals for the chrominance. Color can be reproduced more faithfully with this system because each of these signals is - Yamaha HTR 5860 | MCXSP10 Manual - Page 98
SPECIFICATIONS SPECIFICATIONS AUDIO SECTION • Minimum RMS Output Power for Front, Center, Surround, Surround back 20 Hz to 20 kHz, 0.06% THD 150 µV or less • Channel Separation (1 kHz/10 kHz) CD (5.1 kΩ terminated) to Front L/R ........ 60 dB/45 dB or more • Tone Control (Front L/R) BASS Boost/Cut - Yamaha HTR 5860 | MCXSP10 Manual - Page 99
LIST OF REMOTE CONTROL CODES TV A TANDY 0941 ABEX 1151 ADMIRA 1141 ADVENTURA 1131 AIKO 1121 AIWA 1481 AKAI 0331, 1101, 1111 ALBA 0431 ALLERON 1091 AMBASSADOR 1081 AMSTRAD 0481, - Yamaha HTR 5860 | MCXSP10 Manual - Page 100
1091, 1111, 1771 WATSON 1001 XOGEGO 1611, 1621, 1661, 1741, 1761 YAMAHA 0361, 1031, 1111, 1951, 1961, 1971, 1981 YOKO 1001 ZENITH 0011, 8650 0566 SIGNAL 0276 SL MARX 0276 SPECTAVISION 0236 0506 TOSHIBA 0386 TUDI 0046 UNIKA 0136 UNIVERSAL 0136, 0156, 0206, 0286 VIDEOWAY 0096 - Yamaha HTR 5860 | MCXSP10 Manual - Page 101
0672 DVD PLAYER AKAI AIWA DENON HITACHI JVC KENWOOD LG MAGNAVOX MITSUBISHI ONKYO PANASONIC PHILIPS PIONEER PROSCAN RCA SAMSUNG SHARP SONY TECHNICS THOMSON TOSHIBA YAMAHA ZENITH 0058 0218 0188 0198 0088, 0178 0148 0228 0128 0138 0068, 0128 0028 0098, 0128 0108, 0118 0158 0158 0078 0038 0018 0028 - Yamaha HTR 5860 | MCXSP10 Manual - Page 102
AKAI CARVER DENON FISHER GARRARD JVC KENWOOD MAGNAVOX MARANTZ MITSUBISHI OPTIMUS ONKYO PHILIPS PIONEER REVOX SANSUI SHARP SHERWOOD SONY TEAC TECHNICS VICTOR WARDS YAMAHA 0094, 0214, 0224 0184 0094 0304 0144 0194, 0204 0274, 0284, 0294 0124, 0134, 0154, 0234, 0244, 0264 0094 0094, 0344 0184 0034 - Yamaha HTR 5860 | MCXSP10 Manual - Page 103
ELECTRONIQUE FRANCE S.A. RUE AMBROISE CROIZAT BP70 CROISSY-BEAUBOURG 77312 MARNE-LA-VALLEE CEDEX02, FRANCE YAMAHA ELECTRONICS (UK) LTD. YAMAHA HOUSE, 200 RICKMANSWORTH ROAD WATFORD, HERTS WD18 7GQ, ENGLAND YAMAHA SCANDINAVIA A.B. J A WETTERGRENS GATA 1, BOX 30053, 400 43 VÄSTRA FRÖLUNDA, SWEDEN
-
 1
1 -
 2
2 -
 3
3 -
 4
4 -
 5
5 -
 6
6 -
 7
7 -
8
-
9
-
10
-
11
-
12
-
13
-
14
-
15
-
16
-
17
-
18
-
19
-
20
-
21
-
22
-
23
-
24
-
25
-
26
-
27
-
28
-
29
-
30
-
31
-
32
-
33
-
34
-
35
-
36
-
37
-
38
-
39
-
40
-
41
-
42
-
43
-
44
-
45
-
46
-
47
-
48
-
49
-
50
-
51
-
52
-
53
-
54
-
55
-
56
-
57
-
58
-
59
-
60
-
61
-
62
-
63
-
64
-
65
-
66
-
67
-
68
-
69
-
70
-
71
-
72
-
73
-
74
-
75
-
76
-
77
-
78
-
79
-
80
-
81
-
82
-
83
-
84
-
85
-
86
-
87
-
88
-
89
-
90
-
91
-
92
-
93
-
94
-
95
-
96
-
97
-
98
-
99
-
100
-
101
-
102
-
103
 |
 |

HTR-5860
AV Receiver
OWNER’S MANUAL
U