Yamaha HTR 5860 MCXSP10 Manual - Page 73
BINPUT, RENAME, Input mode, Input rename, Volume Trim
 |
UPC - 027108922096
View all Yamaha HTR 5860 manuals
Add to My Manuals
Save this manual to your list of manuals |
Page 73 highlights
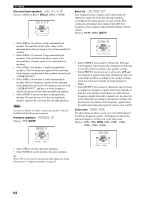
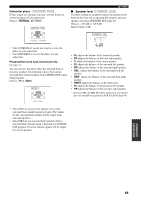
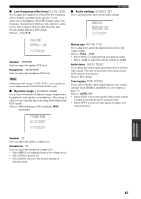
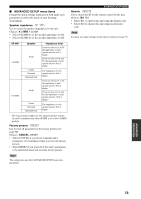
■ Input mode B)INPUT MODE Use this feature to designate the input mode for sources connected to the DIGITAL INPUT jacks when you turn on this unit (see page 36 for details about the input mode). Choices: AUTO, LAST B)INPUT MODE )AUTO LAST SET MENU ■ Volume Trim D)VOLUME TRIM Use this feature to adjust the level of the signal input to each jack. This is useful if you want to balance the level of each input source to avoid sudden changes in volume when switching between input sources. Choices: CD, MD/CD-R, TUNER, DVD, DTV/CBL, V-AUX, VCR1, DVR/VCR2 []:Select [ENTER]:Return • Select AUTO to allow this unit to automatically detect the type of input signal and select the appropriate input mode. • Select LAST to set this unit to automatically select the last input mode used for that source. Note Even if LAST is selected, the last setting for the EX/ES button will not be recalled. ■ Input rename C)INPUT RENAME Use this feature to change the name of the inputs on the OSD and front panel display. C)INPUT RENAME DVD -> DVD []:Position [ ]/[ ]:Chara. p ADVANCED OPERATION p 1 Press an input selector button to select the input you want to change the name of. 2 Press AMP. 3 Press j / i to place the _ (under-bar) under the space or the character you want to edit. 4 Press u / d to select the character you want, then use j / i to move to the next space. • You can use up to 8 characters for each input. • Press d to change the character in the following order, or press u to go in the reverse order: A to Z, a space, 0 to 9, a space, a to z, a space, symbols etc.). 5 Repeat steps 1 through 4 to rename each input. 6 To exit, press SET MENU when finished. 69
-
 1
1 -
2
-
3
-
4
-
5
-
6
-
7
-
8
-
9
-
10
-
11
-
12
-
13
-
14
-
15
-
16
-
17
-
18
-
19
-
20
-
21
-
22
-
23
-
24
-
25
-
26
-
27
-
28
-
29
-
30
-
31
-
32
-
33
-
34
-
35
-
36
-
37
-
38
-
39
-
40
-
41
-
42
-
43
-
44
-
45
-
46
-
47
-
48
-
49
-
50
-
51
-
52
-
53
-
54
-
55
-
56
-
57
-
58
-
59
-
60
-
61
-
62
-
63
-
64
-
65
-
66
-
67
-
 68
68 -
 69
69 -
 70
70 -
 71
71 -
 72
72 -
 73
73 -
 74
74 -
 75
75 -
 76
76 -
 77
77 -
 78
78 -
79
-
80
-
81
-
82
-
83
-
84
-
85
-
86
-
87
-
88
-
89
-
90
-
91
-
92
-
93
-
94
-
95
-
96
-
97
-
98
-
99
-
100
-
101
-
102
-
103
 |
 |