Yamaha HTR 5860 MCXSP10 Manual - Page 22
Connections for other video components, VIDEO AUX jacks on the front panel
 |
UPC - 027108922096
View all Yamaha HTR 5860 manuals
Add to My Manuals
Save this manual to your list of manuals |
Page 22 highlights
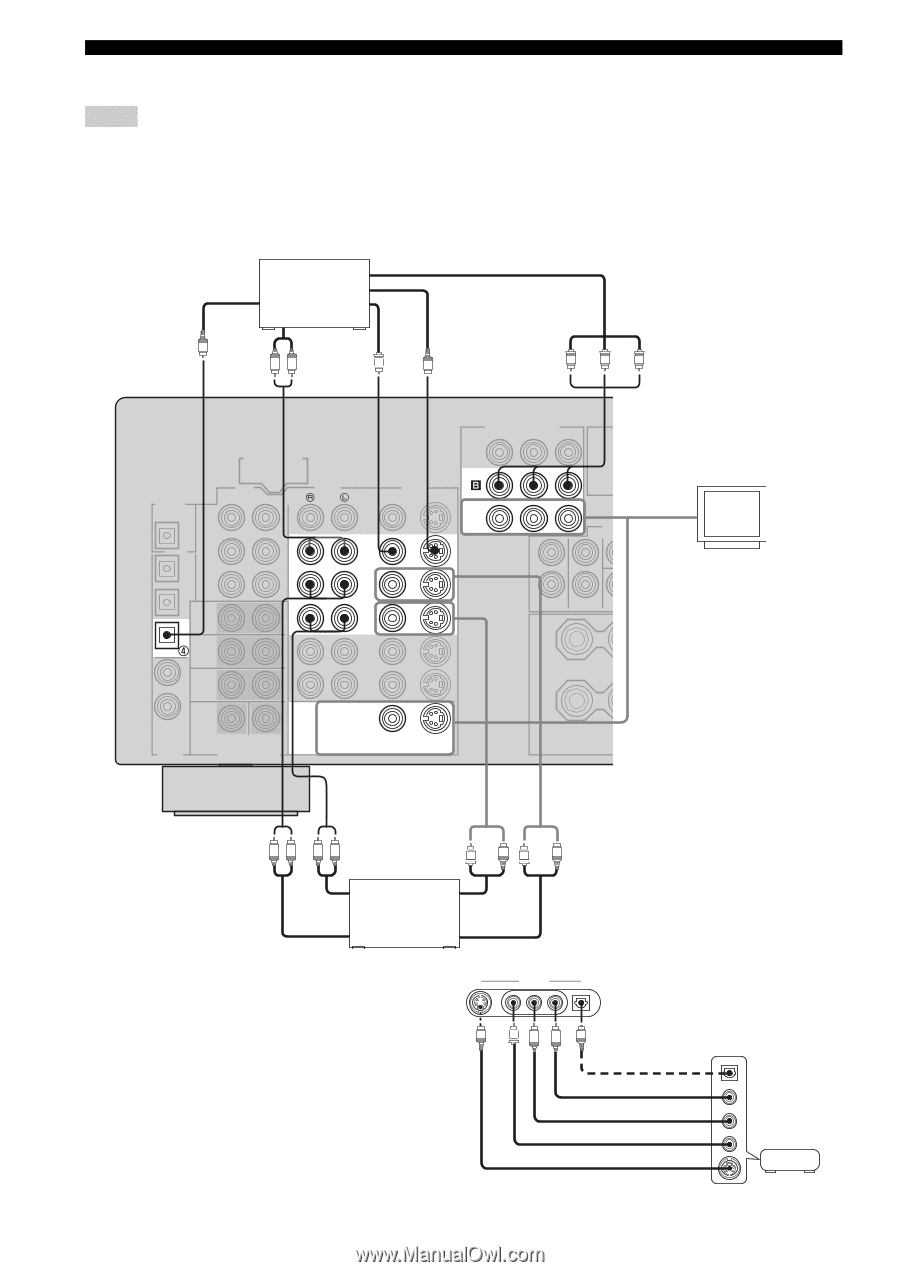
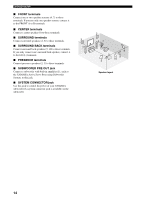
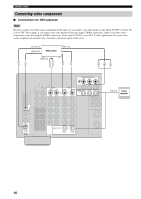
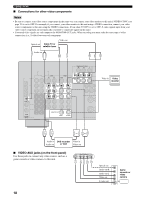
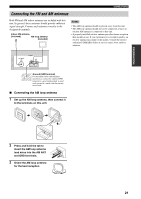
CONNECTIONS ■ Connections for other video components Notes • Be sure to connect your video source components in the same way you connect your video monitor to this unit if VIDEO CONV. (see page 70) is set to OFF. For example, if you connect your video monitor to this unit using a VIDEO connection, connect your video source components to this unit using the VIDEO connections. (Even when V.CONV is set to OFF, S-video signals input from your video source component are automatically converted to composite signals in this unit.) • Converted video signals are only output to the MONITOR OUT jacks. When recording you must make the same type of video connections (i.e., S-video) between each component. Optical out Cable TV or satellite tuner Video out Audio out O RL V S PR PB Y DTV/CBL AUDIO COMPONENT VIDEO PR PB Y DTV/ CBL VIDEO VIDEO S VIDEO MONITOR OUT DTV/ CBL IN VCR 1 OUT Video in Video monitor COAXIAL DIGITAL INPUT MONITOR OUT VIDEO S VIDEO RL RL V or S V or S Audio in DVD recorder Video in Audio out or VCR Video out ■ VIDEO AUX jacks (on the front panel) Use these jacks to connect any video source, such as a game console or video camera, to this unit. S VIDEO VIDEO AUX VIDEO L AUDIO R OPTICAL S V L R O Optical out Audio out R Audio out L Video out S-video out 18 Game console or video camera
-
 1
1 -
2
-
3
-
4
-
5
-
6
-
7
-
8
-
9
-
10
-
11
-
12
-
13
-
14
-
15
-
16
-
 17
17 -
 18
18 -
 19
19 -
 20
20 -
 21
21 -
 22
22 -
 23
23 -
 24
24 -
 25
25 -
 26
26 -
 27
27 -
28
-
29
-
30
-
31
-
32
-
33
-
34
-
35
-
36
-
37
-
38
-
39
-
40
-
41
-
42
-
43
-
44
-
45
-
46
-
47
-
48
-
49
-
50
-
51
-
52
-
53
-
54
-
55
-
56
-
57
-
58
-
59
-
60
-
61
-
62
-
63
-
64
-
65
-
66
-
67
-
68
-
69
-
70
-
71
-
72
-
73
-
74
-
75
-
76
-
77
-
78
-
79
-
80
-
81
-
82
-
83
-
84
-
85
-
86
-
87
-
88
-
89
-
90
-
91
-
92
-
93
-
94
-
95
-
96
-
97
-
98
-
99
-
100
-
101
-
102
-
103
 |
 |