Yamaha HTR 5860 MCXSP10 Manual - Page 29
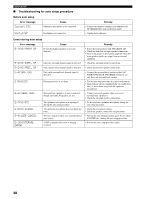
Starting the setup, SET MENU, AUTO:MENU, AUTO:CHECK, RESULT:EXIT - check sp wires
 |
UPC - 027108922096
View all Yamaha HTR 5860 manuals
Add to My Manuals
Save this manual to your list of manuals |
Page 29 highlights
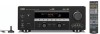
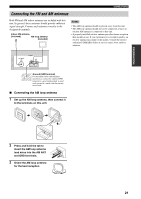
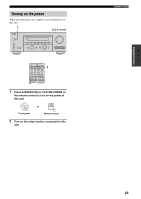
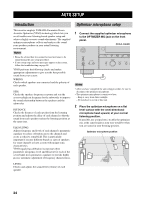
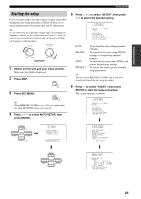
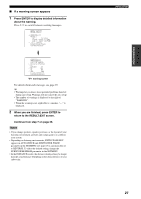
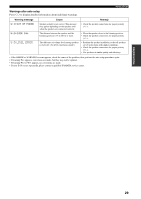
PREPARATION p AUTO SETUP Starting the setup For best results, make sure the room is as quiet as possible during the auto setup procedure (YPAO). If there is too much ambient noise, the results may not be satisfactory. y If your subwoofer has adjustable volume and crossover/high cut frequency controls, set the volume between 9 and 11 o'clock (as viewed on a conventional clockface) and set the crossover/high cut frequency to the maximum. VOLUME CROSSOVER/ HIGH CUT MIN MAX 50Hz 150Hz Subwoofer 1 Switch on this unit and your video monitor. Make sure the OSD is displayed. 2 Press AMP. AMP 3 Press SET MENU. SET MENU MENU SRCH MODE y When MEMORY GUARD is set to ON, you cannot select any other SET MENU items (see page 60). 4 Press u / d to select AUTO SETUP, then press ENTER. 5 Press u / d to select "SETUP", then press j / i to select the desired setting. 1 AUTO:MENU . SETUP;;;;;;;AUTO START Automatic processing of all items [ ]/[ ]:Up/Down []:Select p AUTO RELOAD UNDO DEFAULT To perform the auto setup procedure (YPAO). To reload the last auto setup (YPAO) settings to override any manual changes. To undo the last auto setup (YPAO) and restore the previous settings. To restore the factory preset (default) setup parameters. y You can choose RELOAD or UNDO only if you have already performed the auto setup procedure. 6 Press d to select "START", then press ENTER to start the setup procedure. The screen changes as follows. 1 AUTO:MENU SETUP;;;;;;;AUTO . START Automatic processing of all items [ ]/[ ]:Up/Down [ENTER]:Start p p PRESET/CH A-E/CAT. ENTER A-E/CAT. p p SET MENU . ;AUTO SETUP ;MANUAL SETUP ;SIGNAL INFO. [ ]/[ ]:Up/Down [ENTER]:Enter p 2 AUTO:CHECK INITIALZING . WIRING . SIZE/DISTANCE . EQUALIZING . LEVEL CHECK CH=CENTER [ ]: Exit PRESET/CH A-E/CAT. ENTER A-E/CAT. p p RESULT:EXIT . WARNING (3) RESULT SP : 5/4/0.1 DIST: 10.0/ 12.0ft LVL : -9.0/ +6.5dB . >SET CANCEL [ ]/[ ]:Up/Down [ENTER]:Enter 25
-
 1
1 -
2
-
3
-
4
-
5
-
6
-
7
-
8
-
9
-
10
-
11
-
12
-
13
-
14
-
15
-
16
-
17
-
18
-
19
-
20
-
21
-
22
-
23
-
 24
24 -
 25
25 -
 26
26 -
 27
27 -
 28
28 -
 29
29 -
 30
30 -
 31
31 -
 32
32 -
 33
33 -
 34
34 -
35
-
36
-
37
-
38
-
39
-
40
-
41
-
42
-
43
-
44
-
45
-
46
-
47
-
48
-
49
-
50
-
51
-
52
-
53
-
54
-
55
-
56
-
57
-
58
-
59
-
60
-
61
-
62
-
63
-
64
-
65
-
66
-
67
-
68
-
69
-
70
-
71
-
72
-
73
-
74
-
75
-
76
-
77
-
78
-
79
-
80
-
81
-
82
-
83
-
84
-
85
-
86
-
87
-
88
-
89
-
90
-
91
-
92
-
93
-
94
-
95
-
96
-
97
-
98
-
99
-
100
-
101
-
102
-
103
 |
 |