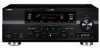
Yamaha HTR-6180BL Owner's Manual - Page 45
Using the remote control for the SCENE feature, Controlling the input source - avs
 |
UPC - 027108930107
View all Yamaha HTR-6180BL manuals
Add to My Manuals
Save this manual to your list of manuals |
Page 45 highlights
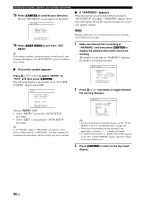
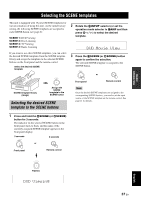
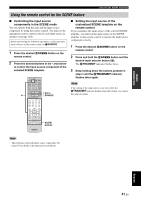
BASIC OPERATION Selecting the SCENE templates Using the remote control for the SCENE feature ■ Controlling the input source components in the SCENE mode You can operate both this unit and the input source component by using the remote control. You must set the appropriate remote control code for each input source in advance (see page 104). Before performing the following operations, set the operation mode selector on the remote control to FSOURCE. 1 Press the desired ASCENE button on the remote control. 2 Press the desired buttons in the * area below to control the input source component of the selected SCENE template. * CODE SET TRANSMIT POWER TV POWER AV STANDBY POWER TUNER DOCK V-AUX XM CBL DTV SIRIUS CD A MD CD-R DVD DVR VCR PHONO TV VOL TV CH AMP VOLUME SOURCE TV TV MUTE TV INPUT MUTE PROG 1 2 ENHANCER SUR. DECODE 3 4 STRAIGHT PURE DIRECT 5 6 7 PARAMETER 8 MULTI CH IN AUDIO SEL 9 0 SLEEP 10 ENT LEVEL TITLE BAND RETURN MEMORY INFO PRESET/CH ENTER SET MENU MENU SRCH MODE A-E/CAT. DISPLAY PRG SELECT REC SCENE 1 2 3 4 Set to SOURCE SCENE buttons ■ Setting the input source of the customized SCENE template on the remote control If you customize the input source of the selected SCENE template, you must set the input source of the SCENE template on the remote control to operate the input source component correctly. 1 Press the desired ASCENE button on the remote control. 2 Press and hold the ASCENE button and the desired input selector button (4). The BTRANSMIT indicator flashes twice. 3 Keep holding down the buttons pressed in step 2 until the BTRANSMIT indicator flashes twice again. Note If the setting of the input source is not successful, the BTRANSMIT indicator flashes repeatedly. In this case, repeat the setup procedure. Note * These buttons control the input source component. See page 103 for details of the function of each button. English 41 En
-
 1
1 -
2
-
3
-
4
-
5
-
6
-
7
-
8
-
9
-
10
-
11
-
12
-
13
-
14
-
15
-
16
-
17
-
18
-
19
-
20
-
21
-
22
-
23
-
24
-
25
-
26
-
27
-
28
-
29
-
30
-
31
-
32
-
33
-
34
-
35
-
36
-
37
-
38
-
39
-
 40
40 -
 41
41 -
 42
42 -
 43
43 -
 44
44 -
 45
45 -
 46
46 -
 47
47 -
 48
48 -
 49
49 -
 50
50 -
51
-
52
-
53
-
54
-
55
-
56
-
57
-
58
-
59
-
60
-
61
-
62
-
63
-
64
-
65
-
66
-
67
-
68
-
69
-
70
-
71
-
72
-
73
-
74
-
75
-
76
-
77
-
78
-
79
-
80
-
81
-
82
-
83
-
84
-
85
-
86
-
87
-
88
-
89
-
90
-
91
-
92
-
93
-
94
-
95
-
96
-
97
-
98
-
99
-
100
-
101
-
102
-
103
-
104
-
105
-
106
-
107
-
108
-
109
-
110
-
111
-
112
-
113
-
114
-
115
-
116
-
117
-
118
-
119
-
120
-
121
-
122
-
123
-
124
-
125
-
126
-
127
-
128
-
129
-
130
-
131
-
132
-
133
-
134
-
135
-
136
-
137
-
138
-
139
-
140
-
141
-
142
-
143
-
144
-
145
-
146
-
147
-
148
-
149
-
150
-
151
-
152
 |
 |
