Yamaha HTR-6180BL Owner's Manual - Page 46
Playback, Basic procedure
 |
UPC - 027108930107
View all Yamaha HTR-6180BL manuals
Add to My Manuals
Save this manual to your list of manuals |
Page 46 highlights
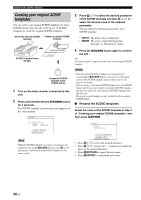
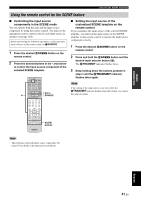
PLAYBACK Playback Caution Extreme caution should be exercised when you play back CDs encoded in DTS. If you play back a CD encoded in DTS on a DTS-incompatible CD player, you will only hear some unwanted noise that may damage your speakers. Check whether your CD player supports CDs encoded in DTS. Also, check the sound output level of your CD player before you play back a CD encoded in DTS. y To play DTS-encoded CDs when using a digital audio connection, set "DECODER MODE" in "INPUT MENU" to "DTS" before the playback (see page 96). Before performing the following operations, set the operation mode selector on the remote control to FAMP. Basic procedure 1 Turn on the video monitor connected to this unit. y See page 46 to display the input source information on the video monitor. 2 Rotate the RINPUT selector (or press one of the input selector buttons (4)) to select the desired input source. The name of the currently selected input source appears in the front panel display for a few seconds. Available input sources MULTI CH VCR DVR V-AUX DTV/CBL DVD MD/CD-R CD TUNER PHONO XM SIRIUS DVD Currently selected input source y The corresponding input selector button on the remote control for the currently selected input source lights up for approximately 5 seconds after you press any buttons on the remote control, showing which source component is currently being operated. 3 Start playback on the selected source component or select a broadcast station. • Refer to the operating instructions for the source component. • See page 53 for details about FM or AM tuning instructions. • See page 60 for details about XM Satellite Radio tuning instructions. • See page 65 for details about SIRIUS Satellite Radio tuning instructions. • See page 70 for details about iPod operations. • See page 72 for details about Bluetooth operations. 4 Rotate JVOLUME (or press EVOLUME +/-) to adjust the volume to the desired output level. y • See page 52 to adjust the level of each speaker. • This does not affect the AUDIO OUT (REC) level. • You can set the initial volume level and maximum volume level (see page 91). 5 Rotate the NPROGRAM selector (or press KPROG l / h repeatedly) to select the desired sound field program. The name of the selected sound field program appears in the front panel display. See page 48 for details about sound field programs. Sci-Fi Currently selected sound field program Note Sound field programs cannot be selected when the component connected to the MULTI CH INPUT jacks is selected as the input source (see page 43). y • Choose a sound field program based on your listening preference, not merely on the name of the program. • When you select an input source, this unit automatically selects the last sound field program used with the corresponding input source. • To display information about the currently selected sound field program in the OSD, see page 74 for details. 42 En
-
 1
1 -
2
-
3
-
4
-
5
-
6
-
7
-
8
-
9
-
10
-
11
-
12
-
13
-
14
-
15
-
16
-
17
-
18
-
19
-
20
-
21
-
22
-
23
-
24
-
25
-
26
-
27
-
28
-
29
-
30
-
31
-
32
-
33
-
34
-
35
-
36
-
37
-
38
-
39
-
40
-
 41
41 -
 42
42 -
 43
43 -
 44
44 -
 45
45 -
 46
46 -
 47
47 -
 48
48 -
 49
49 -
 50
50 -
 51
51 -
52
-
53
-
54
-
55
-
56
-
57
-
58
-
59
-
60
-
61
-
62
-
63
-
64
-
65
-
66
-
67
-
68
-
69
-
70
-
71
-
72
-
73
-
74
-
75
-
76
-
77
-
78
-
79
-
80
-
81
-
82
-
83
-
84
-
85
-
86
-
87
-
88
-
89
-
90
-
91
-
92
-
93
-
94
-
95
-
96
-
97
-
98
-
99
-
100
-
101
-
102
-
103
-
104
-
105
-
106
-
107
-
108
-
109
-
110
-
111
-
112
-
113
-
114
-
115
-
116
-
117
-
118
-
119
-
120
-
121
-
122
-
123
-
124
-
125
-
126
-
127
-
128
-
129
-
130
-
131
-
132
-
133
-
134
-
135
-
136
-
137
-
138
-
139
-
140
-
141
-
142
-
143
-
144
-
145
-
146
-
147
-
148
-
149
-
150
-
151
-
152
 |
 |
