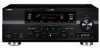
Yamaha HTR-6180BL Owner's Manual - Page 90
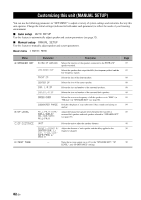
Using SET MENU, to select MANUAL SETUP.
 |
UPC - 027108930107
View all Yamaha HTR-6180BL manuals
Add to My Manuals
Save this manual to your list of manuals |
Page 90 highlights
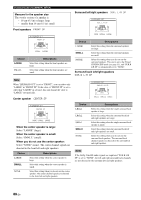
Customizing this unit (MANUAL SETUP) [ p Using SET MENU Use the remote control to access and adjust each parameter. y • You can change the "SET MENU" parameters while this unit is reproducing sound. • If you press RPARAMETER during the "SET MENU" operation, the "SET MENU" operation is canceled. • Press 9RETURN to return to the previous menu level. 1 Set the operation mode selector to FAMP and then press ISET MENU to enter "SET MENU". The top "SET MENU" display appears in the OSD. 2 Press 8k / n to select "MANUAL SETUP". SET MENU ;AUTO SETUP . ;MANUAL SETUP ;SIGNAL INFO [ ]/[ ]: Up/Down [ENTER]: Enter [ p 4 Press 8k / n repeatedly and then press 8ENTER to select and enter the desired menu. The following displays are examples where "SOUND MENU" is selected. 3 SOUND MENU . A)EQUALIZER B)LFE LEVEL C)DYNAMIC RANGE D)LIPSYNC E)EXTD SUR. [ ]/[ ]: Up/Down [ENTER]: Enter 5 Press 8k / n repeatedly and then press 8ENTER to select and enter the desired submenu. The following display is an example where "LFE LEVEL" is selected. B)LFE LEVEL . SPEAKER;;;;;;0dB HEADPHONE;;-20dB [ p 3 Press 8ENTER to enter "MANUAL SETUP". The "MANUAL SETUP" display appears in the OSD. MANUAL SETUP . 1 BASIC MENU 2 VOLUME MENU 3 SOUND MENU 4 INPUT MENU 5 OPTION MENU [ ]/[ ]: Up/Down [ENTER]: Enter [ p [ ]/[ ]: Up/Down [p]/[[]: Adjust 6 Press 8k / n to select the desired parameter and then 8l / h to change the parameter settings. • Press 8h to increase the value. • Press 8l to decrease the value. 7 Press ISET MENU to exit from "SET MENU". 86 En
-
 1
1 -
2
-
3
-
4
-
5
-
6
-
7
-
8
-
9
-
10
-
11
-
12
-
13
-
14
-
15
-
16
-
17
-
18
-
19
-
20
-
21
-
22
-
23
-
24
-
25
-
26
-
27
-
28
-
29
-
30
-
31
-
32
-
33
-
34
-
35
-
36
-
37
-
38
-
39
-
40
-
41
-
42
-
43
-
44
-
45
-
46
-
47
-
48
-
49
-
50
-
51
-
52
-
53
-
54
-
55
-
56
-
57
-
58
-
59
-
60
-
61
-
62
-
63
-
64
-
65
-
66
-
67
-
68
-
69
-
70
-
71
-
72
-
73
-
74
-
75
-
76
-
77
-
78
-
79
-
80
-
81
-
82
-
83
-
84
-
 85
85 -
 86
86 -
 87
87 -
 88
88 -
 89
89 -
 90
90 -
 91
91 -
 92
92 -
 93
93 -
 94
94 -
 95
95 -
96
-
97
-
98
-
99
-
100
-
101
-
102
-
103
-
104
-
105
-
106
-
107
-
108
-
109
-
110
-
111
-
112
-
113
-
114
-
115
-
116
-
117
-
118
-
119
-
120
-
121
-
122
-
123
-
124
-
125
-
126
-
127
-
128
-
129
-
130
-
131
-
132
-
133
-
134
-
135
-
136
-
137
-
138
-
139
-
140
-
141
-
142
-
143
-
144
-
145
-
146
-
147
-
148
-
149
-
150
-
151
-
152
 |
 |
