Yamaha P-255 Owner's Manual - Page 15
Adding reverb, Select a Voice for the right side., Leave Split mode. - 20
 |
View all Yamaha P-255 manuals
Add to My Manuals
Save this manual to your list of manuals |
Page 15 highlights
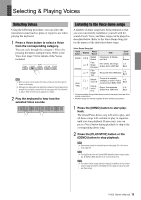
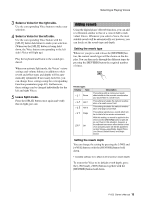
Selecting & Playing Voices 3 Select a Voice for the right side. Use the corresponding Voice button to make your selection. 4 Select a Voice for the left side. Use the corresponding Voice button with the [SPLIT] button held down to make your selection. (Whenever the [SPLIT] button is being held down, the Voice button corresponding to the left side's Voice will light up.) Play the keyboard and listen to the sounds produced. When you activate Split mode, the Voices' octave settings and volume balance in addition to their reverb and effect types and depths will be automatically optimized. If necessary, however, you can change these settings using the corresponding Function parameters (page 40). Furthermore, these settings can be changed individually for the left and right Voices. 5 Leave Split mode. Press the [SPLIT] button once again and verify that its light goes out. Adding reverb Using the digital piano's Reverb function, you can add reverberation similar to that of a concert hall to individual Voices. Whenever you select a Voice, the most suitable reverb will be automatically set; however, you can freely set the reverb type and depth. Setting the reverb type Whenever you press and release the [REVERB] button, the current reverb type will be shown on the display. You can then cycle through the different types by pressing the [REVERB] button the required number of times. Reverb types Display Type rt1 Room rt2 Hall 1 rt3 Hall 2 rt4 Stage OFF Off Description This setting adds a continuous reverb effect similar to the acoustic reverberation you would hear in a small room. This setting simulates the natural reverberation of a small concert hall. This setting simulates the natural reverberation of a large concert hall. This setting reproduces a reverb effect similar to that of a live music environment. With this setting, no reverb is applied to the Voice and the [REVERB] button's light will go out. Even in this situation, however, a soundboard resonance effect similar to that of an acoustic piano will still be applied to certain Voices-specifically, Grand Piano, Live Grand, Ballad Grand, and Bright Grand. Setting the reverb depth You can change the setting by pressing the [-/NO] and [+/YES] buttons with the [REVERB] button held down. • Available settings: 0 (no effect) to 20 (maximum reverb depth) To restore the Voice to its default reverb depth, press the [-/NO] and [+/YES] buttons together with the [REVERB] button held down. P-255 Owner's Manual 15
-
 1
1 -
2
-
3
-
4
-
5
-
6
-
7
-
8
-
9
-
 10
10 -
 11
11 -
 12
12 -
 13
13 -
 14
14 -
 15
15 -
 16
16 -
 17
17 -
 18
18 -
 19
19 -
 20
20 -
21
-
22
-
23
-
24
-
25
-
26
-
27
-
28
-
29
-
30
-
31
-
32
-
33
-
34
-
35
-
36
-
37
-
38
-
39
-
40
-
41
-
42
-
43
-
44
-
45
-
46
-
47
-
48
-
49
-
50
-
51
-
52
-
53
-
54
-
55
-
56
-
57
-
58
-
59
-
60
 |
 |
