Yamaha P-255 Owner's Manual - Page 37
Sound setup, Performing, Check your settings. - correct
 |
View all Yamaha P-255 manuals
Add to My Manuals
Save this manual to your list of manuals |
Page 37 highlights
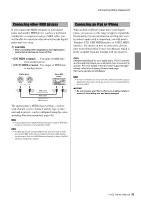
Performing Live input jacks on the PA mixer (or an on-stage sub-mixer) using standard mono audio cables (sold separately). NOTE • If only one of the mixer's channels is available for use with your digital piano, connect the [L/L+R] AUX OUT jack to the corresponding input jack using a standard mono audio cable. In this configuration, your left and right signals will be mixed and output from the instrument in mono. Your instrument should now be fully connected. The next step will be to balance your performance sounds. Sound setup Once all of the instruments and microphones have been connected, the PA operator will ask each musician in turn to play his or her instrument. You should get ready as follows. Turn on your digital piano. As described in the note on the previous page, first set the [MASTER VOLUME] slider to the MIN position and then check with the PA operator whether you can turn on the instrument. When you get the OK, press the [ ] Standby/On switch to turn it on. z x OK? Yes! c Please Check your settings. Once turned on, ensure that your digital piano is set up as follows. • Tuned to match the other instruments (page 41). • Auto Power-Off function disabled (page 10). • Foot switch operating correctly as a sustain pedal (page 11). • Reverb turned off (the PA operator will normally add the right amount of reverb using the PA mixer). OFF Determine the best digital-piano volumes. When asked by the PA operator to output a sound, play the digital piano as you would when performing and determine the best settings for the following. • Volume when you are playing accompaniment • Volume when you are playing loudest, such as during a key- board solo • Volume of each Voice to be used Roughly speaking, the [MASTER VOLUME] slider should be set between 5 and 7 for playing accompaniment and to 8 or 9 when you need to play louder. If set too high, your sound may become distorted; if too low, any background noise will be more noticeable. When the volume needs to be finely adjusted for different Voices or raised in order to play a solo, you should do this yourself using the [MASTER VOLUME] slider. Similarly, you should use the [EQ] sliders to keep the tone well balanced. Balance the overall sound of the band. After the volumes of the various instruments have been set, the PA operator will have everyone play together in order to balance the overall sound of the band. At this time, you should listen to the nearest monitor speaker and ensure that you can hear everything you need to in order to play well. If, for example, you cannot hear your own sound, the singer, or another instrument well enough, ask the PA operator to raise the corresponding level in your monitor's mix. This completes the setup process. You should now be ready to play live. Lock the control panel to prevent mistakes. Your digital piano's Panel Lock function allows you to temporarily disable control-panel buttons to prevent them being operated unintentionally while performing. To activate this function, press the [EFFECT] and [SOUND BOOST] buttons together. • Sound Boost function turned on if you are finding it difficult to make your digital piano heard within the overall mix: This function has been designed to enhance the presence of your instrument when played in a band without making it sound any less natural or expressive. You can choose from three different types of sound boost. (See page 18.) 1 2 3 • Built-in speakers turned off if necessary: There will be no need to use these speakers if you can hear your own sound from an on-stage monitor speaker. (See page 44.) Note that the following will continue to operate normally when the control panel is locked. • Standby/On switch • [MASTER VOLUME] slider • [EQ] sliders • [SUSTAIN PEDAL] jack • Pedal unit Performing When playing live, try to relax and listen to your monitor speaker in order to perform at your best. P-255 Owner's Manual 37
-
 1
1 -
2
-
3
-
4
-
5
-
6
-
7
-
8
-
9
-
10
-
11
-
12
-
13
-
14
-
15
-
16
-
17
-
18
-
19
-
20
-
21
-
22
-
23
-
24
-
25
-
26
-
27
-
28
-
29
-
30
-
31
-
 32
32 -
 33
33 -
 34
34 -
 35
35 -
 36
36 -
 37
37 -
 38
38 -
 39
39 -
 40
40 -
 41
41 -
 42
42 -
43
-
44
-
45
-
46
-
47
-
48
-
49
-
50
-
51
-
52
-
53
-
54
-
55
-
56
-
57
-
58
-
59
-
60
 |
 |
