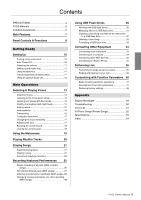
Yamaha P-255 Owner's Manual - Page 8

Panel Controls & Functions - demo

Page 8 highlights

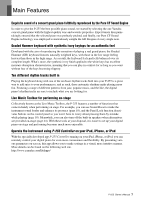
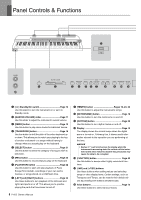
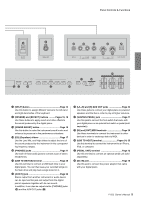
Panel Controls & Functions @1 q w e r ty u i o !0 !1 @0 q [ ] Standby/On switch Page 10 Use this switch to turn the instrument on or set it to Standby mode. w [MASTER VOLUME] slider Page 11 Use this slider to adjust the instrument's overall volume. e [DEMO] button Page 13 Use this button to play demo tracks for individual Voices. r [TRANSPOSE] button Page 16 Use this button to shift the pitch of the entire keyboard up or down. This allows you to match your playing to the key of another instrument or a singer without having to change what you actually play on the keyboard. t [SELECT] button Page 21 Use this button to select the category of song you wish to play back. y [REC] button Page 25 Use this button to record what you play on the keyboard. u [PLAY/STOP] button Page 22 Use this button to start and stop playback of Piano Songs (50 included), recordings of your own performances, or songs stored on a USB flash drive. i [LEFT] and [RIGHT] buttons Page 23 Use these buttons to turn playback of the left-hand and right-hand parts on or off. This allows you to practice playing the parts that have been turned off. 8 P-255 Owner's Manual o [TEMPO] button Pages 19, 20, 22 Use this button to adjust the instrument's tempo. !0 [METRONOME] button Page 19 Use this button to turn the metronome on and off. !1 [RHYTHM] button Page 20 Use this button to turn rhythm tracks on and off. !2 Display Page 10 The display shows the current tempo when the digital piano is turned on. Following this, it shows useful information relevant to the operation you are performing at the time. NOTICE • Dashes ("-") will scroll across the display while the instrument is accessing data. Do not turn off the instrument at this time. Failure to observe this precaution may cause the data to be corrupted. !3 [FUNCTION] button Page 40 Use this button to access other highly convenient functions. !4 [-/NO] and [+/YES] buttons Use these buttons when setting values and selecting songs or other display items. Certain settings, such as Transpose and Tempo, can be reset to their default values by pressing both buttons simultaneously. !5 Voice buttons Page 13 Use these buttons to select various Voices.

  • 1
  • 2
  • 3
  • 4
  • 5
  • 6
  • 7
  • 8
  • 9
  • 10
  • 11
  • 12
  • 13
  • 14
  • 15
  • 16
  • 17
  • 18
  • 19
  • 20
  • 21
  • 22
  • 23
  • 24
  • 25
  • 26
  • 27
  • 28
  • 29
  • 30
  • 31
  • 32
  • 33
  • 34
  • 35
  • 36
  • 37
  • 38
  • 39
  • 40
  • 41
  • 42
  • 43
  • 44
  • 45
  • 46
  • 47
  • 48
  • 49
  • 50
  • 51
  • 52
  • 53
  • 54
  • 55
  • 56
  • 57
  • 58
  • 59
  • 60

P-255
Owner’s Man
u
al
8
Panel Controls & F
u
nctions
q
[
] Standby/On switch
...................................
Page 10
Use this switch to t
u
rn the instr
u
ment on or set it to
Stand
b
y mode.
w
[MASTER VOLUME] slider
...............................
Page 11
Use this slider to adj
u
st the instr
u
ment’s o
v
erall
v
ol
u
me.
e
[DEMO] button
..................................................
Page 13
Use this
bu
tton to play demo tracks for indi
v
id
u
al Voices.
r
[TRANSPOSE] button
.......................................
Page 16
Use this
bu
tton to shift the pitch of the entire key
b
oard
u
p
or down. This allows yo
u
to match yo
u
r playing to the key
of another instr
u
ment or a singer witho
u
t ha
v
ing to
change what yo
u
act
u
ally play on the key
b
oard.
t
[SELECT] button
..............................................
Page 21
Use this
bu
tton to select the category of song yo
u
wish to
play
b
ack.
y
[REC] button
.....................................................
Page 25
Use this
bu
tton to record what yo
u
play on the key
b
oard.
u
[PLAY/STOP] button
........................................
Page 22
Use this
bu
tton to start and stop play
b
ack of Piano
Songs (50 incl
u
ded), recordings of yo
u
r own perfor-
mances, or songs stored on a USB flash dri
v
e.
i
[LEFT] and [RIGHT] buttons
............................
Page 23
Use these
bu
ttons to t
u
rn play
b
ack of the left-hand and
right-hand parts on or off. This allows yo
u
to practice
playing the parts that ha
v
e
b
een t
u
rned off.
o
[TEMPO] button
.................................
Pages 19, 20, 22
Use this
bu
tton to adj
u
st the instr
u
ment’s tempo.
!
0
[METRONOME] button
....................................
Page 19
Use this
bu
tton to t
u
rn the metronome on and off.
!
1
[RHYTHM] button
............................................
Page 20
Use this
bu
tton to t
u
rn rhythm tracks on and off.
!
2
Display
.............................................................
Page 10
The display shows the c
u
rrent tempo when the digital
piano is t
u
rned on. Following this, it shows
u
sef
u
l infor-
mation rele
v
ant to the operation yo
u
are performing at
the time.
!
3
[FUNCTION] button
........................................
Page 40
Use this
bu
tton to access other highly con
v
enient f
u
nc-
tions.
!
4
[-/NO] and [+/YES] buttons
Use these
bu
ttons when setting
v
al
u
es and selecting
songs or other display items. Certain settings, s
u
ch as
Transpose and Tempo, can
b
e reset to their defa
u
lt
v
al-
u
es
b
y pressing
b
oth
bu
ttons sim
u
ltaneo
u
sly.
!
5
Voice buttons
....................................................
Page 13
Use these
bu
ttons to select
v
ario
u
s Voices.
• Dashes (“-”) will scroll across the display while the
instrument is accessing data. Do not turn off the instru-
ment at this time. Failure to observe this precaution may
cause the data to be corrupted.
NOTICE
q
@0
w
e
r
t
y
u
i
o
!0
!1
@
1