Yamaha P-255 Owner's Manual - Page 27
Recording individual parts (MIDI songs), Select the part to record.
 |
View all Yamaha P-255 manuals
Add to My Manuals
Save this manual to your list of manuals |
Page 27 highlights
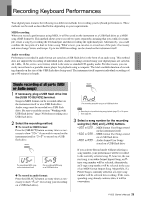
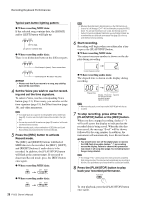
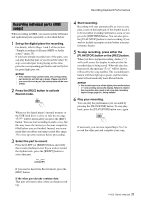
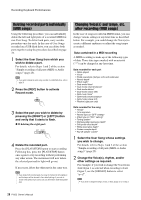
Recording Keyboard Performances Recording individual parts (MIDI songs) When recording in MIDI, you can record the left-hand and right-hand parts separately as described below. 1 Set up the digital piano for recording. For details, refer to Steps 1 and 3 of the section "Simple recording of all parts (MIDI or Audio songs)" (page 25). If you have already recorded one of the parts, you can play back that part as you record the other. To stop a recorded part from playing at this time, press the corresponding part button and verify that its green light goes out. NOTICE • If the selected song contains data, the corresponding part button(s) will light up in green. Please note that if you record to such a part, the existing data will be overwritten. 2 Press the [REC] button to activate Record mode. Whenever the digital piano's internal memory or the USB flash drive is close to full, the message "Enp" will be shown after you press the [REC] button. You can start recording in such a case, but this may cause the memory to become completely filled before you are finished. Instead, we recommend that you delete any unnecessary files (page 33) to free up some memory before proceeding. 3 Select the part to record. Press the [LEFT] or [RIGHT] button and verify that it starts flashing in red. If you wish to record the rhythm track, press the [RIGHT] button to select that part. 4 Start recording. Recording will start automatically as soon as you play a note on the keyboard. If the rhythm track is to be recorded, recording will start as soon as you press the [RHYTHM] button. You can also press the [PLAY/STOP] button to start recording if you wish to include an empty section before your performance begins. 5 To stop recording, press either the [PLAY/STOP] button or the [REC] button. When you have stopped recording, dashes ("-") will scroll across the display to indicate that the recorded data is being saved. When the data has been saved, the message "End" will be shown, followed by the song number. The recorded part's button will then light up in green, and the instrument will automatically leave Record mode. NOTICE • You should never turn off the digital piano while dashes ("-") are scrolling across the display. Failure to observe this precaution may result in all song data, including Import Songs (page 21), being deleted. 6 Play your recording. You can play the performance just recorded by pressing the [PLAY/STOP] button. To stop playback, press the [PLAY/STOP] button once again. If necessary, you can now repeat Steps 2 to 5 to record the other part and complete your song. If you need to deactivate Record mode, press the [REC] button. If the other part already contains data: That part will start to play when you begin recording. P-255 Owner's Manual 27
-
 1
1 -
2
-
3
-
4
-
5
-
6
-
7
-
8
-
9
-
10
-
11
-
12
-
13
-
14
-
15
-
16
-
17
-
18
-
19
-
20
-
21
-
 22
22 -
 23
23 -
 24
24 -
 25
25 -
 26
26 -
 27
27 -
 28
28 -
 29
29 -
 30
30 -
 31
31 -
 32
32 -
33
-
34
-
35
-
36
-
37
-
38
-
39
-
40
-
41
-
42
-
43
-
44
-
45
-
46
-
47
-
48
-
49
-
50
-
51
-
52
-
53
-
54
-
55
-
56
-
57
-
58
-
59
-
60
 |
 |
