Yamaha P-255 Owner's Manual - Page 9
L/L+R] and [R] AUX OUT jacks, IN] and [OUT] MIDI terminals - owners manual
 |
View all Yamaha P-255 manuals
Add to My Manuals
Save this manual to your list of manuals |
Page 9 highlights
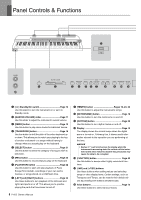
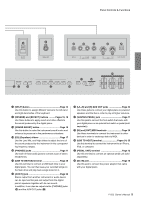
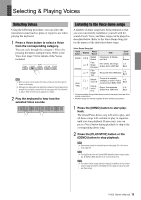
Panel Controls & Functions @8 @7 @2 @3 @4 @5 @6 !2 !3 !4 !9 !7 !8 !5 !6 !6 [SPLIT] button Page 14 Use this button to assign different Voices to the left-hand and right-hand sides of the keyboard. !7 [REVERB] and [EFFECT] buttons ..........Pages 15, 16 Use these buttons to apply reverb and other effects to the sound produced by the digital piano. !8 [SOUND BOOST] button Page 18 Use this button to make the instrument sound louder and enhance its presence in live performance situations. !9 [EQ] (Equalizer) sliders Page 17 Use the Low, Mid, and High sliders to adjust the tone of the sound produced by the instrument in the corresponding frequency ranges. @0 [PHONES] jacks Page 11 Use each of these audio jacks to connect a pair of stereo headphones. @1 [USB TO DEVICE] terminal Page 30 Use this terminal to connect a USB flash drive to your digital piano. You can then save your recorded songs on the flash drive and play back songs stored on it. @2 [AUX IN] jack Page 34 Stereo output from another instrument or audio device can be input via this jack and output from the digital piano's speakers together with its own sound. In addition, it can also be output via the [PHONES] jacks (@0) and the AUX OUT jacks (@3). @3 [L/L+R] and [R] AUX OUT jacks Page 34 Use these jacks to connect your digital piano to powered speakers and the like in order to play at higher volumes. @4 [SUSTAIN PEDAL] jack Page 11 Use this jack to connect the foot switch that came with your digital piano or an optional foot switch or pedal (sold separately). @5 [IN] and [OUT] MIDI terminals Page 35 Use these terminals to connect the instrument to other devices in order to exchange data via MIDI. @6 [USB TO HOST] terminal Pages 34, 35 Use this terminal to connect the instrument to an iPhone, iPad, or computer. @7 [PEDAL UNIT] terminal Page 12 Use this terminal to connect an optional pedal unit (sold separately). @8 [DC IN] jack Page 10 Use this jack to connect the power adaptor that came with your digital piano. P-255 Owner's Manual 9
-
 1
1 -
2
-
3
-
 4
4 -
 5
5 -
 6
6 -
 7
7 -
 8
8 -
 9
9 -
 10
10 -
 11
11 -
 12
12 -
 13
13 -
 14
14 -
15
-
16
-
17
-
18
-
19
-
20
-
21
-
22
-
23
-
24
-
25
-
26
-
27
-
28
-
29
-
30
-
31
-
32
-
33
-
34
-
35
-
36
-
37
-
38
-
39
-
40
-
41
-
42
-
43
-
44
-
45
-
46
-
47
-
48
-
49
-
50
-
51
-
52
-
53
-
54
-
55
-
56
-
57
-
58
-
59
-
60
 |
 |
