Yamaha P-255 Owner's Manual - Page 23
Convenient playback functions, Part Cancel MIDI songs, A-B Repeat MIDI songs
 |
View all Yamaha P-255 manuals
Add to My Manuals
Save this manual to your list of manuals |
Page 23 highlights
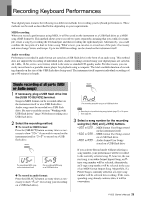
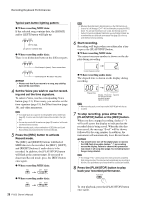
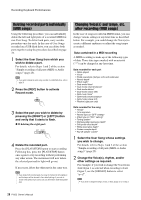
Playing Songs Convenient playback functions Part Cancel (MIDI songs) Your digital piano's Preset Songs and certain other MIDI songs are divided into left-hand and right-hand parts. When playing this type of song, you can turn off either of these parts as described below to practice playing it yourself. Practicing parts individually in this way makes it easier to master difficult pieces. A-B Repeat (MIDI songs) Using your digital piano's A-B Repeat function as described below, you can loop playback in a specific region of a MIDI song. This can be extremely useful when practicing difficult pieces. In addition, you can also turn off individual parts as described above when using this function. 1 Turn off the part you wish to practice. When a song with left-hand and right-hand-parts is selected, both the [LEFT] and [RIGHT] buttons will light up. To turn off one of these parts, press the corresponding button and verify that its light goes out. You can toggle each part on and off using the corresponding button. 2 Start the song. Press the [PLAY/STOP] button to start playback. Practice the part you just turned off using the other part as a guide. 3 Stop playback. A song will stop automatically after playing to the end, and in such a case, the playback position will be returned to the start of the song. Press the [PLAY/STOP] button if you want to stop the song before it reaches the end. NOTE • The left- and right-hand parts can also be toggled on and off during playback. • When another song is selected, both the left-hand and right-hand parts will be automatically turned on. 1 Play the song and set the start point (A) and end point (B) of the loop. Select and start the song you wish to practice. As you listen, set the A point by pressing the [PLAY/ STOP] button with the [FUNCTION] button held down. The message "A-" will be shown on the display to indicate that the A point has been set. Following this, set the B point by again pressing the [PLAY/STOP] button with the [FUNCTION] button held down. The message "A-b" will be shown on the display to indicate that the A and B points have been set. In addition, playback will return to the A point at this time and looping will begin automatically. 2 Stop playback. When you stop the song using the [PLAY/STOP] button, the A and B point settings will be retained. Canceling the A and B point settings To remove both the A and B points, again press the [PLAY/STOP] button with the [FUNCTION] button held down. You can also cancel these settings by selecting a different song. NOTE • A-B Repeat cannot be used together with a rhythm track. The A and B points will be removed from a song if a rhythm track is turned on. • You can press the [FUNCTION] button while looping in order to show the current playback volume for MIDI songs (page 22). Press the [FUNCTION] button once again to return the display to normal. NOTE • Looping from the beginning of a song: If you wish to set the A point at the beginning of a song, press the [PLAY/ STOP] button with the [FUNCTION] button held down before starting playback. • Looping to the end of a song: If you wish to set the B point at the end of the song, set the A point in the normal fashion and let the song play to the end. The B point will then be automatically set at the end. • Signaling return from B to A When playback reaches the B point with A-B Repeat activated, a click sound will be played before returning to the A point in order to help you stay in time. P-255 Owner's Manual 23
-
 1
1 -
2
-
3
-
4
-
5
-
6
-
7
-
8
-
9
-
10
-
11
-
12
-
13
-
14
-
15
-
16
-
17
-
 18
18 -
 19
19 -
 20
20 -
 21
21 -
 22
22 -
 23
23 -
 24
24 -
 25
25 -
 26
26 -
 27
27 -
 28
28 -
29
-
30
-
31
-
32
-
33
-
34
-
35
-
36
-
37
-
38
-
39
-
40
-
41
-
42
-
43
-
44
-
45
-
46
-
47
-
48
-
49
-
50
-
51
-
52
-
53
-
54
-
55
-
56
-
57
-
58
-
59
-
60
 |
 |
