Yamaha PSR-A1000 Owner's Manual - Page 122
Setting Auto Accompaniment-related Parameters — Style Setting, Split Point, and Chord Fingering
 |
View all Yamaha PSR-A1000 manuals
Add to My Manuals
Save this manual to your list of manuals |
Page 122 highlights
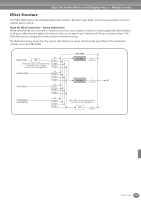
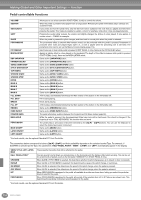
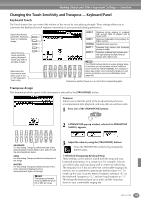
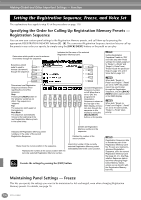
Making Global and Other Important Settings - Function Setting Auto Accompaniment-related Parameters - Style Setting, Split Point, and Chord Fingering The explanations here apply to step #3 of the procedure on page 118. Setting Auto Accompaniment-related Parameters - Style Setting and Split Point These select the part to which the split point setting is applied: accompaniment, left-hand About Section Set range, or both. Press the desired key for the split When any of the Main A-D F point while holding down one of these buttons. sections is not included in G The pressed key is included in the range for the the accompaniment style Auto Accompaniment area of the keyboard data, the nearest section is H (ACMP) or the left-hand range (LEFT). automatically selected. For I A+L (ACMP + LEFT) example, when Main D is not Allows you to simultaneously set the split contained in the selected J point for both the left-hand range and the accompaniment style, Main Auto Accompaniment area of the keyboard. C will be called up. 1 2 3 4 5 6 7 8 L (LEFT) Allows you to set the split point for the left-hand range of the keyboard. A (ACMP) Allows you to set the split point for the Auto Accompaniment area of the keyboard. Determines the split points for the auto accompaniment (ACMP) and the lefthand range (LEFT). The same value can be set for both or for each independently, using buttons [F], [G], and [H] (see above). You can use these buttons by themselves to set the split point value. Determines the default section that is automatically called up when selecting different accompaniment styles (when accompaniment is stopped). Turns touch response for the accompaniment on/off. When this is set to "ON," the accompaniment volume changes in response to your playing strength (in the Auto Accompaniment area of the keyboard). The PSR-A1000 lets you automatically enable Sync Stop (page 62) simply by quickly pressing/releasing keys in the Auto Accompaniment area of the keyboard. This parameter lets you set the length of the key-hold time. Turns the Stop Accompaniment (ACMP) function on/off. When this is set to "ON," you can play the chord and bass sounds of the accompaniment by playing chords - even when the accompaniment style is not playing back. About Split Point Split point is the position on keyboard that separates the Auto Accompaniment area (ACMP) and left-hand area (LEFT) from the righthand area (MAIN). The LEFT split point cannot be set lower than the ACMP split point, and the ACMP split point cannot be set higher than the LEFT split point. Split point (A) Split point (L) Auto Accompaniment area Left-hand area Right-hand area Split point (A) + (L) Auto Accompaniment area + Left-hand area Right-hand area 122 PSR-A1000
-
 1
1 -
2
-
3
-
4
-
5
-
6
-
7
-
8
-
9
-
10
-
11
-
12
-
13
-
14
-
15
-
16
-
17
-
18
-
19
-
20
-
21
-
22
-
23
-
24
-
25
-
26
-
27
-
28
-
29
-
30
-
31
-
32
-
33
-
34
-
35
-
36
-
37
-
38
-
39
-
40
-
41
-
42
-
43
-
44
-
45
-
46
-
47
-
48
-
49
-
50
-
51
-
52
-
53
-
54
-
55
-
56
-
57
-
58
-
59
-
60
-
61
-
62
-
63
-
64
-
65
-
66
-
67
-
68
-
69
-
70
-
71
-
72
-
73
-
74
-
75
-
76
-
77
-
78
-
79
-
80
-
81
-
82
-
83
-
84
-
85
-
86
-
87
-
88
-
89
-
90
-
91
-
92
-
93
-
94
-
95
-
96
-
97
-
98
-
99
-
100
-
101
-
102
-
103
-
104
-
105
-
106
-
107
-
108
-
109
-
110
-
111
-
112
-
113
-
114
-
115
-
116
-
 117
117 -
 118
118 -
 119
119 -
 120
120 -
 121
121 -
 122
122 -
 123
123 -
 124
124 -
 125
125 -
 126
126 -
 127
127 -
128
-
129
-
130
-
131
-
132
-
133
-
134
-
135
-
136
-
137
-
138
-
139
-
140
-
141
-
142
-
143
-
144
-
145
-
146
-
147
-
148
-
149
-
150
-
151
-
152
-
153
-
154
-
155
-
156
 |
 |
